---
title: AI Maker
description: OneAI Documentation
tags: EN, Draft
---
[OneAI Documentation](/s/LiV2Pb1FB)
# AI Maker
AI Maker is a set of MLOps solutions for building and managing machine learning life cycle. Select **AI Maker** from the Services to enter the AI Maker homepage.
:::info
:bulb:**Tips:** **Recommendations**
* AI Maker provides many ready-made **Templates** and [**Case studies**](/s/LiV2Pb1FB#Case-Study) for various AI applications, so you can quickly apply them. First-time users of AI Maker are recommended to start with an interesting [**Case Study**](/s/LiV2Pb1FB#Case-Study) to experience the process of using AI Maker's various services.
* AI developers or those who want to run their own machine learning development environment and training and inference programs on AI Maker are recommended to refer to this document after having practiced the [**Case Study**](/s/LiV2Pb1FB#Case-Study) before developing and managing the machine learning lifecycle using AI Maker.
:::
## Preparations
### 1. Prepare Training Data
* Before starting a training job using AI Maker, you must first prepare training data and upload it to the Storage Service provided by the system.
:::info
:bulb:**Tips:** To upload training data, see **[Storage Service](/s/M6ONotkTD)**.
:::
### 2. Modify the Training Job Code
To run machine learning training jobs on AI Maker, please follow the steps below to modify the code.
#### 2.1 Set the Training Data Source
* Set the environment variables for the training data input directory according to your training data storage location. For example:
```=
INPUT = 'Training data storage path'
...
DATASET_PATH = str(os.environ.get('INPUT') + '/dataset')
```
#### 2.2 Set the Model Output Directory
* Set the environment variables for the model output directory. For example:
```=
OUTPUT='Model storage path'
...
MODEL_PATH = str(os.environ.get('OUTPUT'))
```
#### 2.3 Set Hyperparameters
* Set adjustable hyperparameters such as: `BATCH_SIZE`、`LEARNING_RATE`.
```=
# Example for Hyper Parameter Variables
BATCH_SIZE = int(os.environ.get('BATCH_SIZE', 8))
LEARNING_RATE = float(os.environ.get('LEARNING_RATE', 0.00001))
```
#### 2.4 Send the Results Back to AI Maker
* Add the following code to the program in **Training Jobs** to send the training results back to AI Maker.
```=
import AIMaker as ai
// your code
ai.sendUpdateRequest({result})
```
:::info
:bulb:**Tips:**
* {result} is the training result to be returned to AI Maker, such as error_rate, accuracy, AI Maker only accepts a set of returned values.
* The type of {result} must be int or float (Numpy type int or float is not acceptable).
:::
### 3. Modify the Inference Code
* To run the inference services on AI Maker, please follow the steps below to modify the code.
#### 3.1 Set the Model Location
* You can save the trained model from a training job to AI Maker's model repository, or upload an existing model, and read the environment variables of the model location in the inference program, for example:
```=
OUTPUT='Model storage path'
...
MODEL_PATH = str(os.environ.get('OUTPUT'))
```
#### 3.2 Send the Inference Results Back to AI Maker
* The **AIMakerMonitor** package provided by AI Maker allows you to send inference results back to AI Maker and present the number of model calls and results in a visual graph in the AI Maker Inference Services. Below is a description of the usage of the three functions in the **AIMakerMonitor** package.
1. **Record the number of API calls**
- **monitor.api_count_inc()**, each time this function is called, the number of API calls will be incremented by 1 in the statistics table.
```=
import AIMakerMonitor as monitor
// your code
monitor.api_count_inc()
```
2. **Data according to data tag**
- **monitor.counter_inc(name of monitored data, tag name)**, this function can be used for statistical classification, and the number of occurrences of each tag can be counted to better understand data distribution. For example, statistics on the number of times a car is recognized in an image classification application. <br>
- **Name of monitored data**: the table name of the record, the type is string.
- **Tag name**: the appeared tag name, the type is string. <br>
The following example shows that `object_detect` in this table, the number of occurrences of this `car` tag is incremented by 1.
```=
import AIMakerMonitor as monitor
// your code
monitor.counter_inc(object_detect, car)
```
3. **Statistical data**
- **monitor.gauge_set(name of monitored data, tag name, value)** , this function can be used for statistical values, such as the confidence index of each recognition.
- **Name of monitored data**: the table name of the record, the type is string.
- **Tag name**: the appeared tag name, the type is string.
- **Value**: the value, as an int or float. <br>
The following example shows `confidence` in this table, the confidence in recognizing this `car` tag.
```=
import AIMakerMonitor as monitor
// your code
monitor.gauge_set(confidence, car, 90)
```
:::info
:bulb: **Tips:** The above code examples are written for Python language, if you are not developing in Python, please adjust accordingly.
:::
### 4. Prepare the Image
AI Maker runs as an image file when running training jobs or inference tasks, so you must package the development environment and the packages required by AI Maker into an image file and upload it to the Container Image Service.
:::info
:bulb: **Tips:** **Use public image**
You can prepare your own image or use the [**Public Image**](/s/TmlWGJUye) provided by the system. The system provides optimized container images for various AI operations, a variety of AI training frameworks, and pre-installed additional packages for AI Maker to quickly deploy your work environment and improve work efficiency!
:::
* Create and upload image file
* Additional packages required for AI Maker
- [AIMaker](https://pypi.org/project/AIMaker/)
- [AIMakerMonitor](https://pypi.org/project/AIMakerMonitor/)
- [requests](https://pypi.org/project/requests/)
* Modify Dockerfile
```=
# Dockerfile Example
# Specify a Parent Image
FROM tensorflow/tensorflow:1.11.0-gpu
...
# Install AI Maker Required Packages
RUN pip install AIMaker requests AIMakerMonitor
...
# Specify Command to Run within the Container
CMD python $INPUT/app.py
...
```
:::info
:bulb:**Tips:** For instructions on uploading an image file, see [**Container Image**](/s/jcp_A0vTo).
:::
## Start
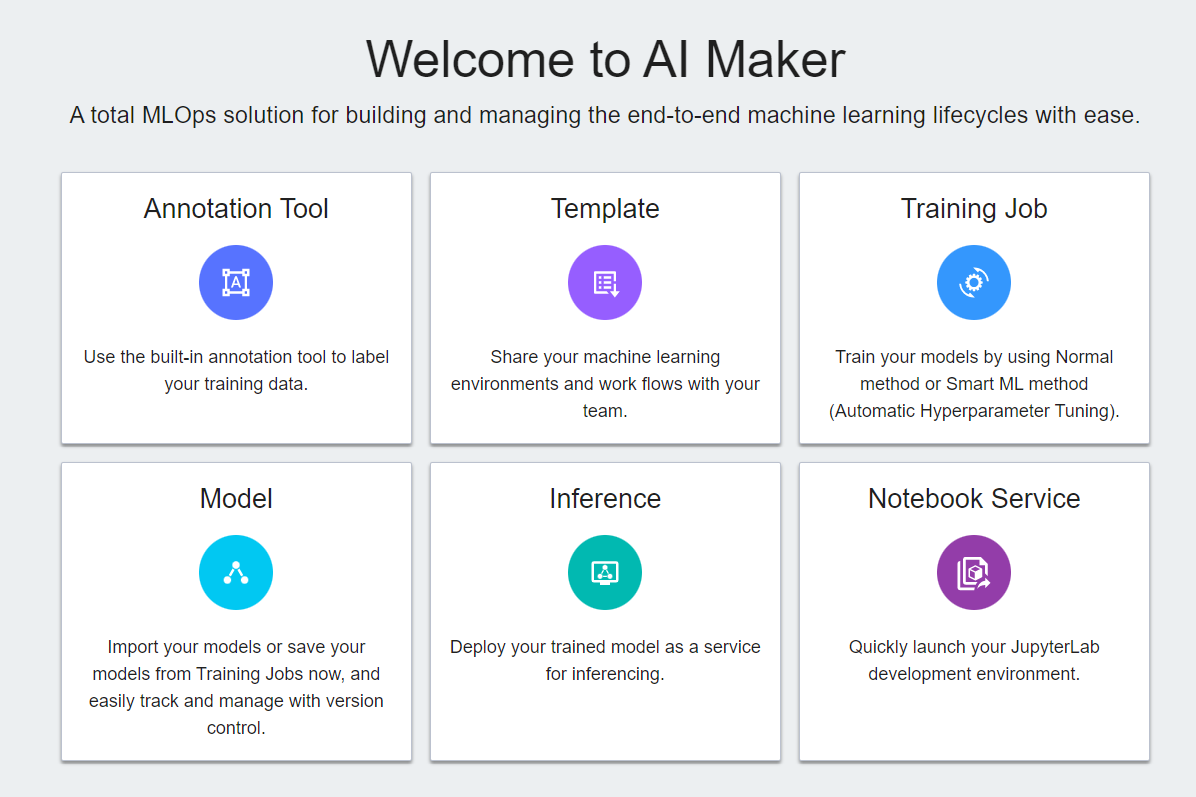
After entering the AI Maker service homepage, you can see various related services provided in AI Maker, and these tools can be used in any combination.
The settings of each service are described below. To quickly learn how to use these functions, please follow the steps of [**AI Maker Case Study - YOLOv4 Image Recognition Application**](/s/JyKyKQe1ce).
* [**Annotation Tool**](#Annotation-Tool): Use the built-in annotation tools to annotate your training data.
* [**Template**](#Template): Set templates for machine learning training environments and workflows.
* [**Training Job**](#Training-Job): Run normal or distributed training jobs, or tune your models by automatically tuning hyperparameters.
* [**Model**](#Model): Model catalog and version control.
* [**Inference**](#Inference): Perform inference using trained model.
* [**Notebook Service**](/s/NhcXXOUdS): Provide an integrated development environment (IDE) for ML.
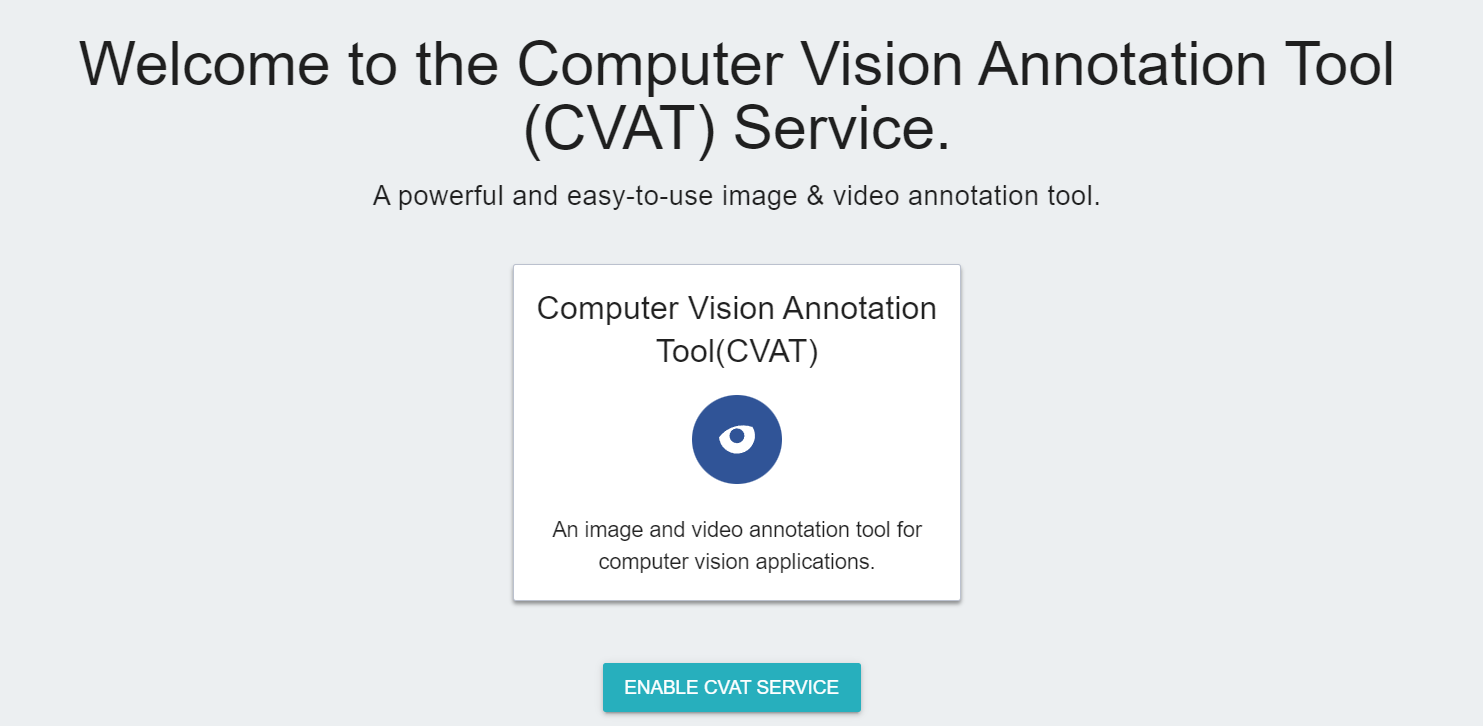
## Annotation Tool
AI Maker has a built-in CVAT (Computer Vision Annotation Tool) to help you quickly annotate the training data of machine learning, or connect the trained model to CVAT through the inference service for automatic annotation.
### Enable CVAT
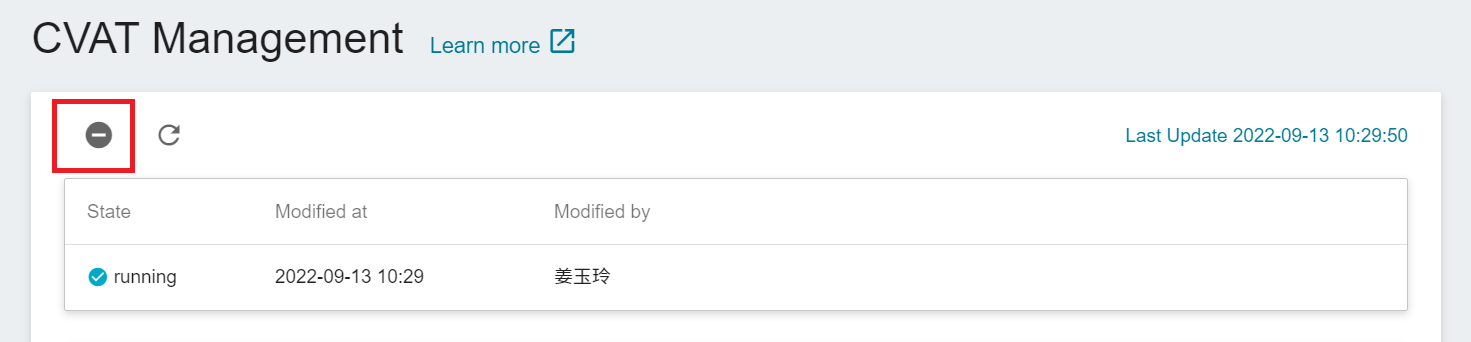
* Click **Annotation Tools** on the left menu bar to enter the CVAT service home page. You need to click **Enable CVAT Service** if you are using it for the first time. Only one CVAT service can be enabled for each project.
* Click **Annotation Tool** on the left menu bar to enter the **CVAT Management** page. After CVAT is successfully enabled, the CVAT service link and account password will appear, and the status will be **`running`**.
:::info
:bulb: **Tips:** When CVAT is enabled for the first time, it is recommended to change the default password. This password has no expiration date and can be used by members of the same project to log in to CVAT service. For security reasons, please change the password regularly.
:::
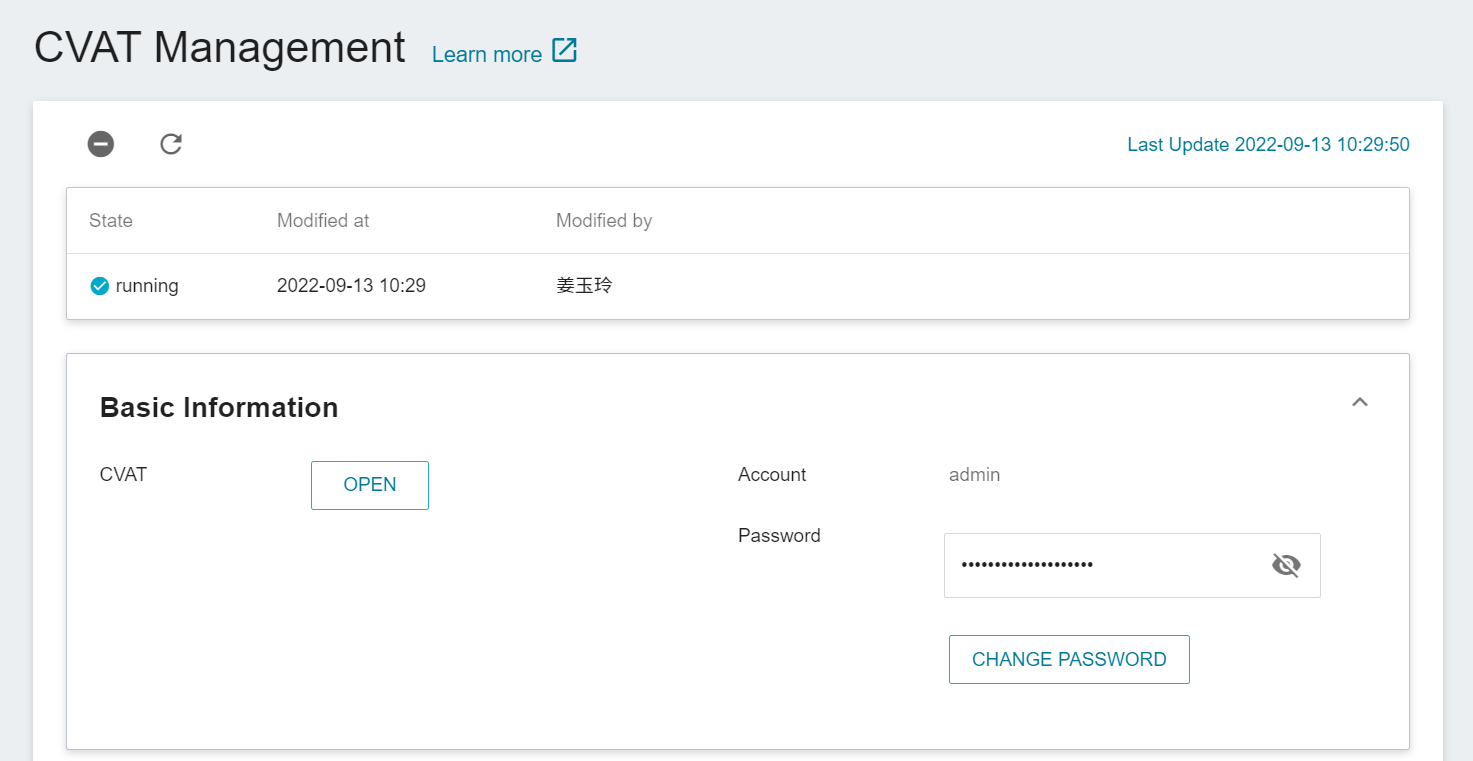
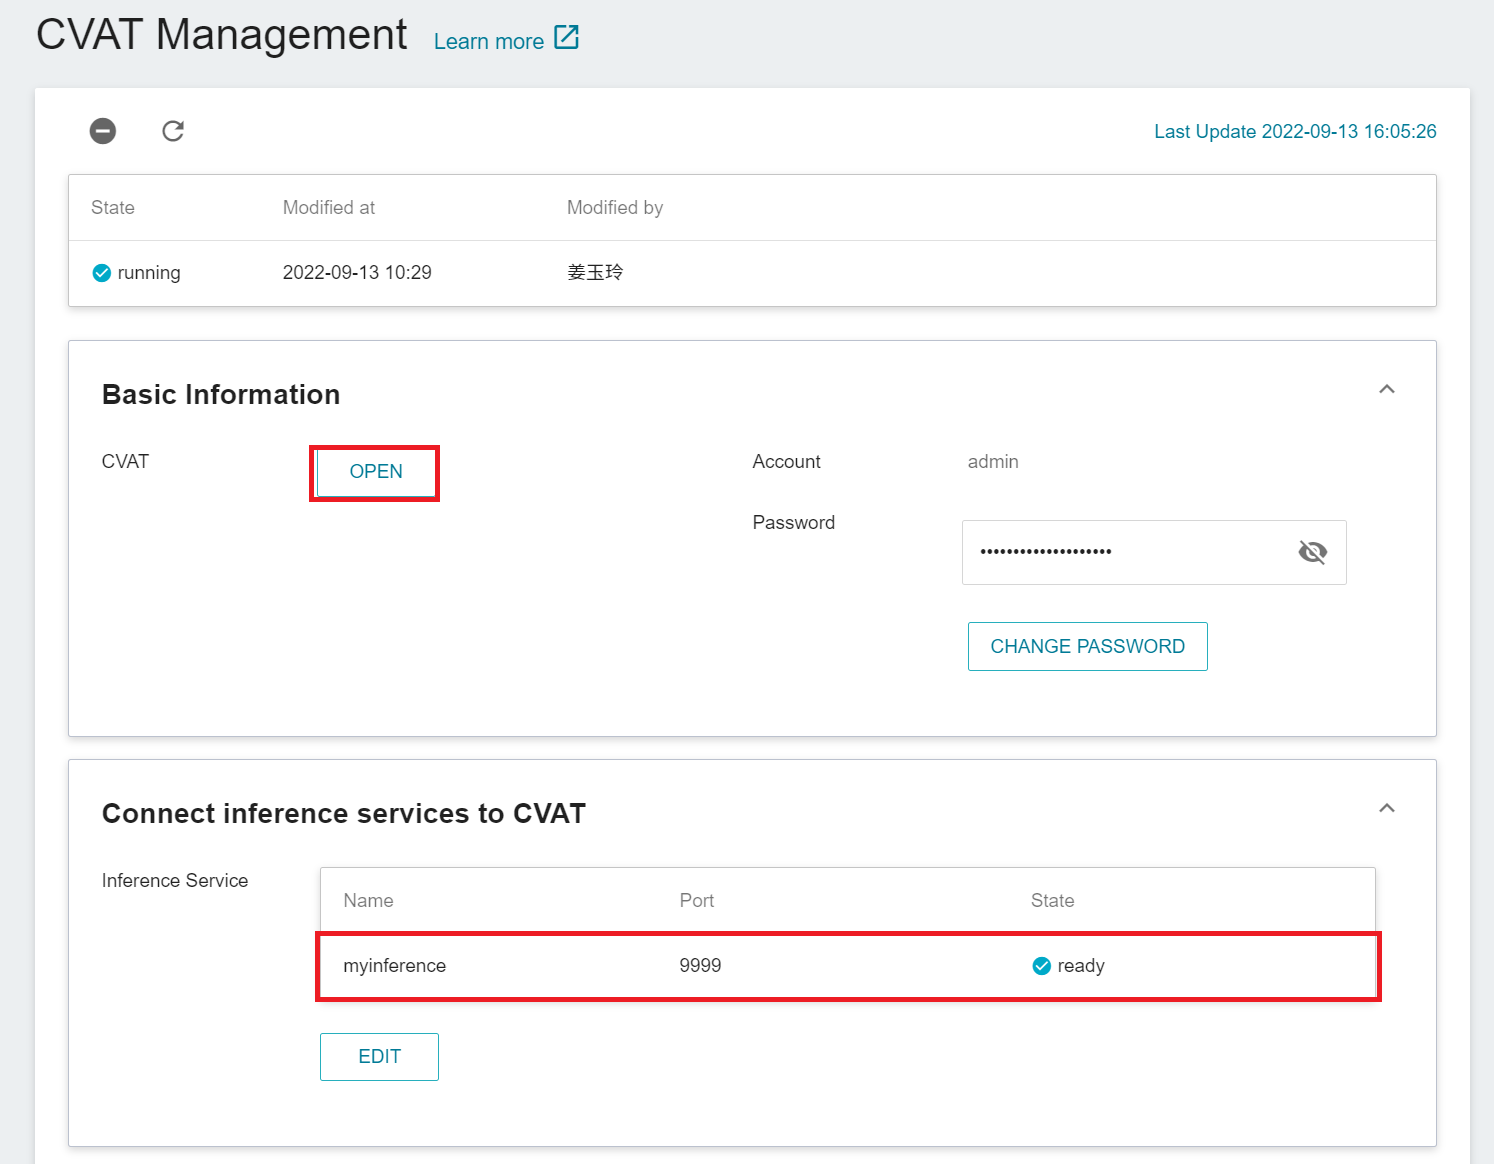
* Click **Open** in the basic information to open the login page of the CVAT service in the browser.
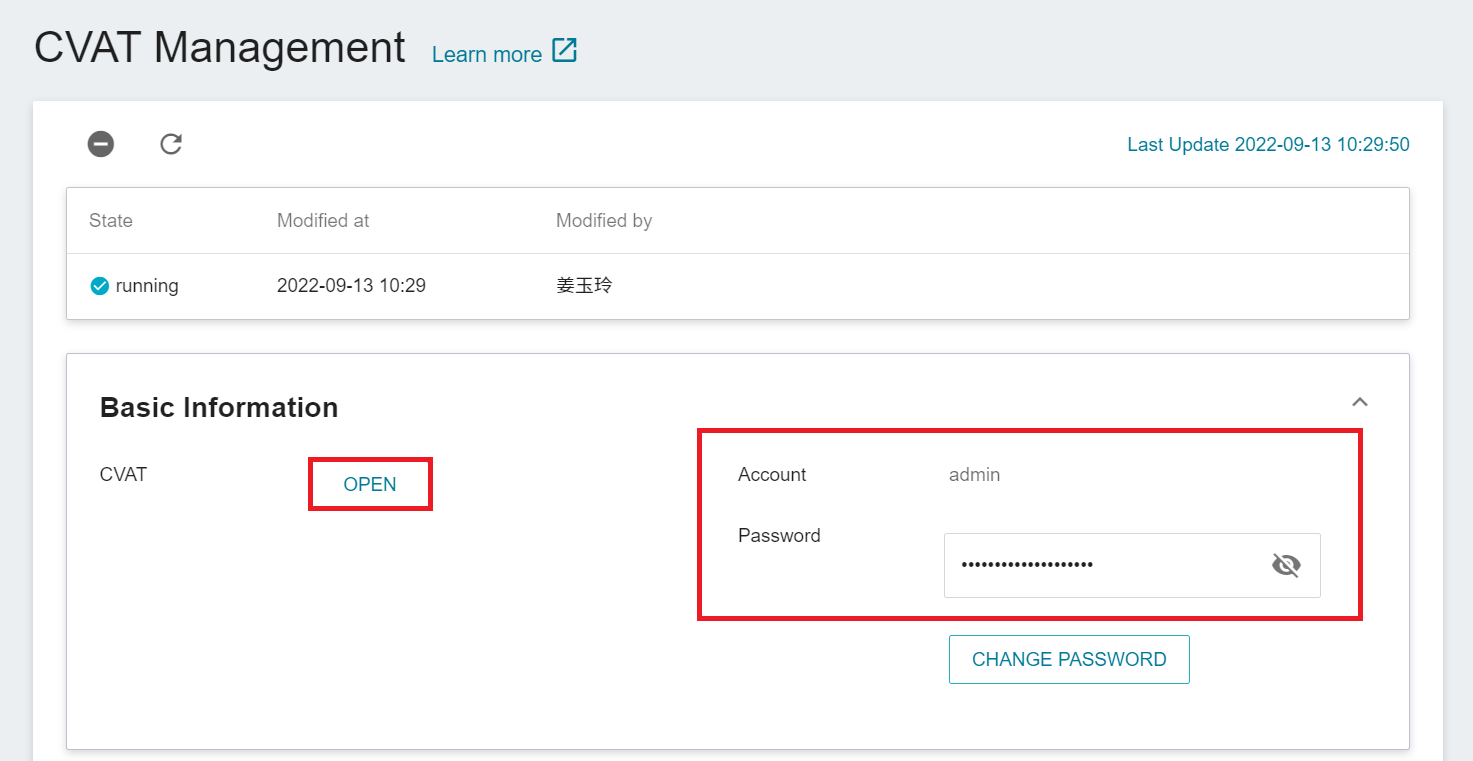
* Enter the account and password provided in the basic information.
:::warning
:warning: **Highly recommended**
Please use the Google Chrome browser to log in to CVAT. Using other browsers may cause unpredictable problems.
:::
:::info
:bulb: **Tips:** For more CVAT annotation task instructions, please refer to: [**AI Maker Case Study - YOLOv4 Image Recognition Application > Using CVAT to create annotation task**](/s/JyKyKQe1ce#2-Annotation-Data).
:::
### Add Annotation Task
* After successfully logging in to the CVAT service page, click **+** then click **+ CREATE A NEW TASK** to create an annotation task.

* Next, set the task name, label and select the file to be annotated. It is recommended to upload the data to the storage service first, and then select the bucket in the CVAT service. After the setting is complete, click **Submit**.
:::warning
:warning: **Note: CVAT file size limit**
In the CVAT service, it is recommended that you use the bucket of the storage service as data source. If the data is uploaded locally, the CVAT service limits the file size of each TASK to 1 GB.
:::
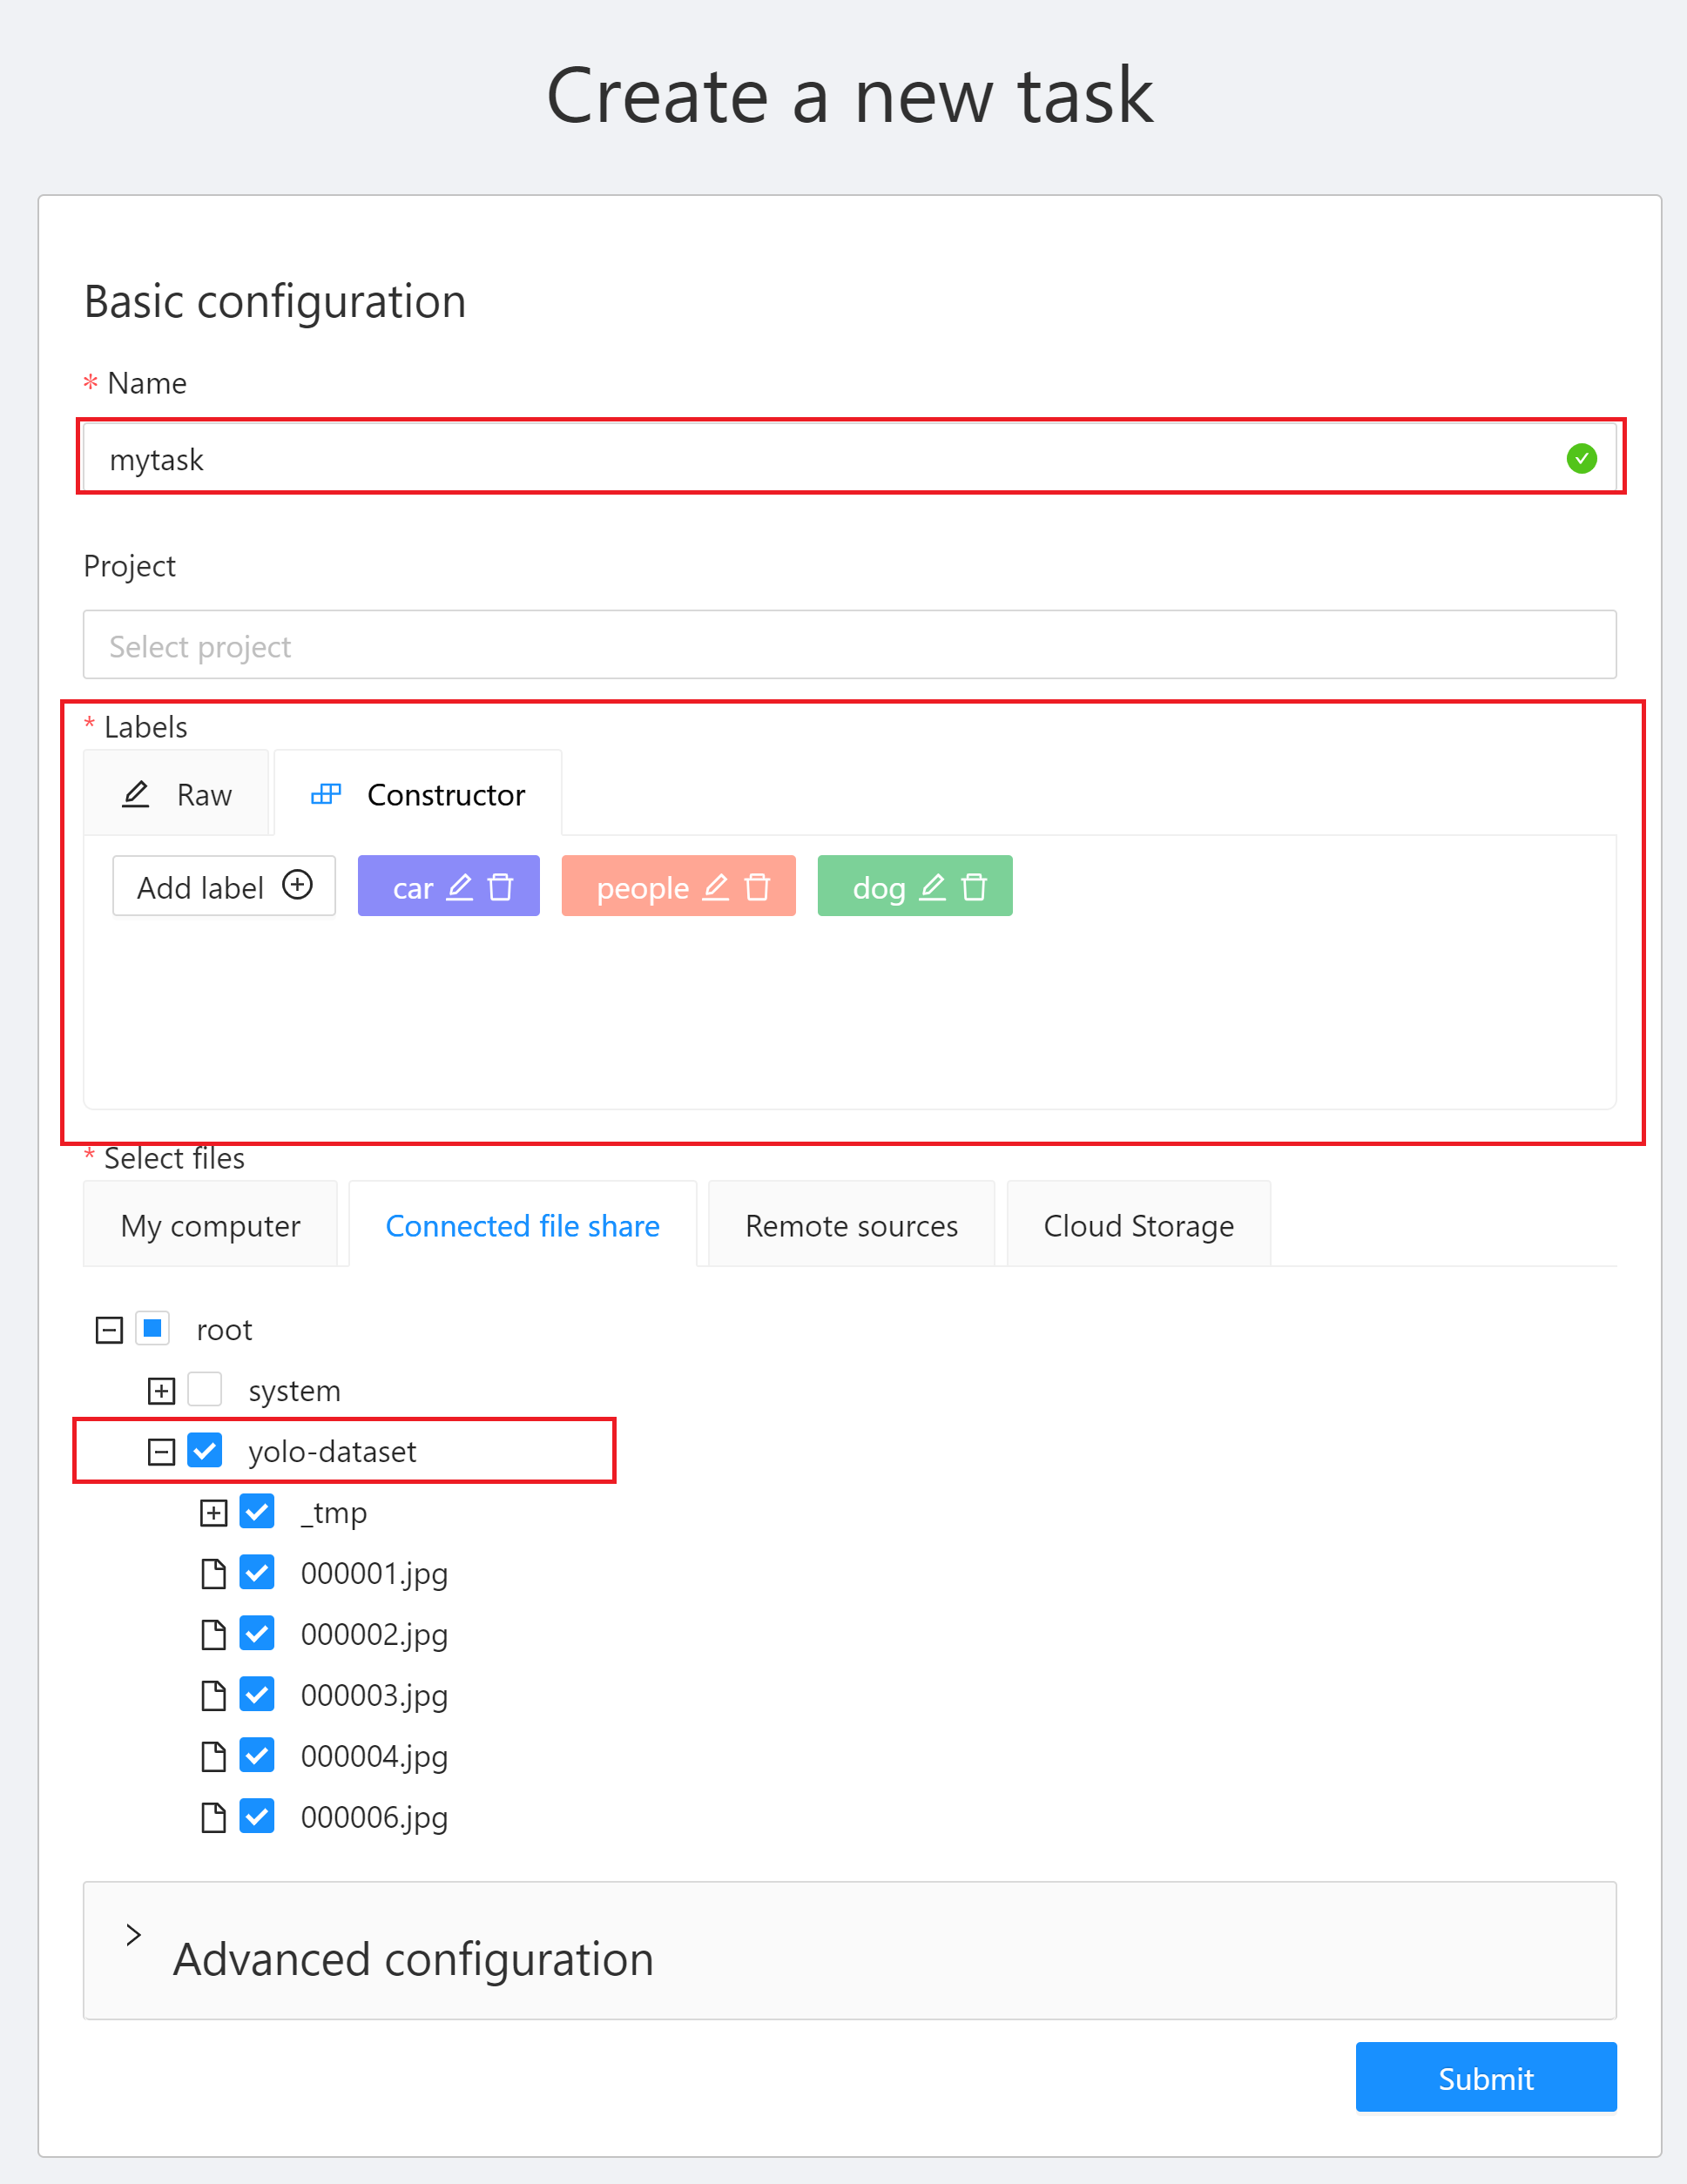
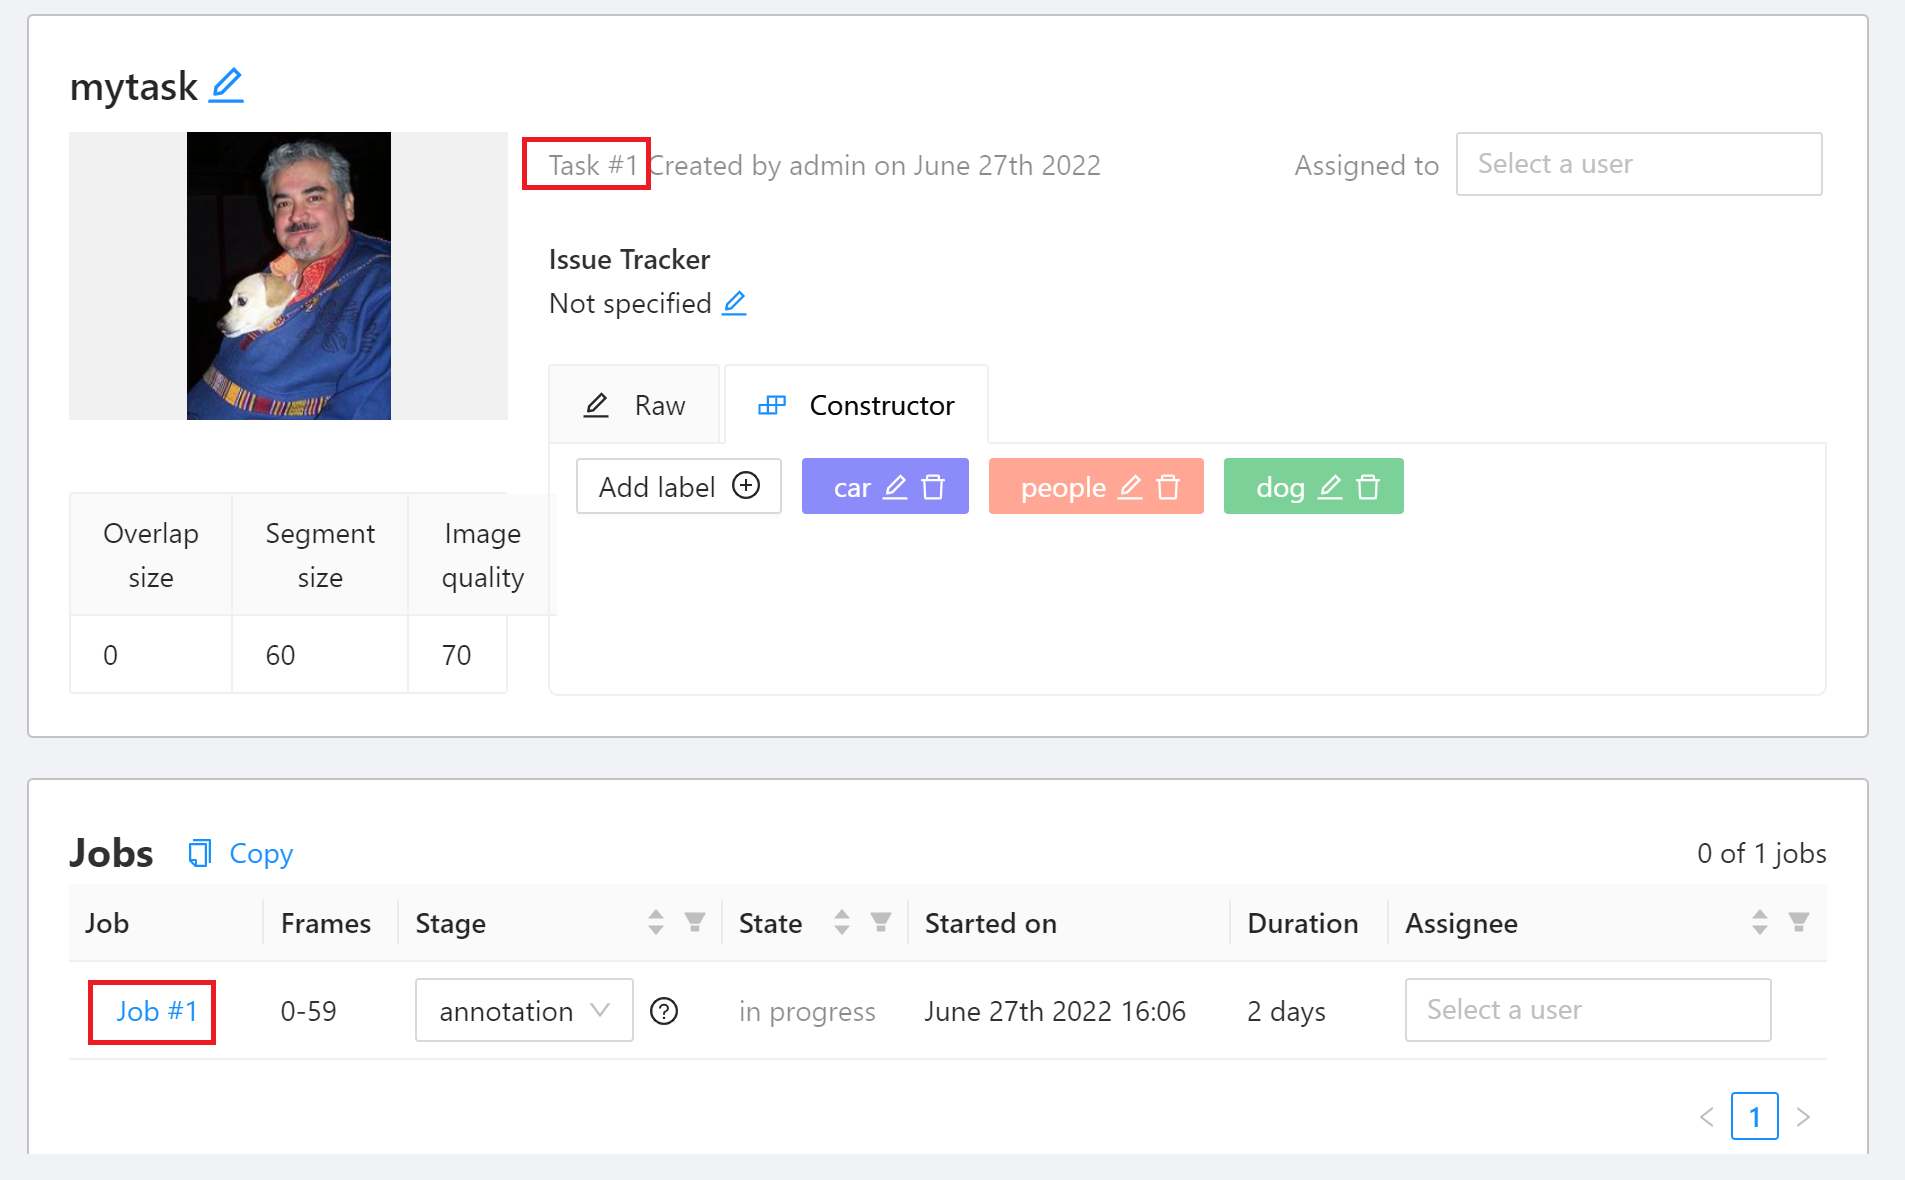
* After the annotation is created, it will appear at the top of the **Tasks** list. Click **Open** to enter the task details page.

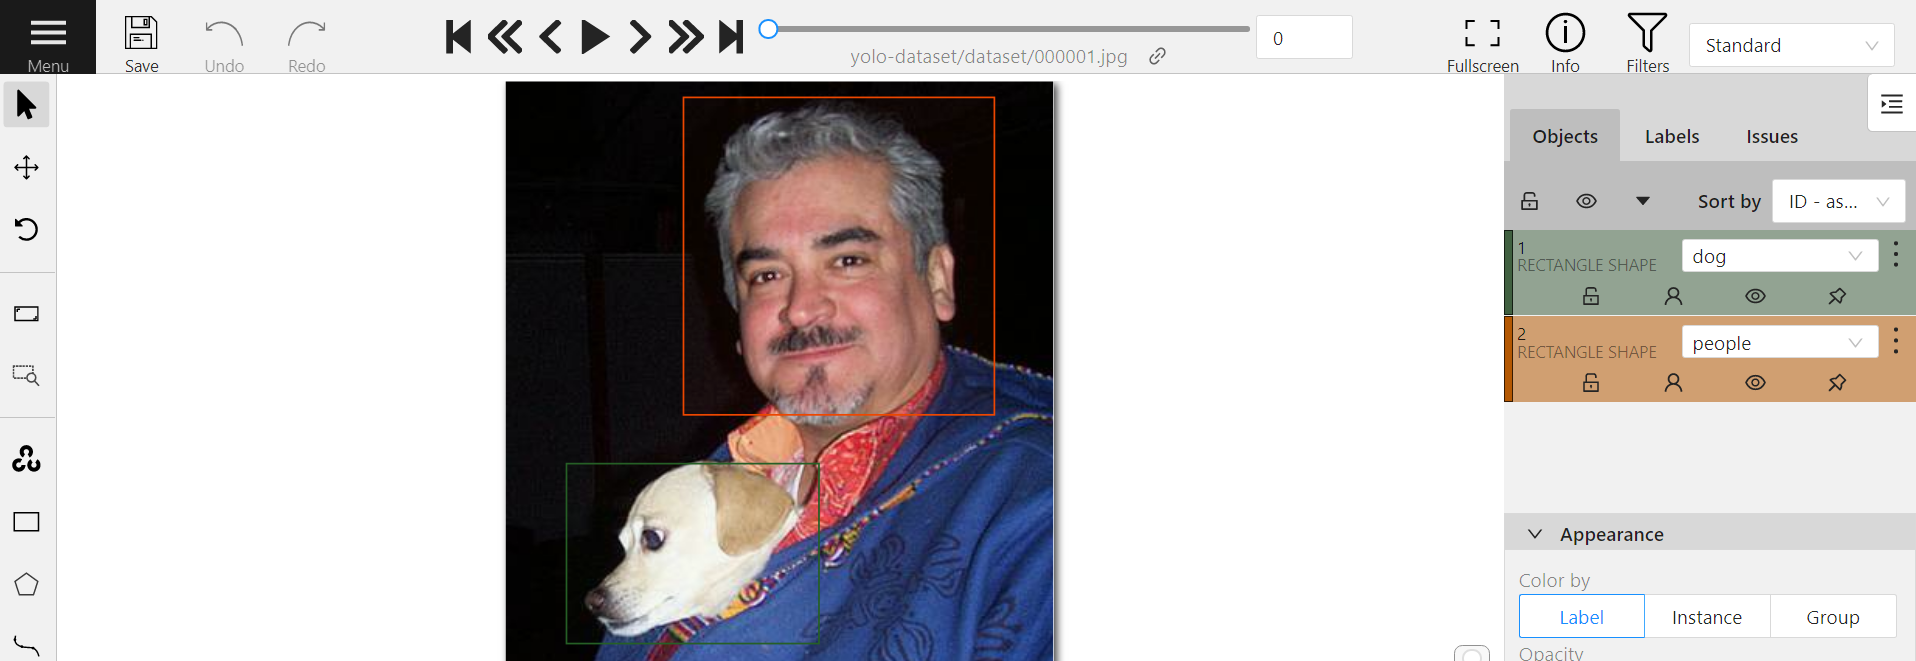
* Click Job to enter the data annotation screen and start annotating.
* Move the mouse to the rectangle annotation tool **Draw new rectangle** on the left toolbar, select the label of the **Label** menu, and then click **Shape**.
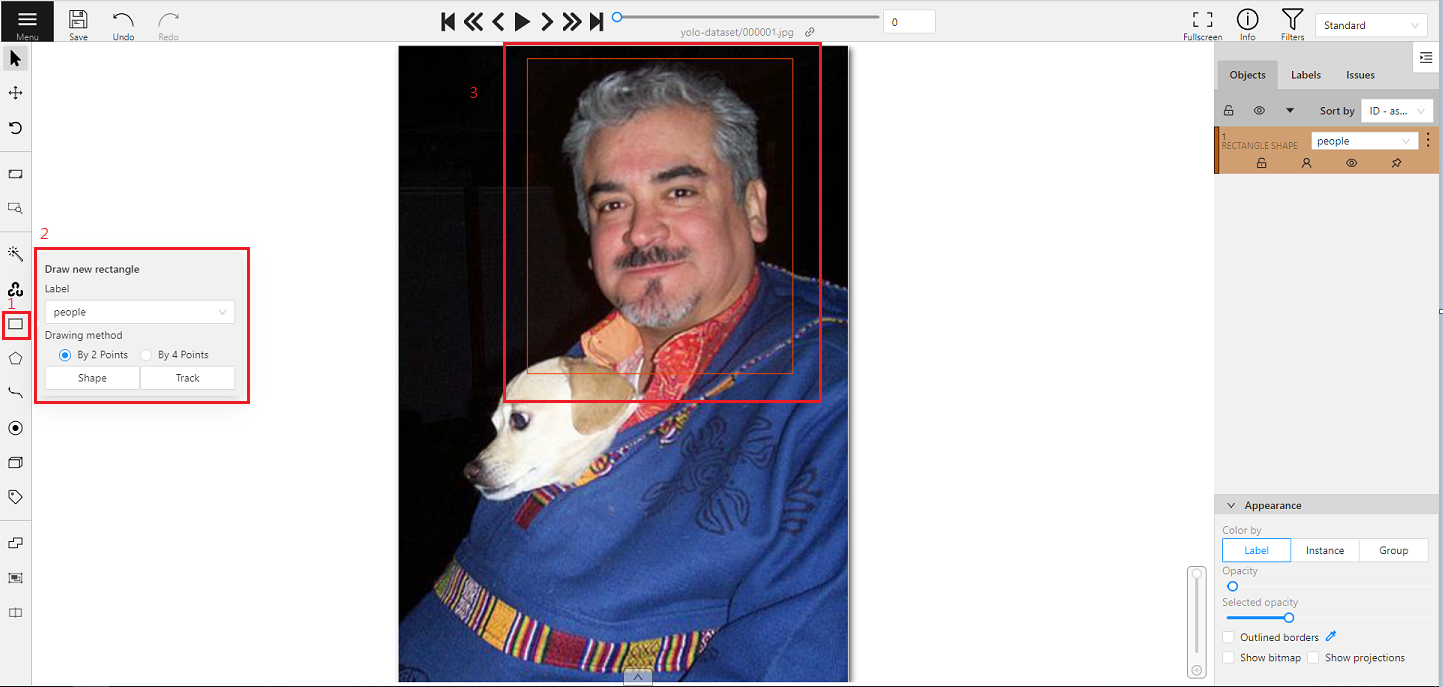
* After the annotation is completed, click **Save** above to save the annotation results.
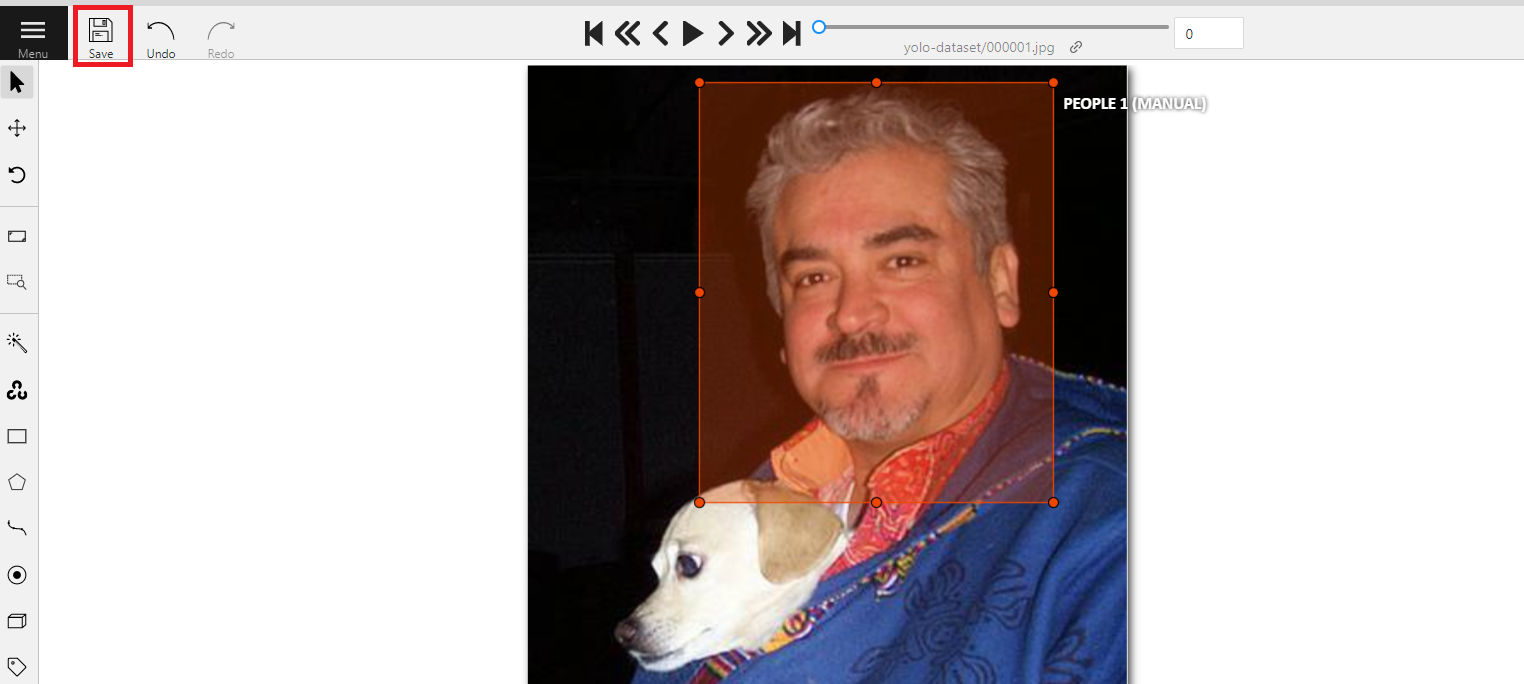
:::warning
:warning: **Note:** Make it a habit to save at any time during the annotation process, so as not to lose your work due to unavoidable incidents.
:::
:::info
:bulb:**Tips:**
* For more information about CVAT, please refer to **https://github.com/opencv/cvat**.
* For CVAT User Guide, please refer to **https://opencv.github.io/cvat/docs/manual/**.
:::
### Export Annotation Data
* After the annotation task is completed, the annotated data can be exported to the storage service, and then used in training machine learning model in AI Maker.
* On the annotation task page, move the mouse to the **Actions** menu in the upper right, then click **EXPORT TASK DATASET**
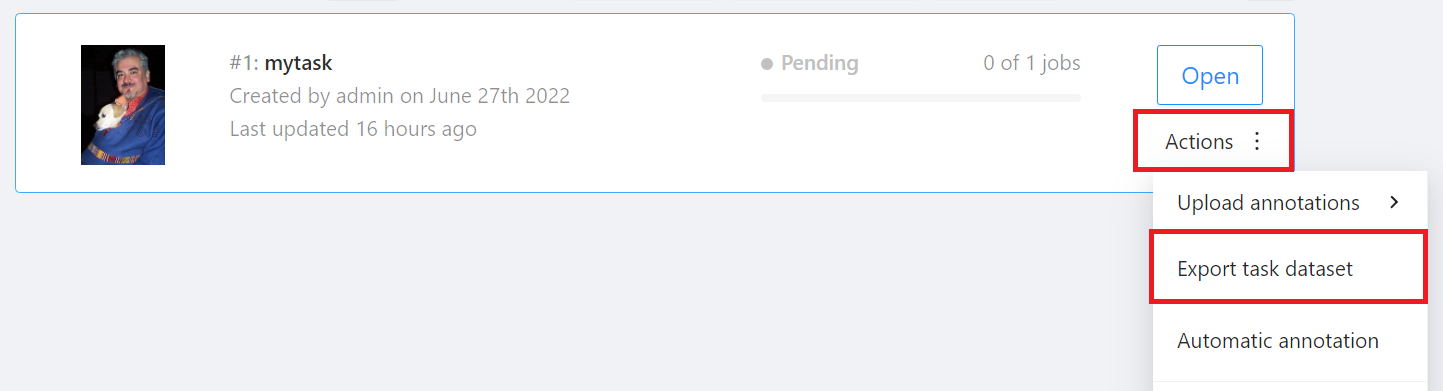
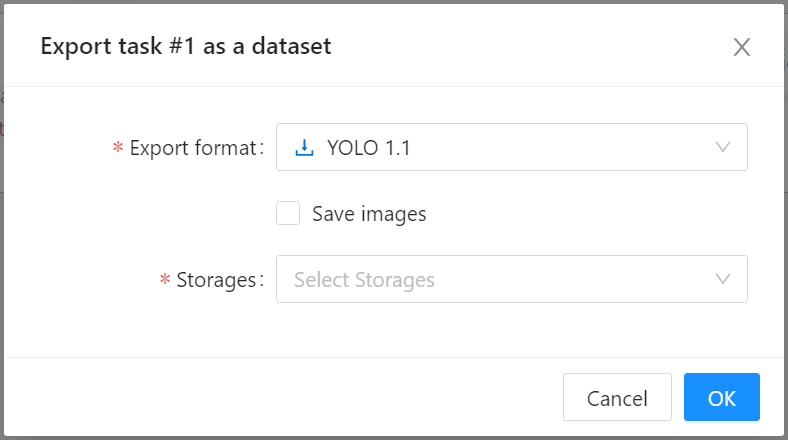
* Then select the Export format and Storages in the **Export task as a dataset** window, then click **OK**.
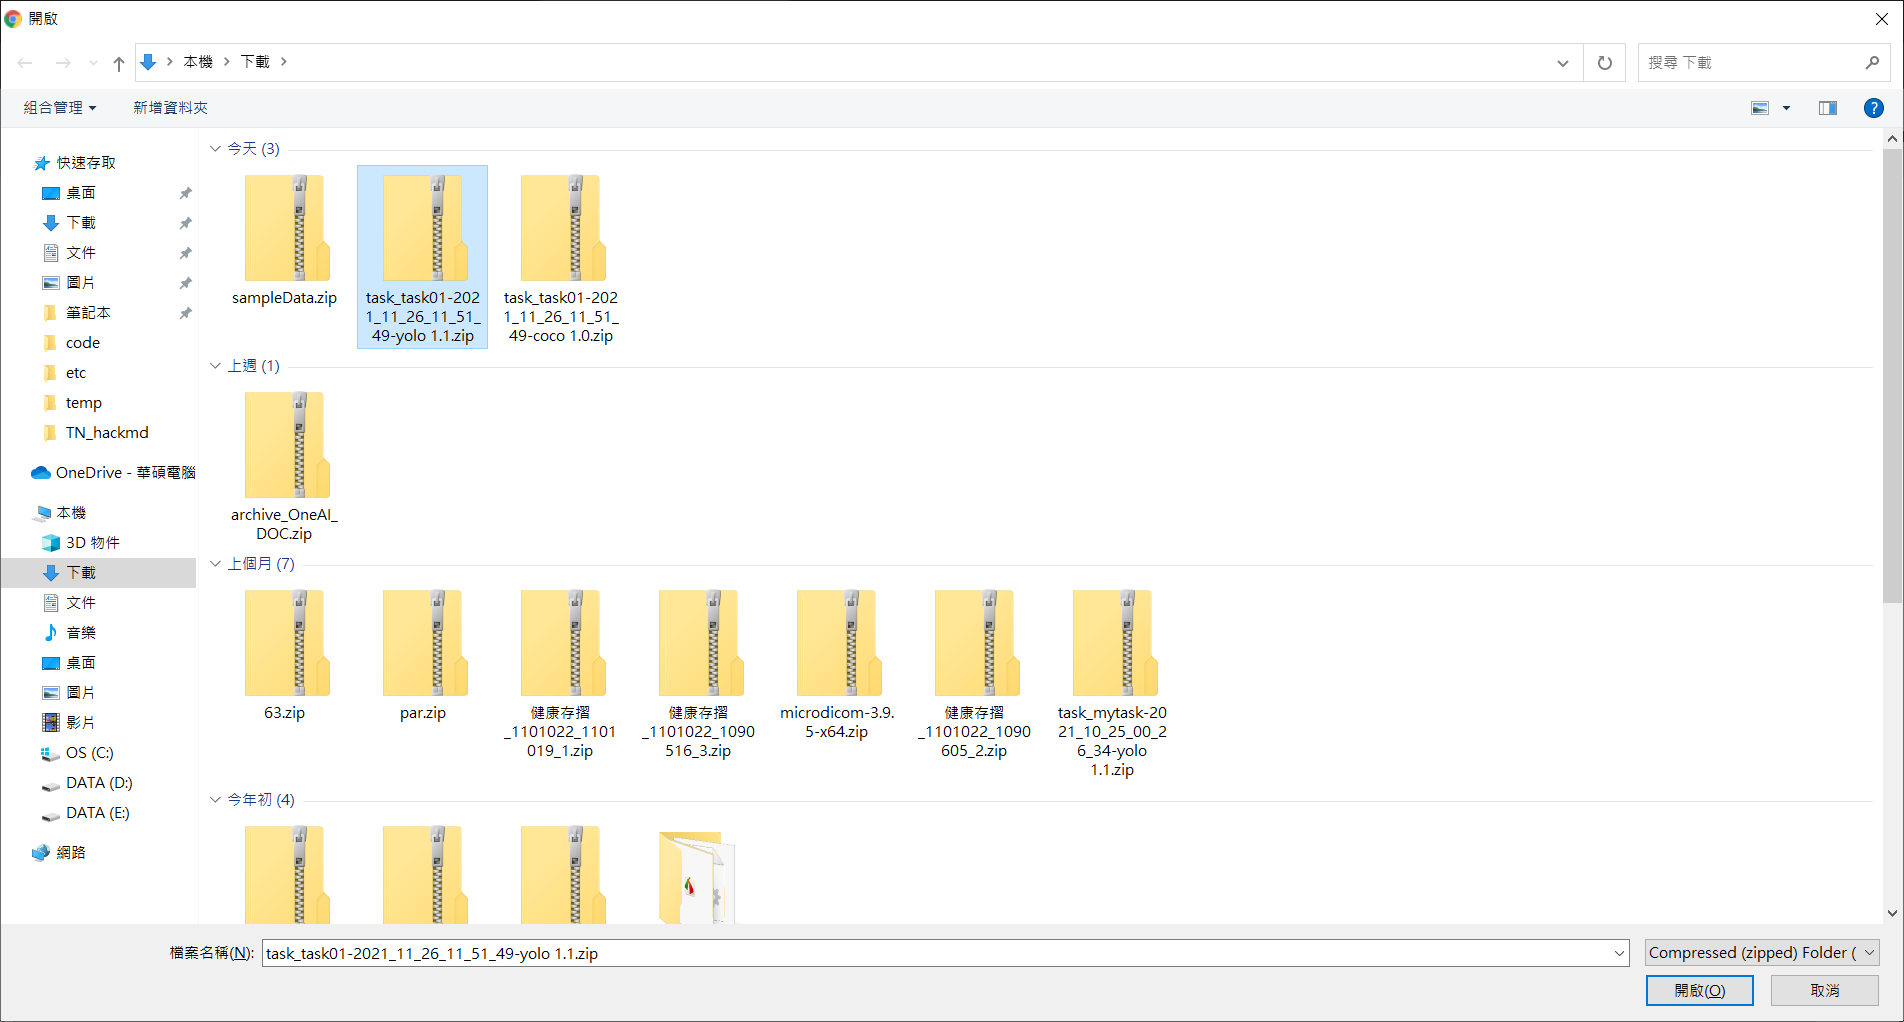
### Import Annotation Data
* If you already have annotated data, you can refer to the [**Annotation data format supported by CVAT**](https://opencv.github.io/cvat/docs/manual/advanced/formats/) to prepare the annotation data file to be imported.
* On the annotation task page, move the mouse to the **Actions** menu in the upper right, then click **UPLOAD ANNOTATION**, and then select the format of the annotation data.
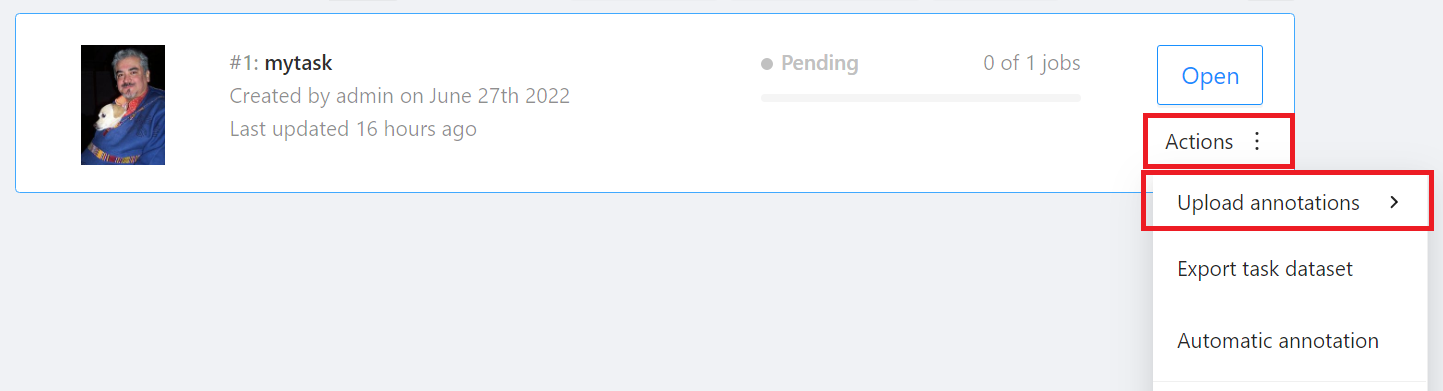
* Then select the annotation data file to be imported.
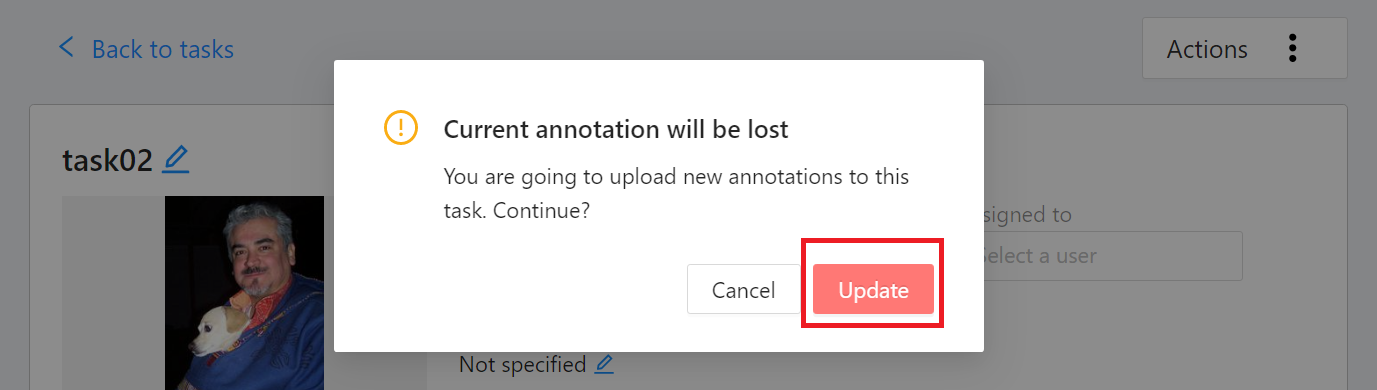
* The imported annotation data will overwrite the current annotation results, click **Update** after confirmation.
* Click Job to enter the data annotation screen to view the imported annotation results.
:::info
:bulb:**Tips:** Please refer to the [**Official CVAT documentation**](https://opencv.github.io/cvat/docs/manual/advanced/formats/) for the description of the annotation data format supported by CVAT.
:::
### Disable CVAT Service
* Click the disable icon above to disable the CVAT service.
* Click **OK** again.
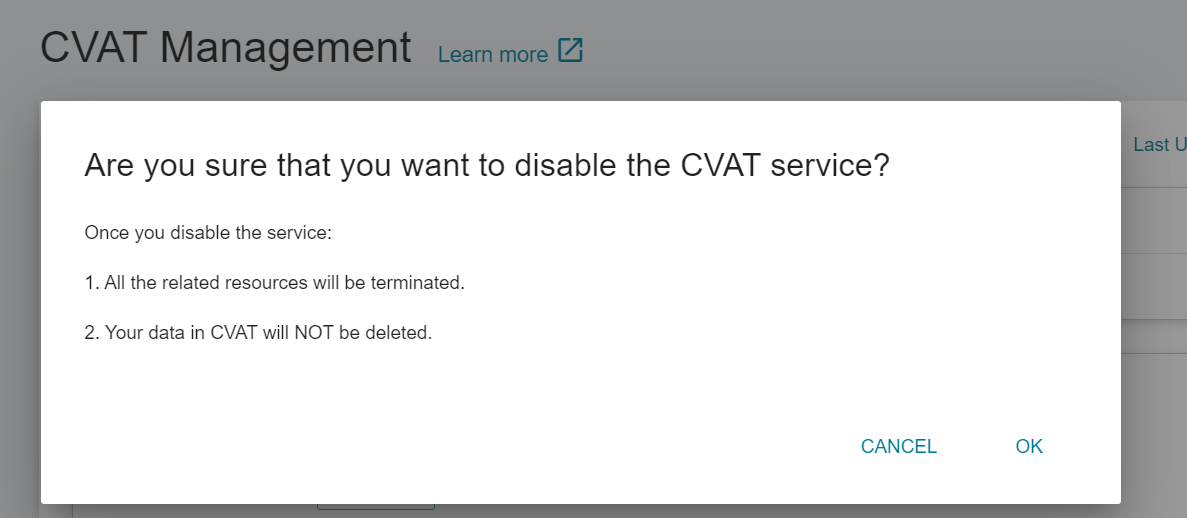
:::info
:bulb:**Tips:** Disabling the CVAT service will not delete the data in CVAT.
:::
## Template
The AI Maker template function allows you to save the parameters or settings required for each task in the machine learning development process as templates for quick application to save development time in the future.
### Public and Private Templates
There are two types of templates: public templates and private templates:
* **Public templates**: The system has multiple built-in machine learning training and inference templates, such as: YOLO image recognition, Clara medical image recognition and table data application and more, to help users get started quickly.
:::info
:bulb:**Tips:** For more information about public templates, please refer to [**AI Maker Case Study**](/s/LiV2Pb1FB#Case-Study).
:::
* **Private Templates**: User-created templates that can only be shared with team members within the project.
### Create a Template
Click **Template** on the left to enter the **Template Management** page, and click **+CREATE**. If you are just starting to use AI Maker, you can skip the step of creating a template and create a **Training Job** directly.
* Enter the template name and description, select the template type, and click **NEXT: TRAINING JOB >**.
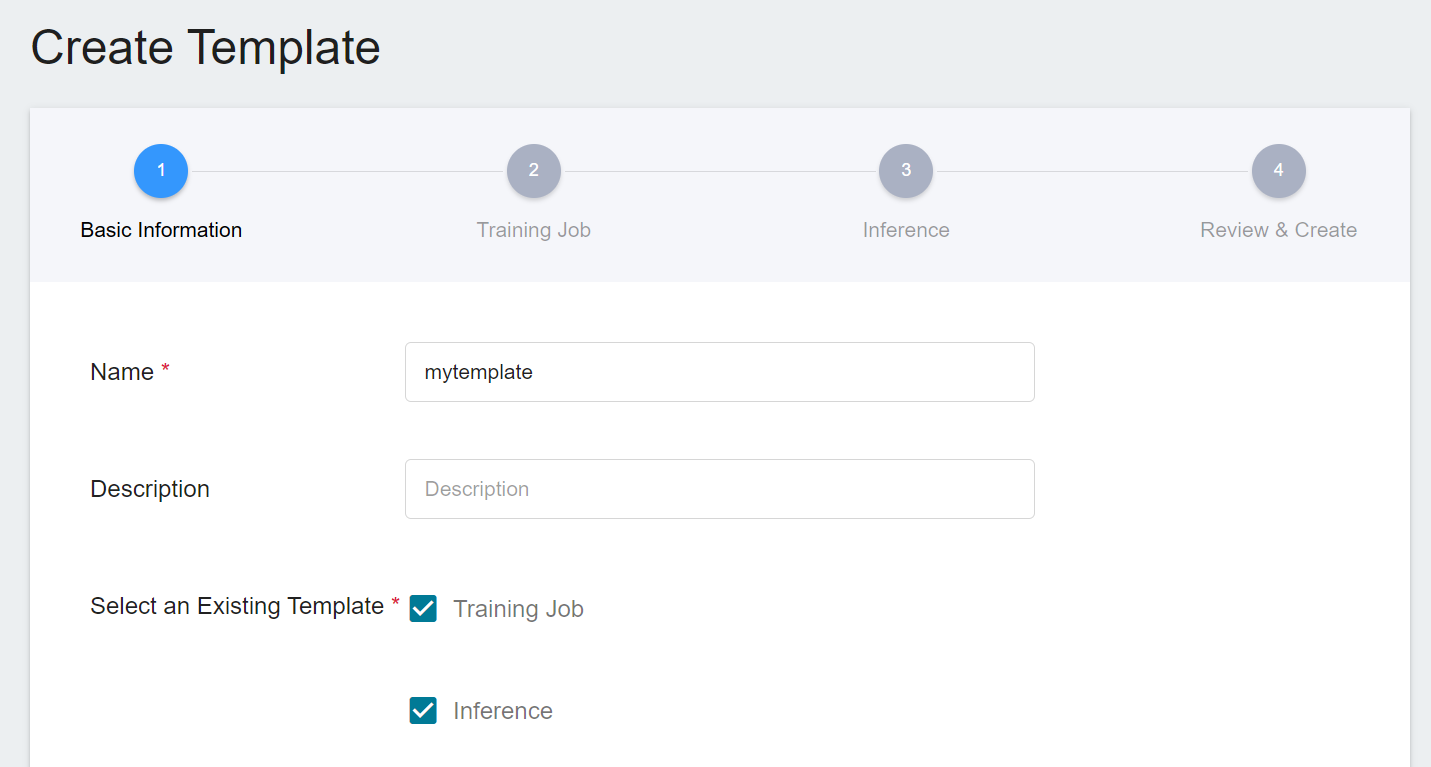
* Follow the steps below to complete the template settings. You can choose to set only one template or multiple templates.
#### Set Up a Training Job Template
* Select an Existing Template: Click **SELECT** to select a **PUBLIC** or **PRIVATE** template. The system will show the settings of the selected template, which can be directly applied or modified. You can also set it yourself if you prefer not to choose any.
:::info
:bulb: **Tips:** It is recommended to refer to the public template settings for the first use.
:::
* Image source: Click **SELECT** to select a **PUBLIC** or **PRIVATE** image.
* Image Tags: Select the image tags.
* Environment variables: Enter the name and value of the environment variables.
* Hyperparameters: When **Smart ML training job** is selected as the training job method, you need to set the hyperparameters required by the machine learning algorithm, including the name, type, and value (or value range) of the parameter. After selecting the type (integer, decimal, and array), please follow the prompts to enter the values in corresponding numeric format.
* Target parameter: Enter the name of the target parameter and the target direction. For example: the target direction of accuracy is the maximum value, and the target direction of error is the minimum value.
* Command: Enter the command or program name to be executed, for example: .`python $INPUT/app.py`.
* Input Directory: Specify the storage location of the training data.
* Output Directory: The storage location and mounting path of the model after training. The default output directory is `OUTPUT`, and the mounting path is `/output`.
When done, click **REVIEW & CREATE** or **NEXT: INFERENCE>**.

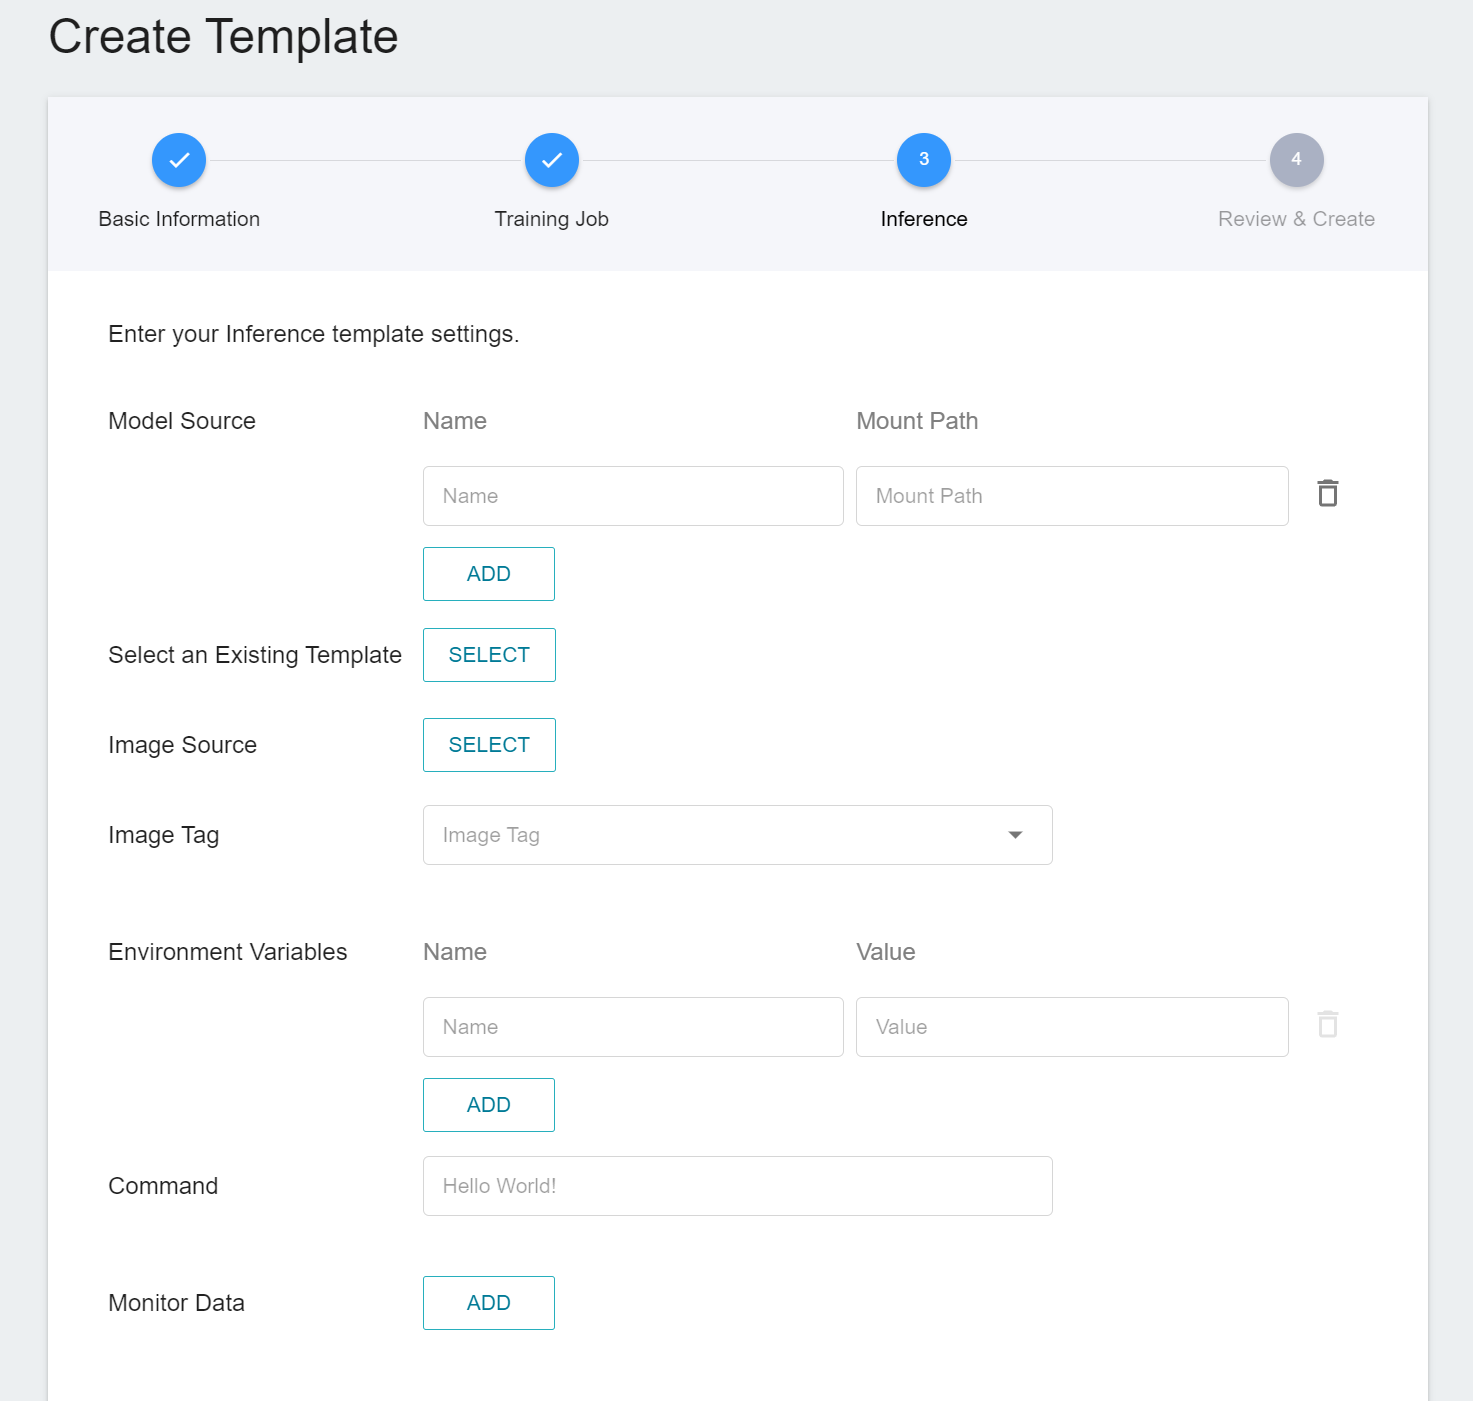
#### Set Up Inference Templates
* Model Source: Enter the name and mount path of the model source. If you need multiple models for inference, you can click **ADD** to add other model sources.
* Select an Existing Template: Click **SELECT** to select a **PUBLIC** or **PRIVATE** template. The system will show the settings of the selected template, which can be directly applied or modified. You can also set it yourself if you prefer not to choose any.
* Image source: Click **SELECT** to select a **PUBLIC** or **PRIVATE** image.
* Image version: Select the image version.
* Environment variables: Enter the name and value of the environment variables.
* Command: Enter the command or program name to be executed. For example: `python $INPUT/app.py`.
* Monitor data: Click **ADD**, then enter the name and category of the monitor data, and the monitoring results will be displayed in the monitoring page of the inference task as a graph.
:::info
:bulb: **Tips:** The monitor data settings are related to your inference program. For related instructions, see [**Preparations > Send the Inference Results Back to AI Maker**](#32-Send-the-Inference-Results-Back-to-AI-Maker).
:::
Click **NEXT: REVIEW & CREATE >** when finished, review the template settings, and click **CREATE** after confirming.
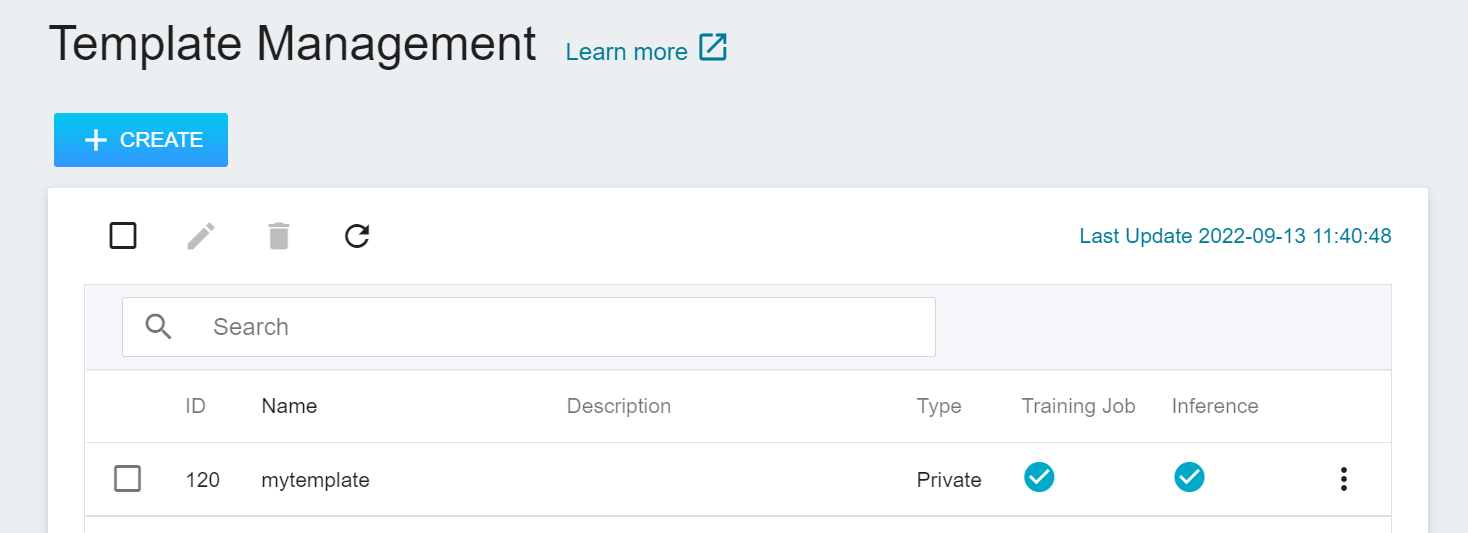
* After the template is created, it will appear in the template management list. A checked icon will appear on the successfully created template item. Click on the template list to enter the **Template Details** page to view the template settings.
### Template Management
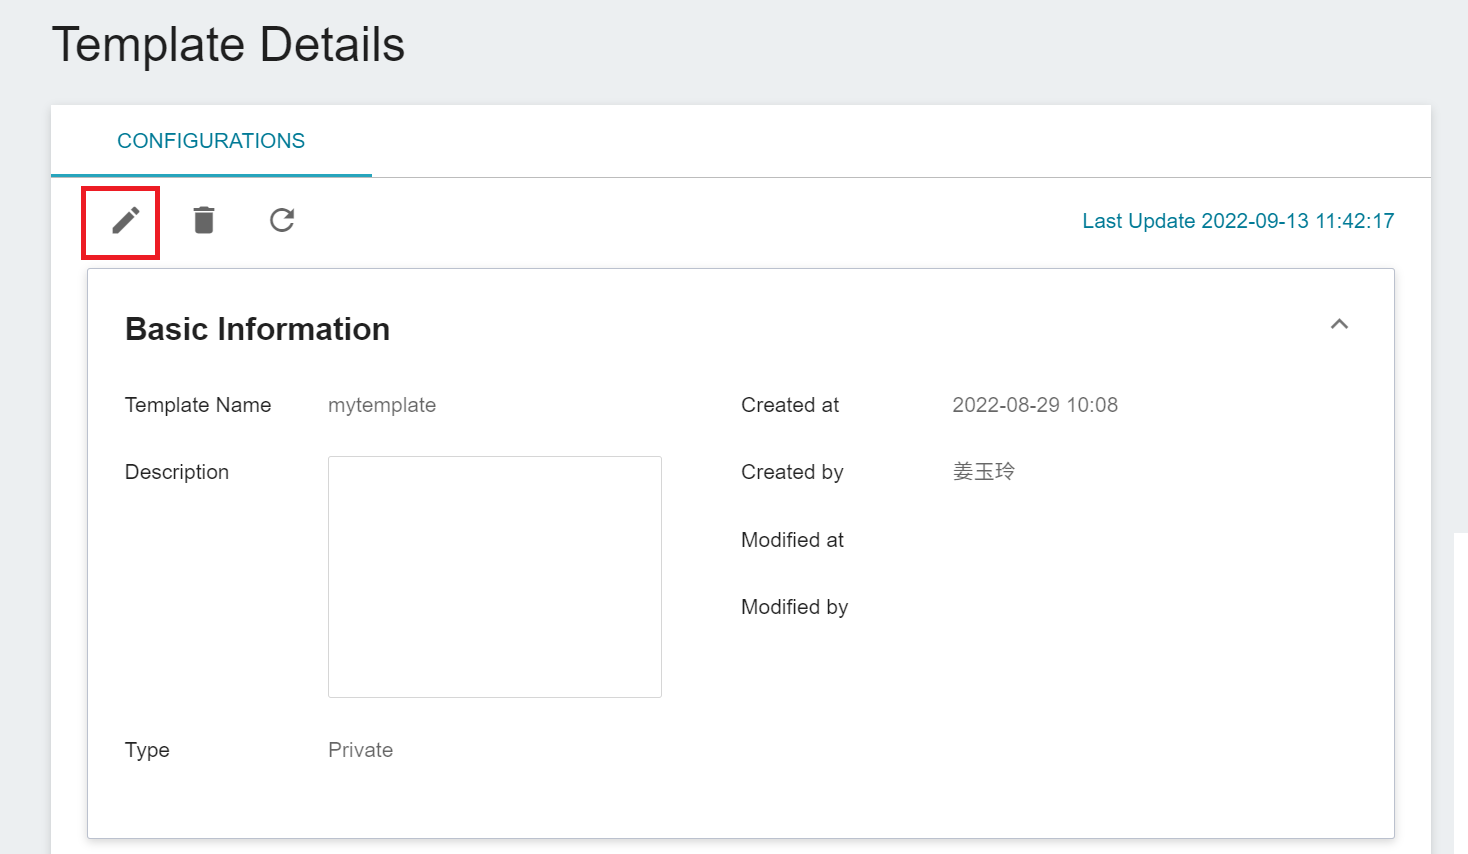
#### Edit Template
* Go to the template details page, click the pencil icon in the command bar to edit the template settings, and click **Save Changes** when finished.
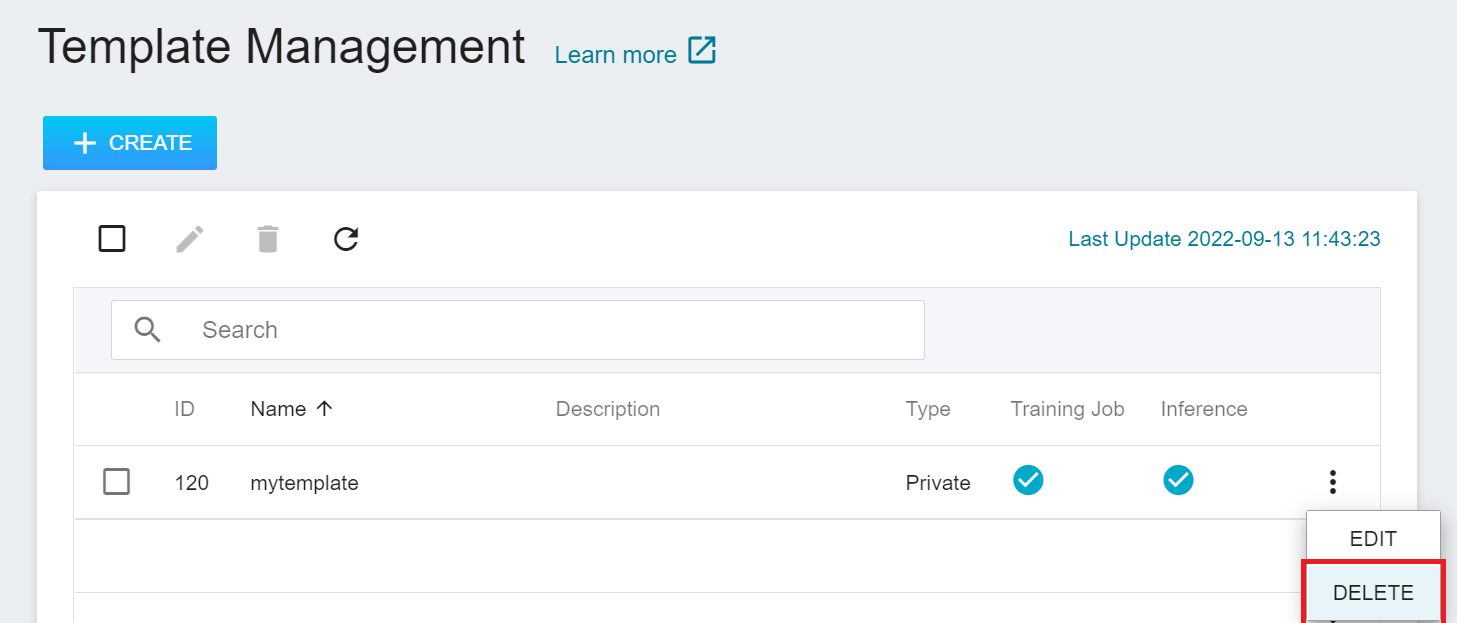
### Delete Template
* In the template management list, move the mouse to the more options icon on the right, then click **Delete**.
## Training Job
* The Training Jobs could be either a normal training job or a Smart ML training job:
- **Normal training**: One-time training according to the user's settings.
- **Smart ML training job**: Smart ML training jobs can automatically adjust hyperparameters, effectively use computing resources for multiple model training, and save users time and cost in analyzing and adjusting model training parameters.
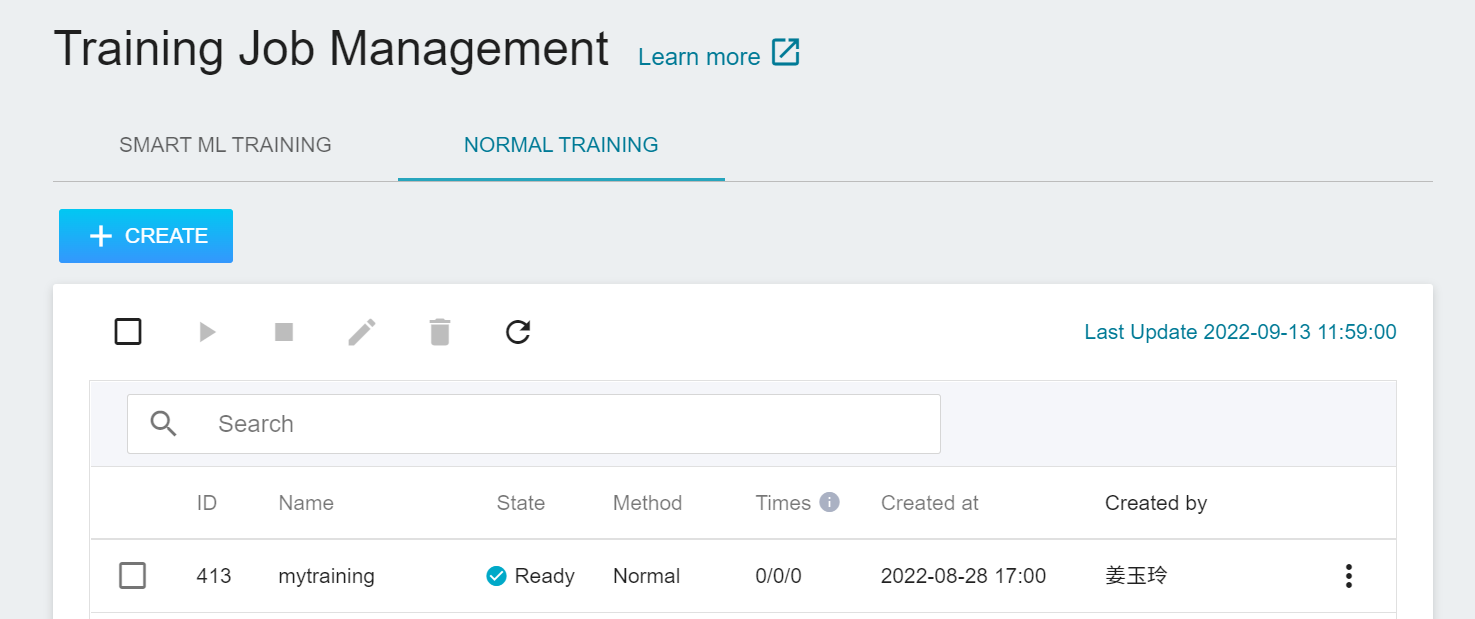
### Create Training Jobs
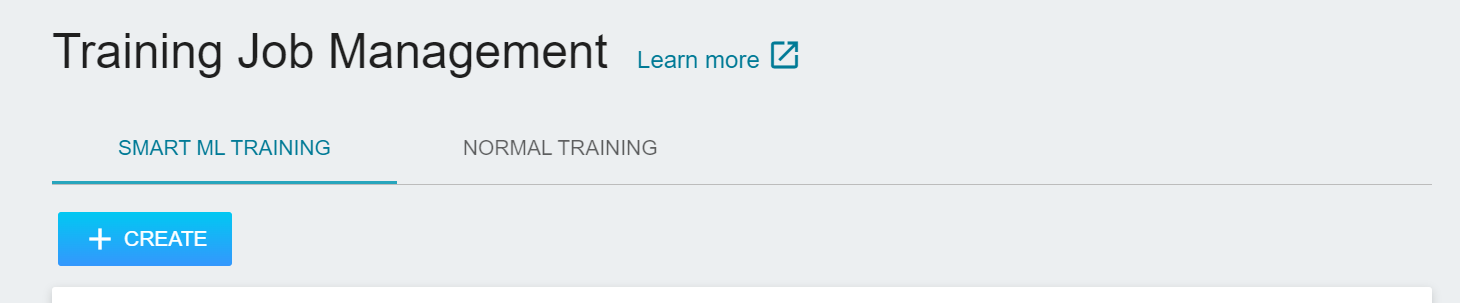
* Click **Training Jobs** on the left, click to switch between **NORMAL** or **SMART ML Training Job** from the upper tab, and then click **+ CREATE**.
Complete the following settings:
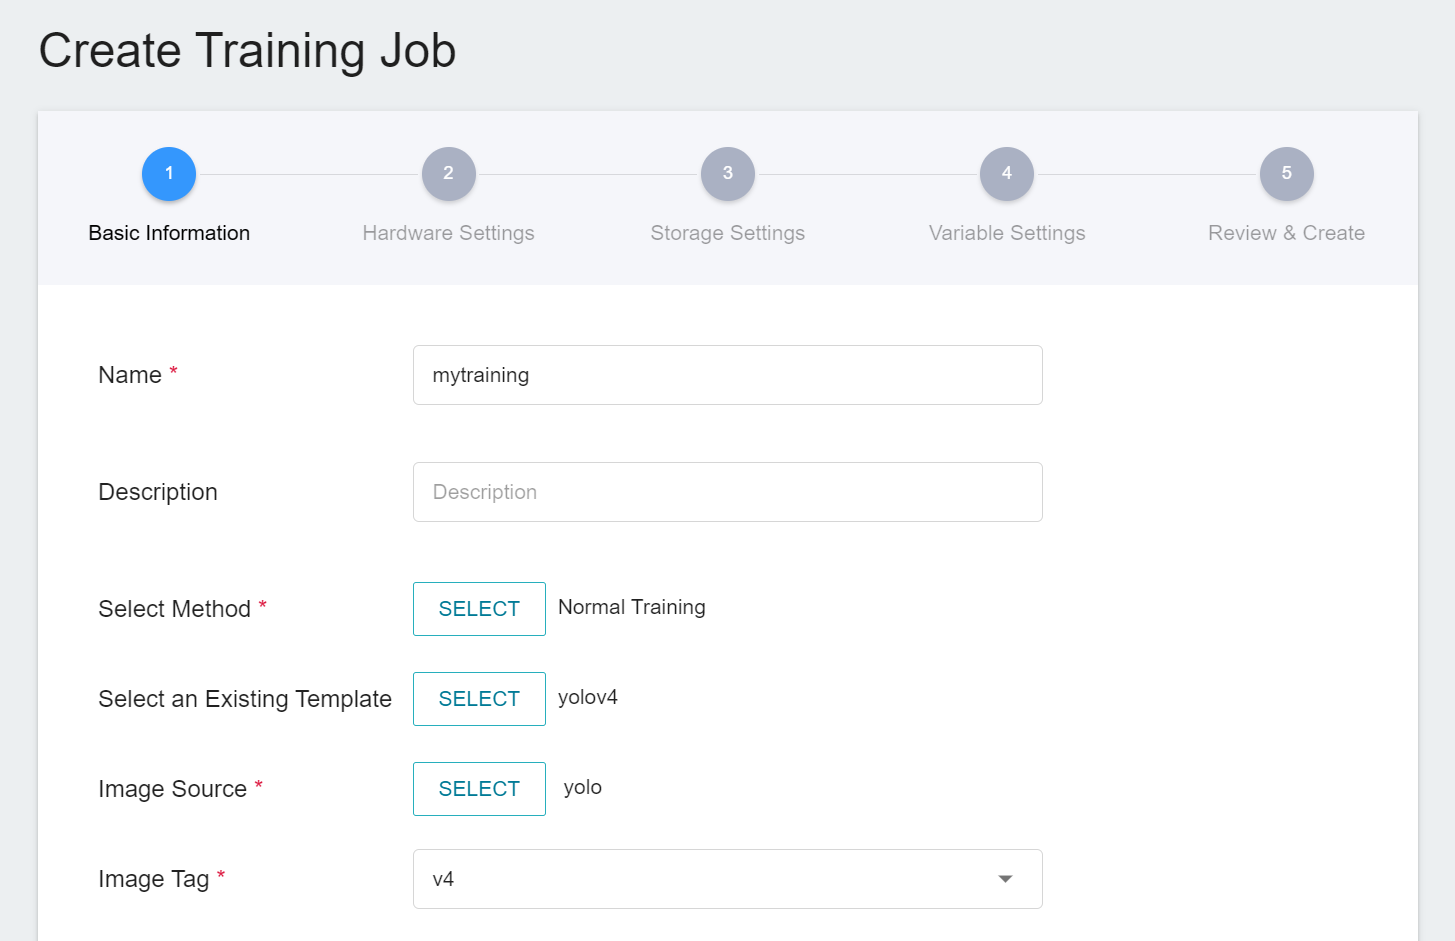
#### 1. Basic Information
* Name: Enter a name for the training job.
* Description: Enter a description for the training job.
* Algorithm: For **Smart ML Training Jobs**, you can select the algorithm provided by the system.
- **Bayesian**: Efficiently run multiple training jobs and find better parameter combinations according to environmental variables, the settings range of hyperparameters, and the number of training times.
- **TPE**: Tree-structured Parzen Estimator, which is similar to the Bayesian algorithm and can optimize the training jobs of high-dimensional hyperparameters.
- **Grid**: Experienced machine learning users can specify multiple values for the hyperparameters, and the system will run multiple training jobs based on the combination of listed hyperparameters and obtain the calculated results.
- **Random**: Randomly select hyperparameters for the training job within the specified range.
* Select Method: Click **SELECT** to select a training method. Different training methods will switch to different settings page.
* Select an Existing Template: Click **SELECT** to select a **PUBLIC** or **PRIVATE** template. The system will show the settings of the selected template, which can be directly applied or modified. You can also set it yourself if you prefer not to choose any.
* Image source: Click **SELECT** to select a **PUBLIC** or **PRIVATE** image.
* Image version: Select the image version.
Then click **NEXT: HARDWARE SETTINGS >**.
:::info
:bulb: **Tips:** Below is an example using the yolov4 template. New user of AI Maker can refer to the [**AI Maker Case Study - YOLOv4 image recognition application**](/s/JyKyKQe1ce).
:::
#### 2. Hardware Settings
* Select the appropriate hardware configuration according to your computing needs. You can also click **View Available Quota** to view the current resource quota and usage of your project, and then click **NEXT: STORAGE SETTINGS >**.
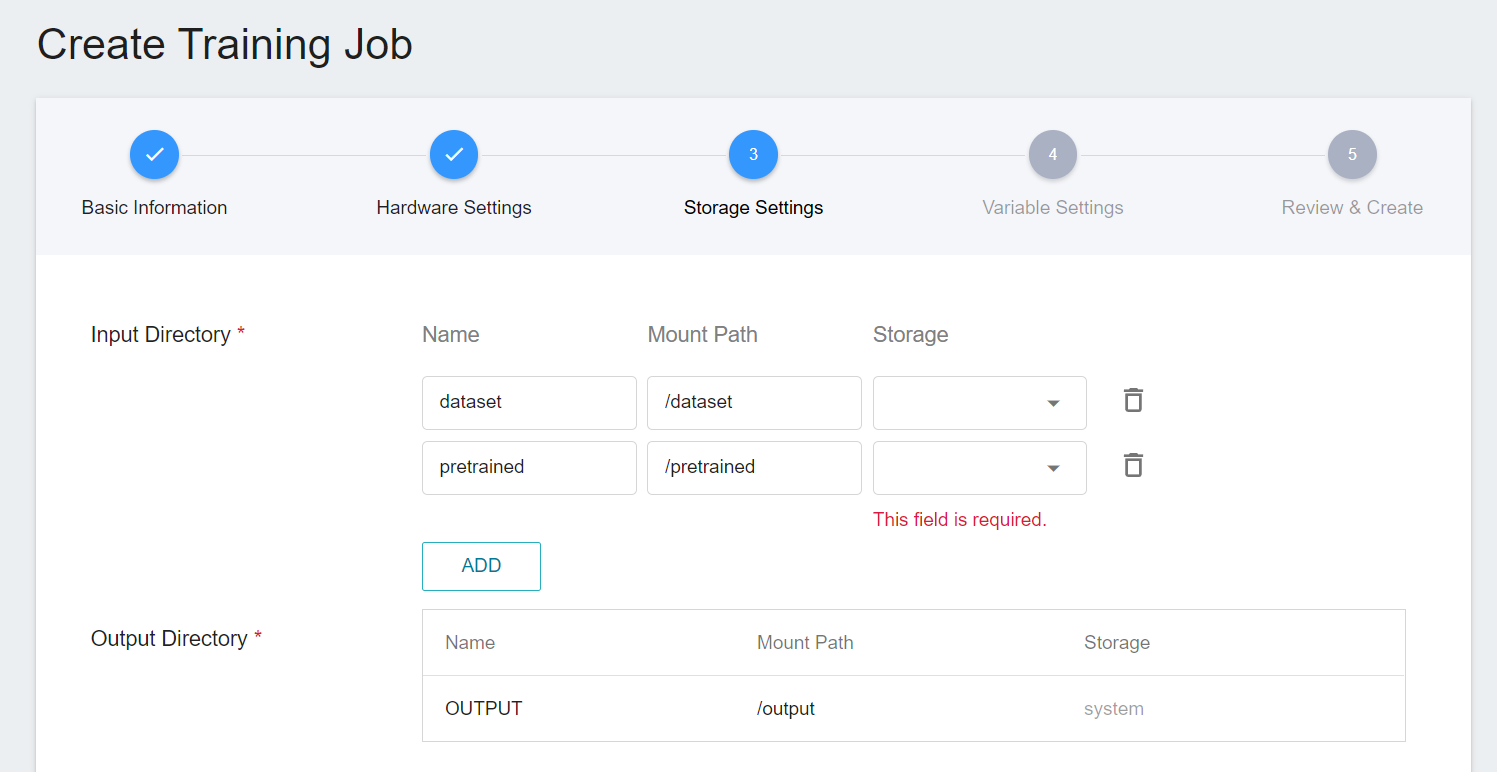
#### 3. Storage Settings
* Input directory: Specify the storage name and subpath where the training data is located, or create a new storage location.
* Output directory: The storage location and mounting path of training results are preset by AI Maker.
Then click **NEXT: VARIABLE SETTINGS >**.
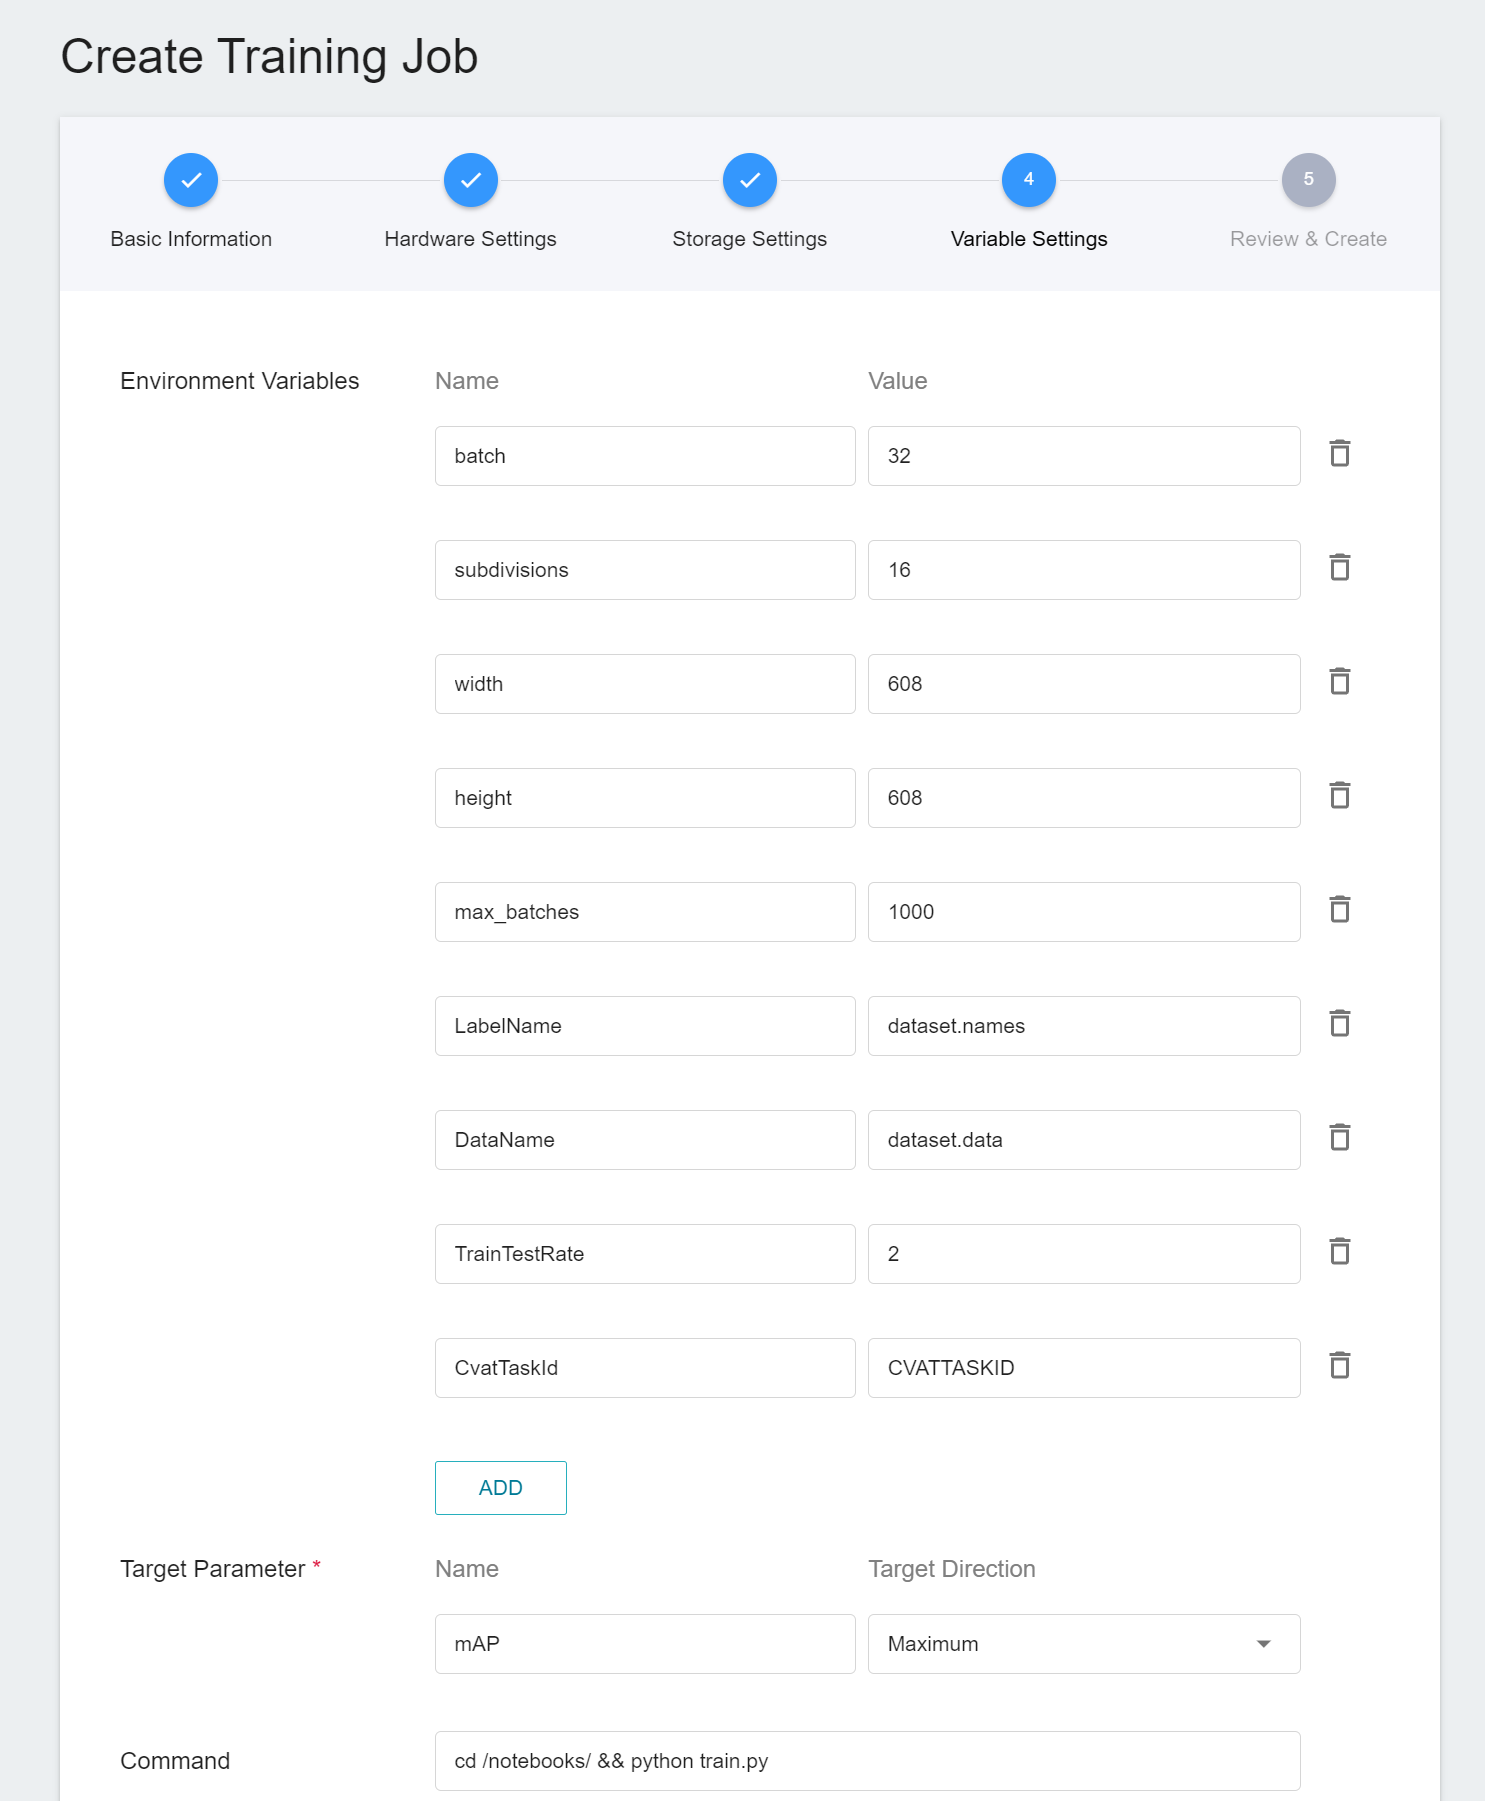
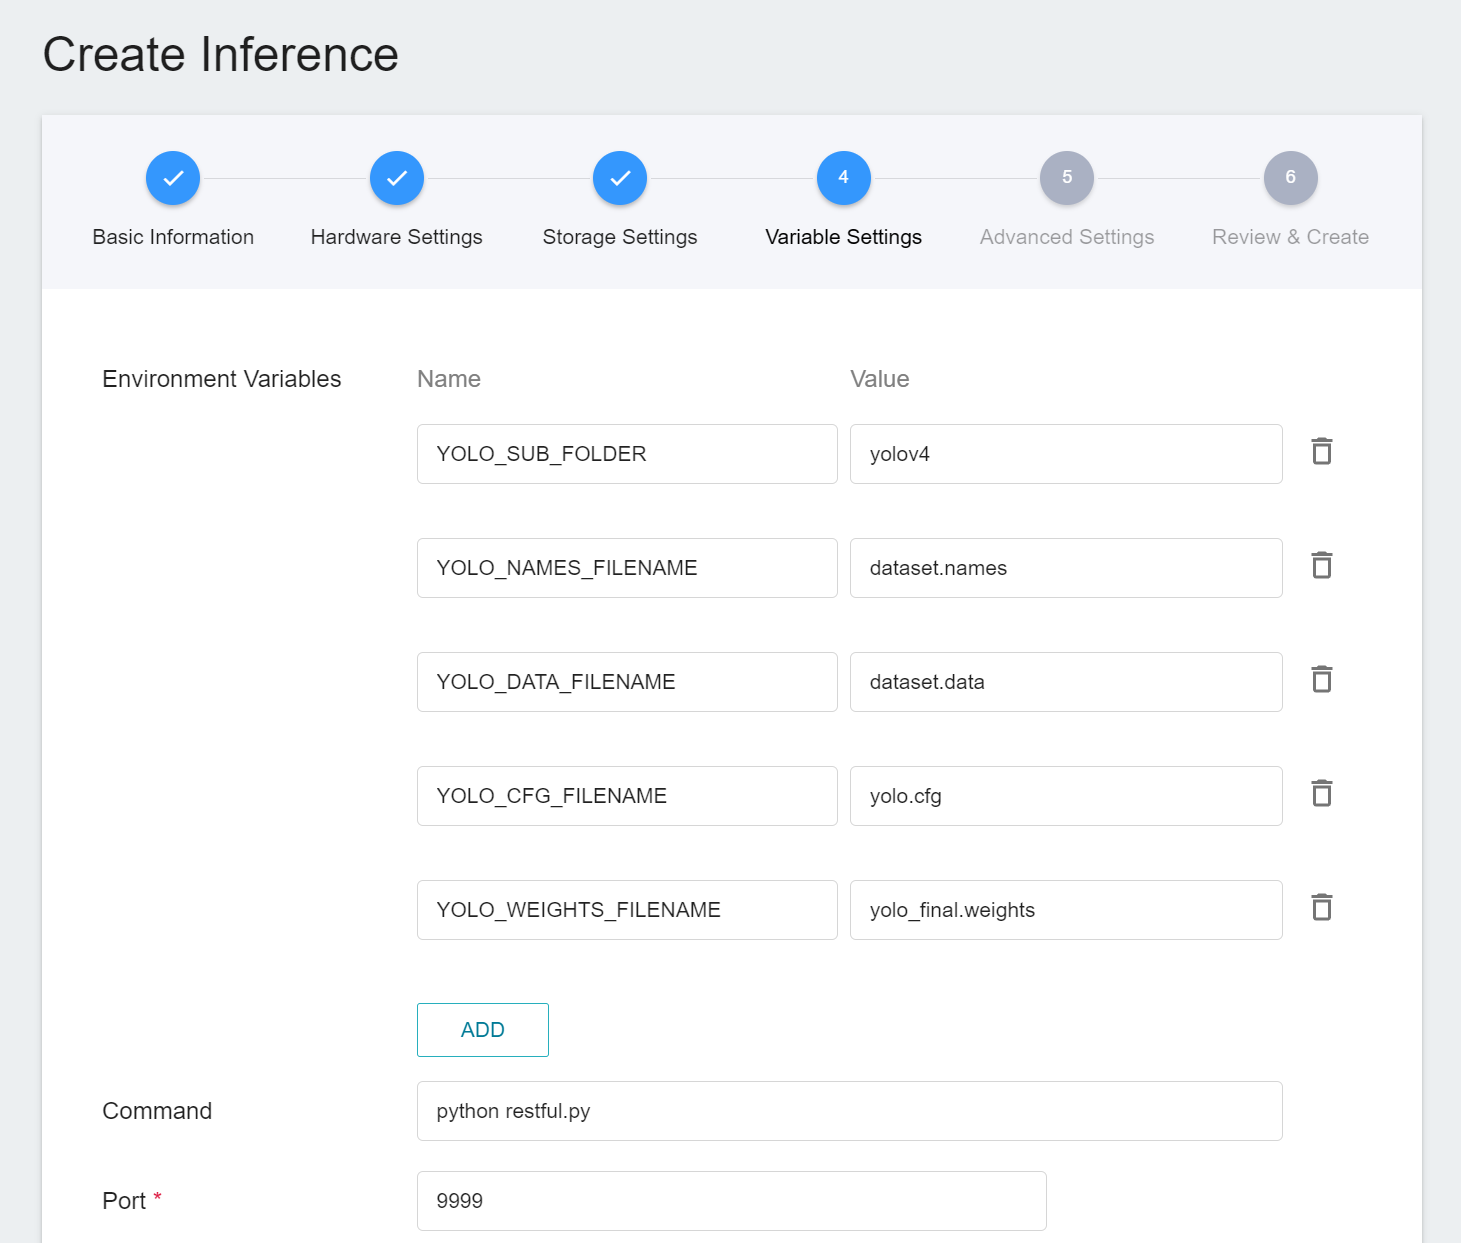
#### 4. Variable Settings
* Environment variables: Enter the name and value of the environment variables.
* Hyperparameters: When Smart ML training job is selected as the training job method, you need to set the hyperparameters required by the machine learning algorithm, including the name, type, and value (or value range) of the parameter. After selecting the type (integer, decimal, and array), please follow the prompts to enter the values in corresponding numeric format.
* Target parameter: Enter the name of the target parameter and the target direction. For example: The target direction of accuracy is the maximum value, and the target direction of error is the minimum value.
* Command: Enter the command or program name to be executed. For example: `python $INPUT/app.py`.
* Trial times: Set the number of training sessions.
Then click **NEXT: REVIEW & CREATE >**.
#### 5. Review & Create
* View the created training job settings, and click **CREATE** after confirming.
### Training Job Management
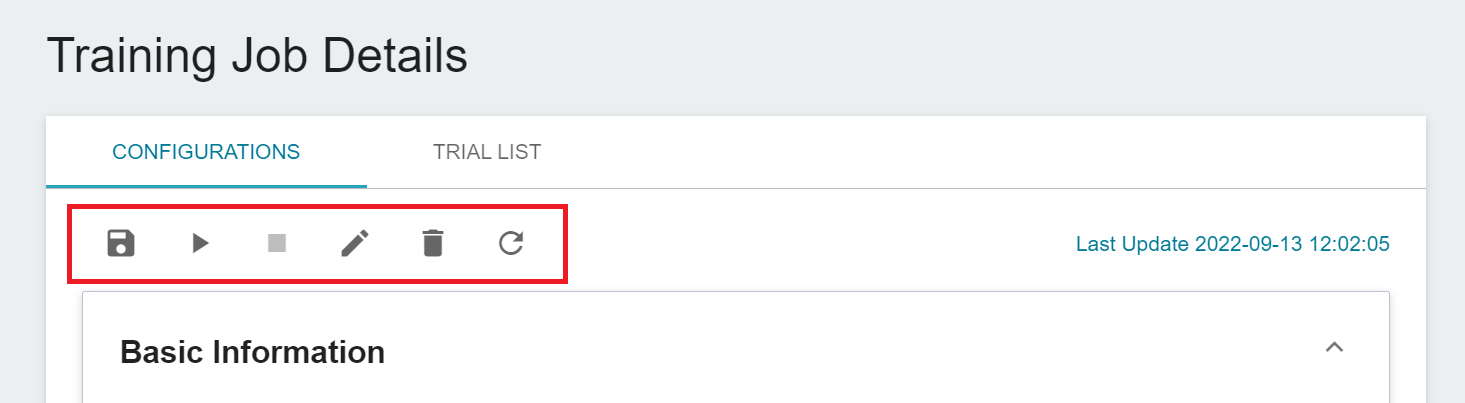
* After the training job is created, it will appear at the top of the list. Click the list to enter the training job details page.
* On the training job details page, you can view the detailed settings of the training job. Click the icon in the command bar to perform operations such as **Save (Save as Template)**, **Start**, **Stop**, **Edit**, **Delete** and **Refresh**.
:::info
:bulb: **Tips:** Please refer to [**Service Status Description**](/s/rfvQ74z-e#AI-Maker-General-Training-Job-(Jobs)). If the service creation failed, it is recommended to use the [**Notebook Service**](/s/NhcXXOUdS) or [**Container Service**](/s/HbSSCSWcN) to confirm the environment setting and that the program can be executed successfully.
:::
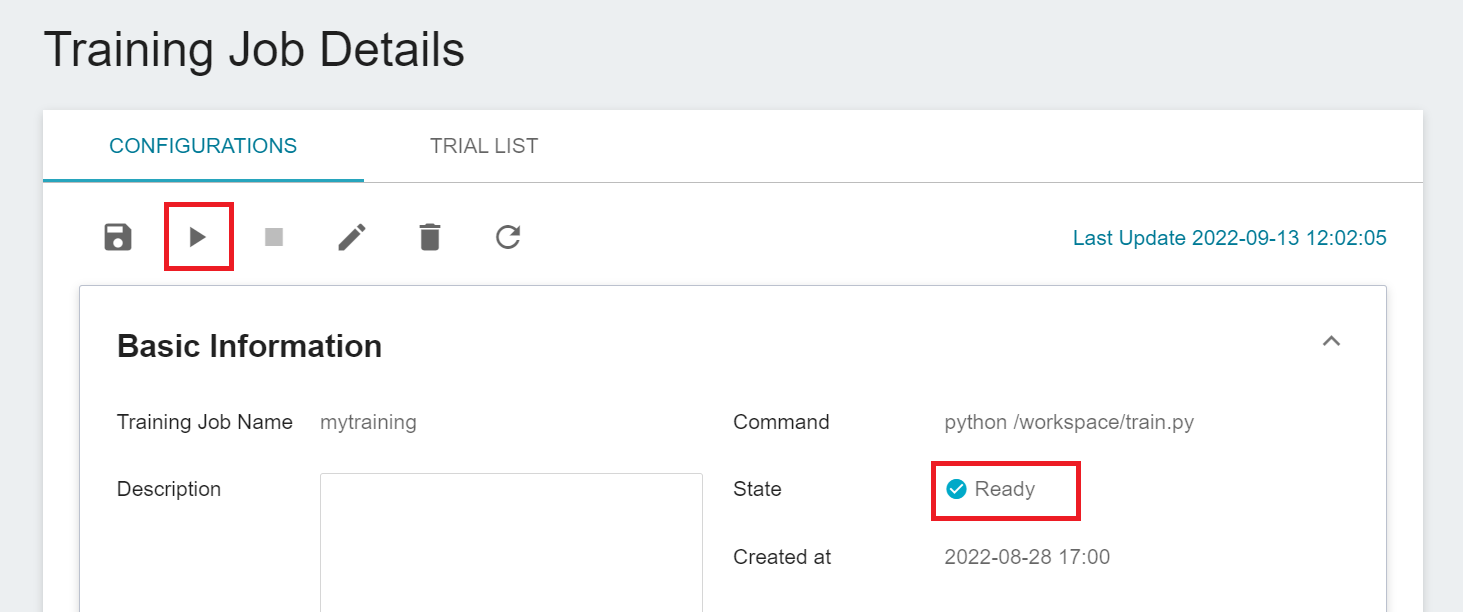
### Start a Training Job
* Go to the **Training Job Details** page to confirm the content of the settings. If the status of the training job is displayed as **`Ready`** , you can click the **Start** icon above to run the training job.
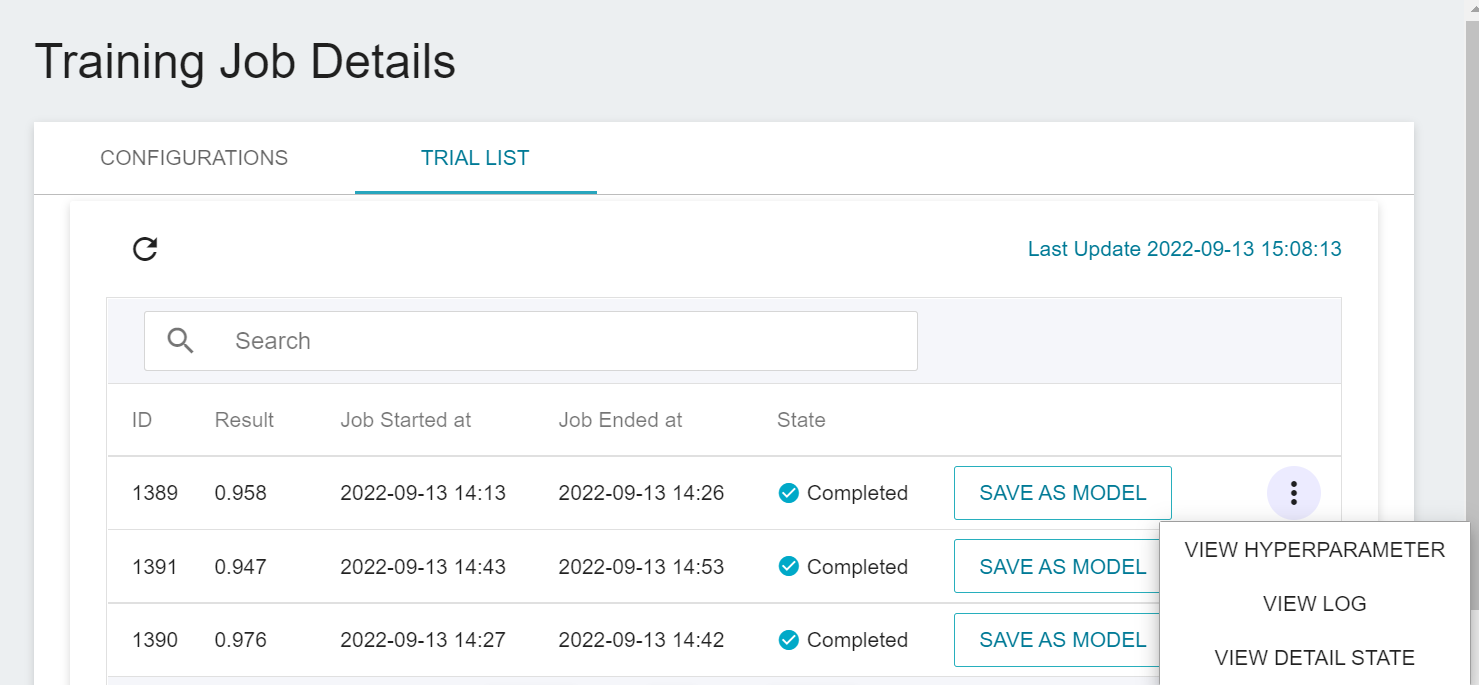
* Click the **Trial List** above to enter the **Trial List** page. After a few minutes, the schedule and status of the training jobs will be displayed in the list.
* Move the mouse cursor to the more options icon on the right side of the list, and select **View Hyperparameters**, **View Logs** or **View Detail State**. The menu items will be different depending on the training method and state.
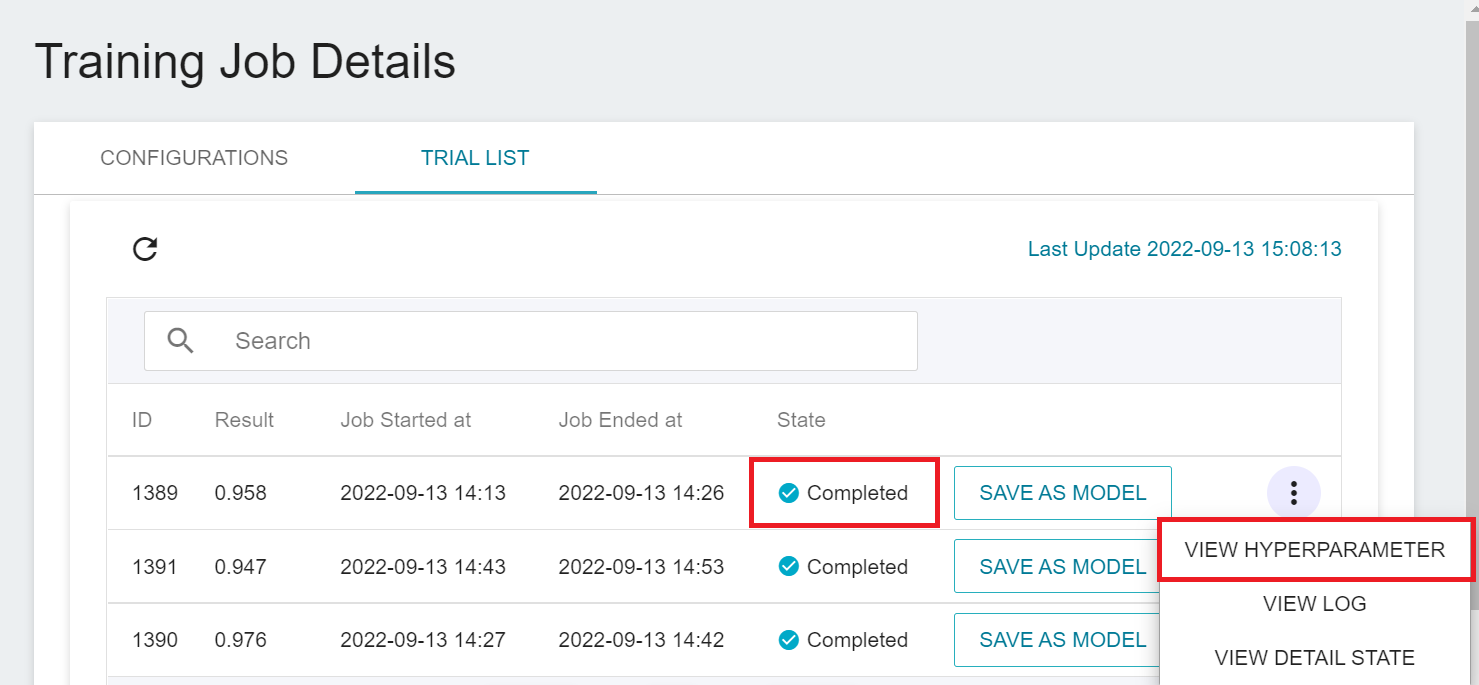
### View Training Results
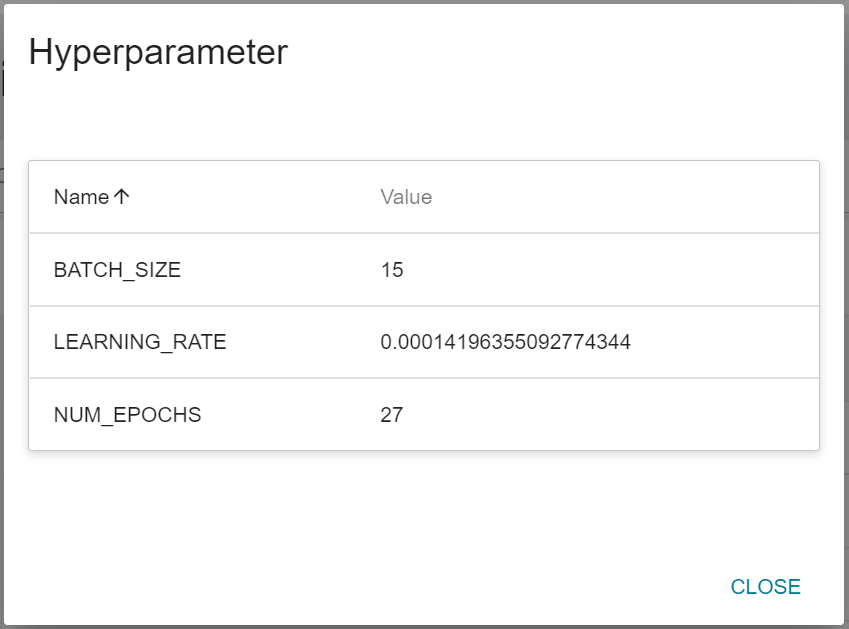
* After the training job is completed, the work item in the **Trial List** page will change to **`Completed`** and the result will be displayed. If it is a **Smart ML Training Job**, you can click **View Hyperparameters** in the more options menu on the right to view the hyperparameters used in the training job.
### Save Model
* Click **Save as model** to save the model that achieves expected results to the model repository, enter the model name and version and click **OK**.

* After the model is saved, you will be presented with the model management page, showing the version list of the model.
## Model
The Model features help developers manage the lifecycle of models and accelerate the ML development process by managing saved models, selecting models for inference, or removing underperforming models.
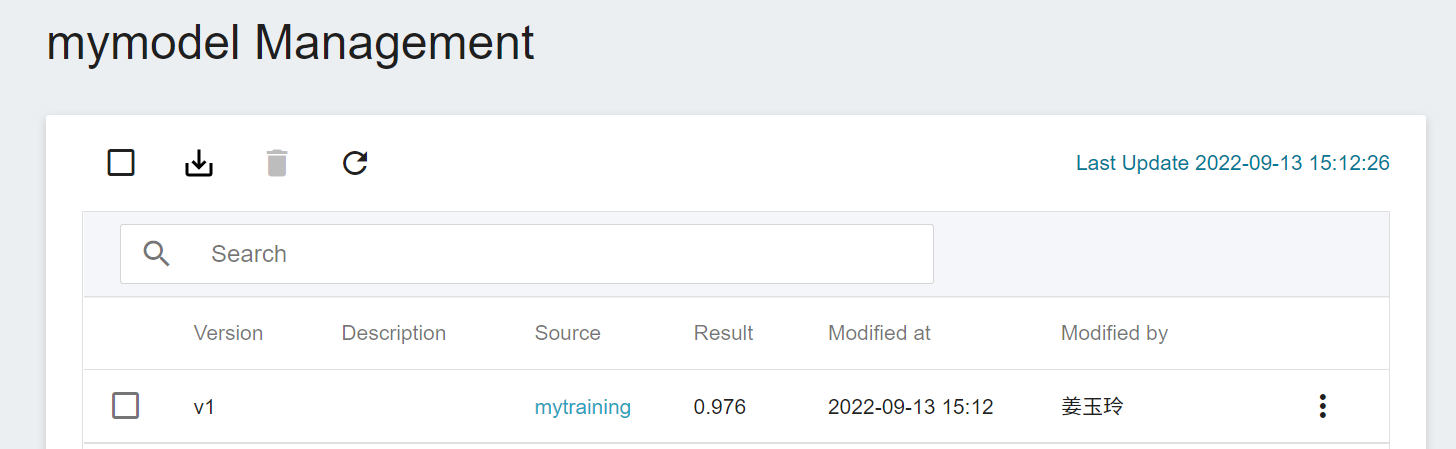
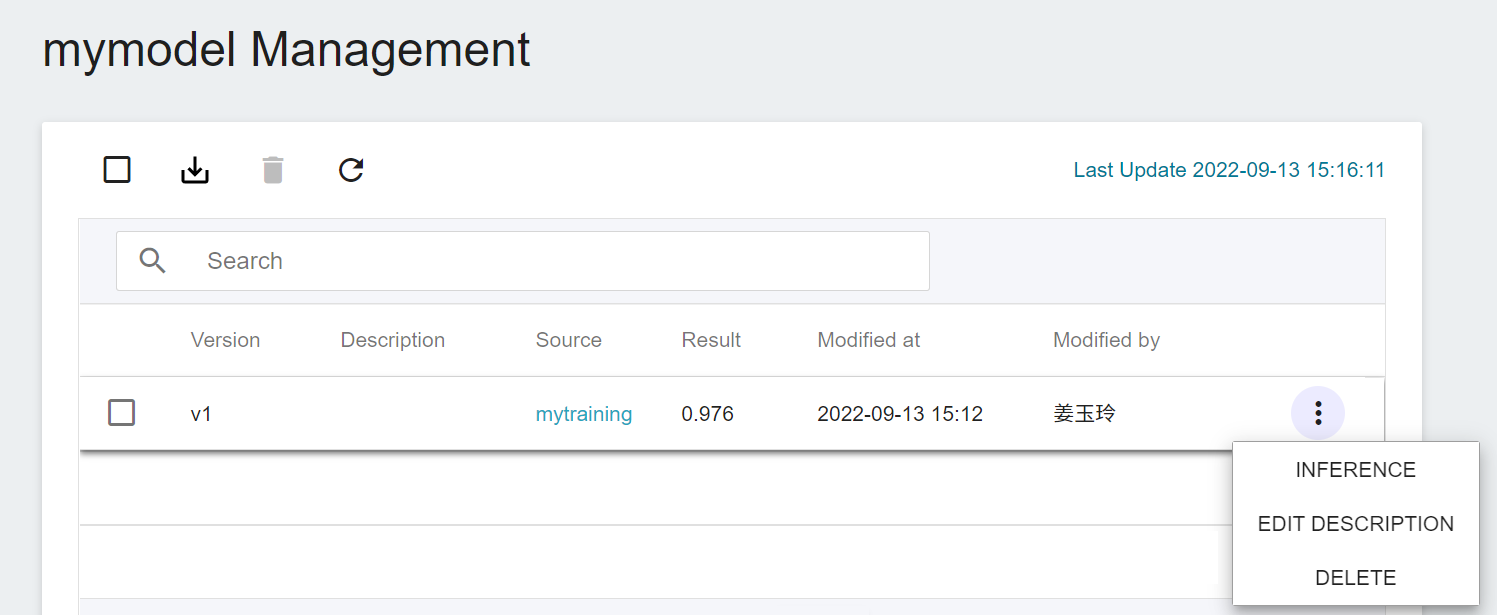
### Model Management
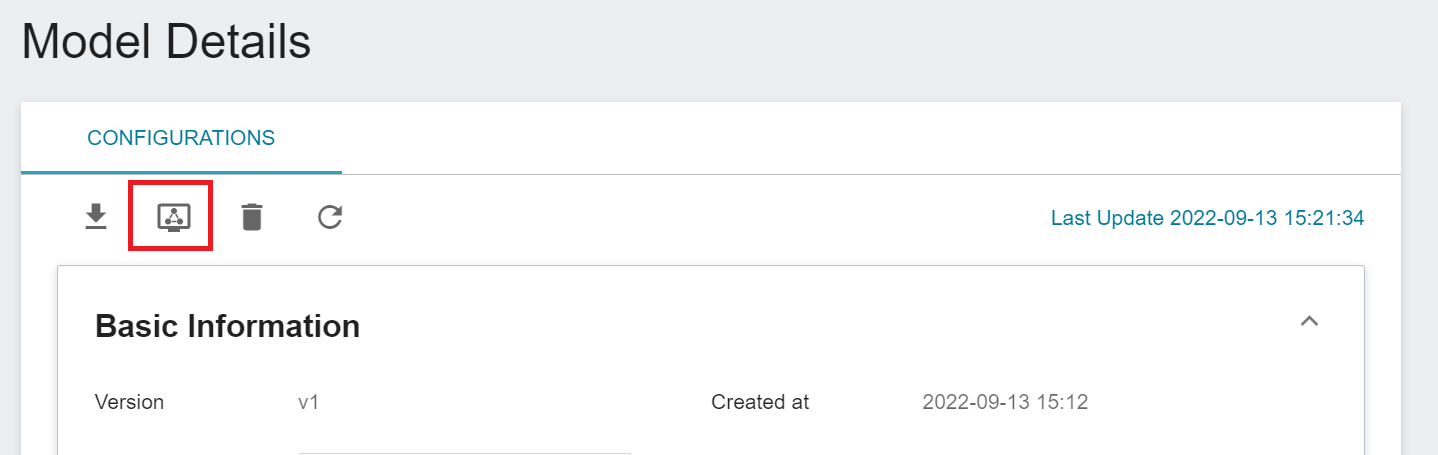
* Click **MODEL** on the left to enter the **Model Management** page, and then click the model in the list to enter the model version management page.


* On the **Model Details** page, move the mouse cursor to the more options icon on the right side of the list to view the details of the model, or click **INFERENCE**, **EDIT DESCRIPTION** or **DELETE**.
:::info
:bulb: **Tips:** Models that are not performing well or are no longer in use can be deleted to save resources.
:::
* Click the model version list to view model details.

### Import Model
If you already have a trained model, you can package the model into a ZIP file and upload it to Storage Service, and then import it into AI Maker for centralized management or subsequent inference tasks.
* Select **Storage Service** from the OneAI service list to enter the storage service management page, enter the name of the storage you want to upload in the search box, and then click the list to enter the storage.
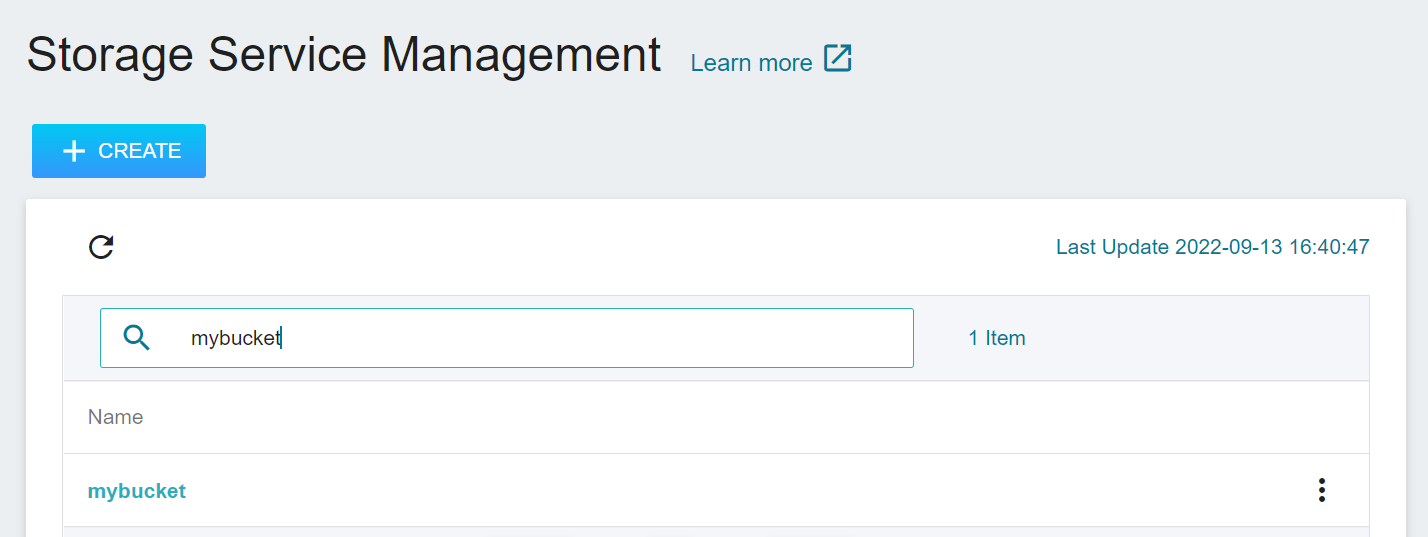
* Upload a ZIP archive of the prepared model to this bucket (Please see **[Storage Service](/s/M6ONotkTD)**).
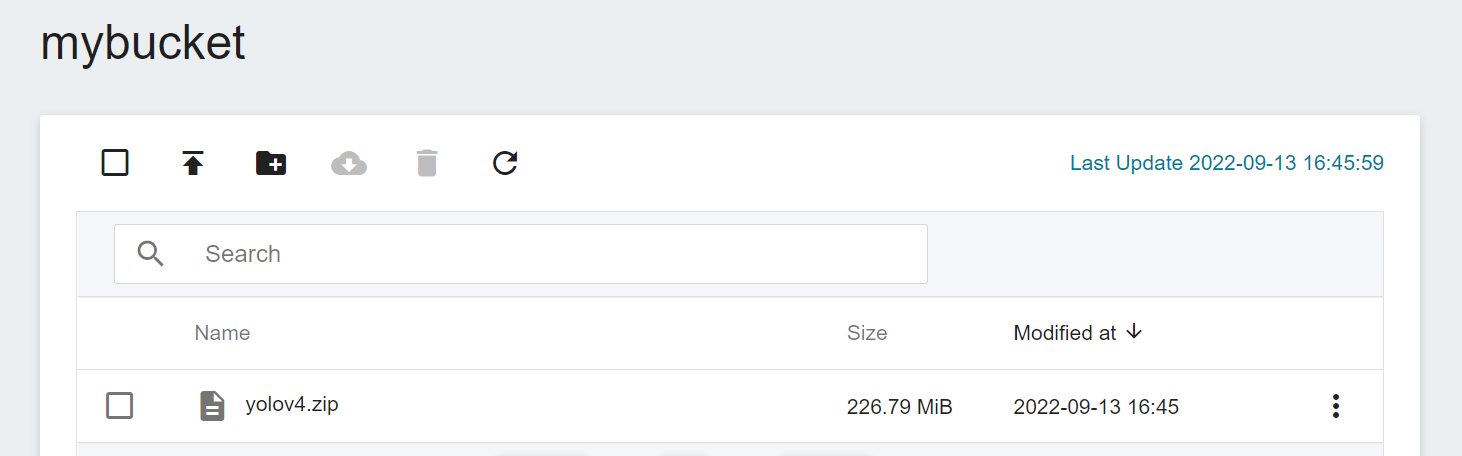
* After uploading the ZIP file of the trained model to the Storage Service, click the **Import** icon above to import the existing model.
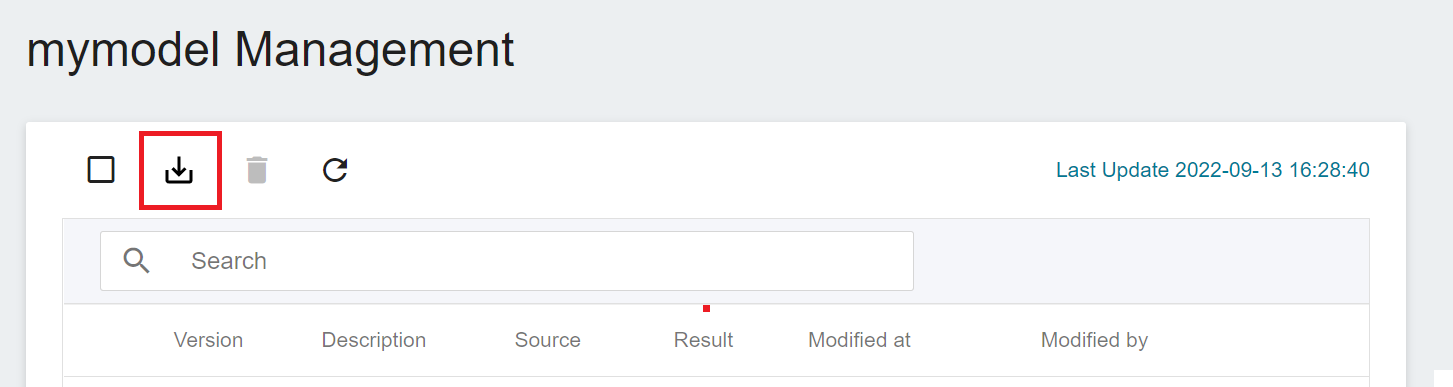
* After completing the **Import Model** settings, click **OK**.
- Model Name: This field value is automatically brought in.
- Version: Please input the model version, for example: yolov4.
- Desscriptions:Please input the model description,optional.
- Storage: Please select a stroage.
- Storage Subpath: Select the subpath of the storage where the model is stored.
- File Namer: Please enter the full filename of the ZIP archive of this model, for example: yolov4.zip.
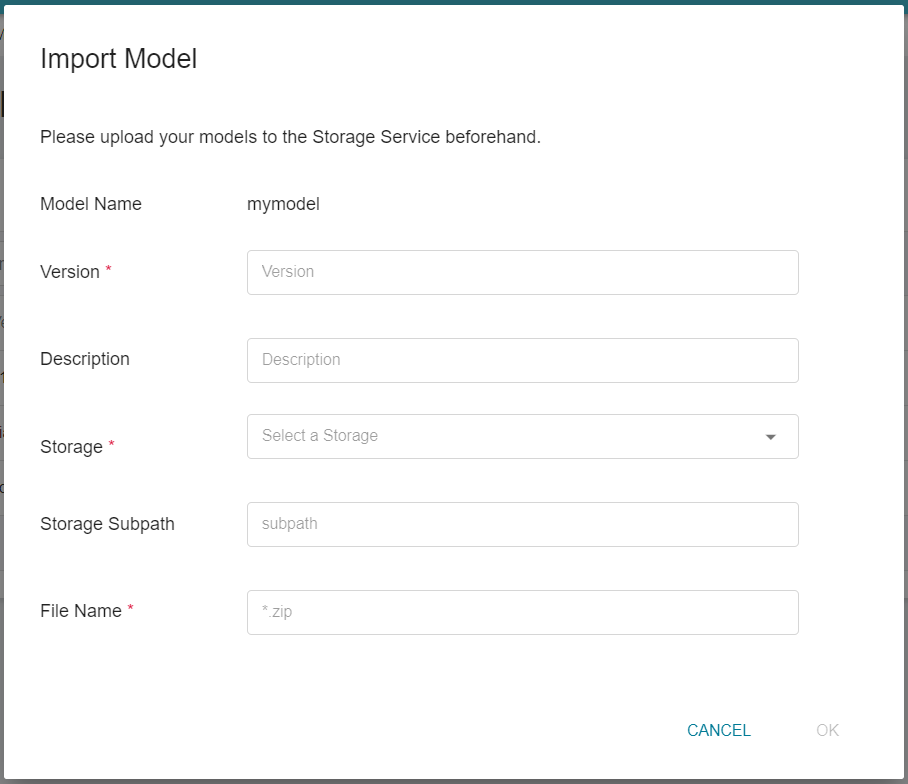
* It may take some time to import the model, you can click the Refresh icon above, and it will appear in the model version list after the import is successful.

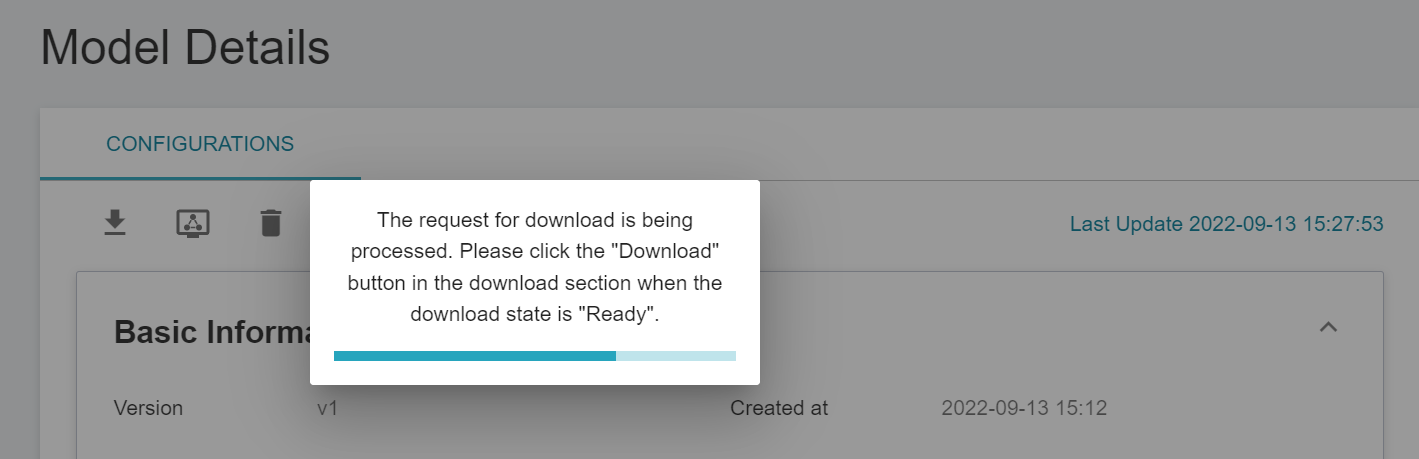
### Download the Model
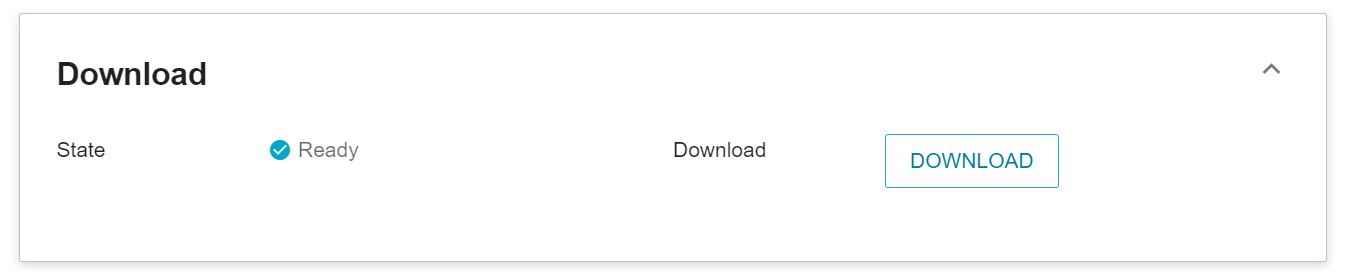
* On the **Model Details** page, click the **Download** icon above, and the system will first package the model into a ZIP file, and then provide the **Download** button.
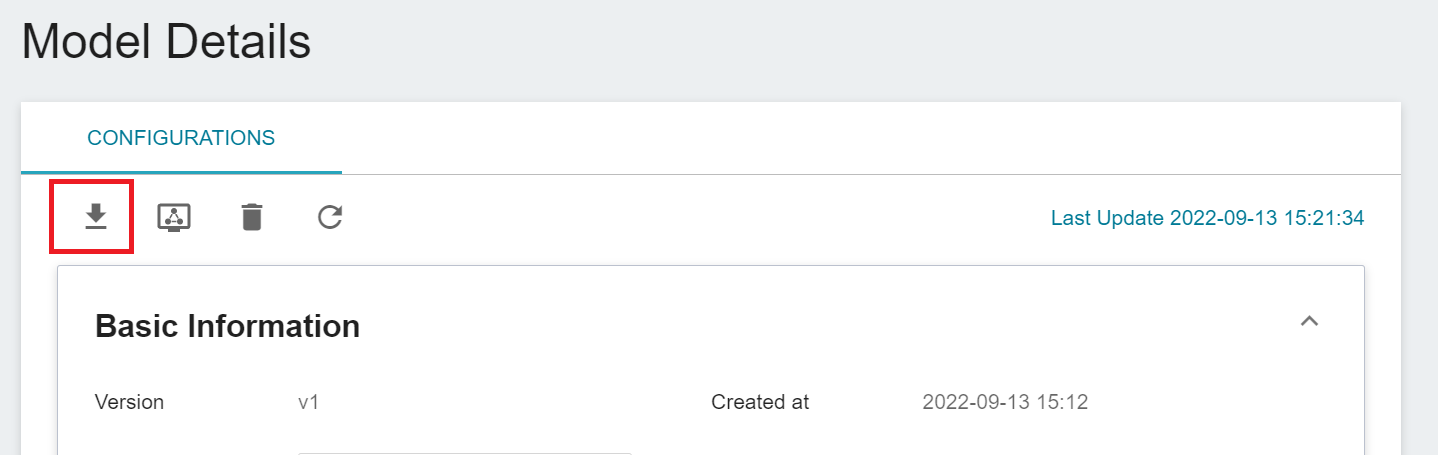
* Please follow the prompts on the page, wait for the status of **Download** to change to **`Ready`** and then click the **DOWNLOAD** button to get the ZIP file of the model.
## Inference
The inference feature makes it possible to deploy trained models to applications or services to perform inference.
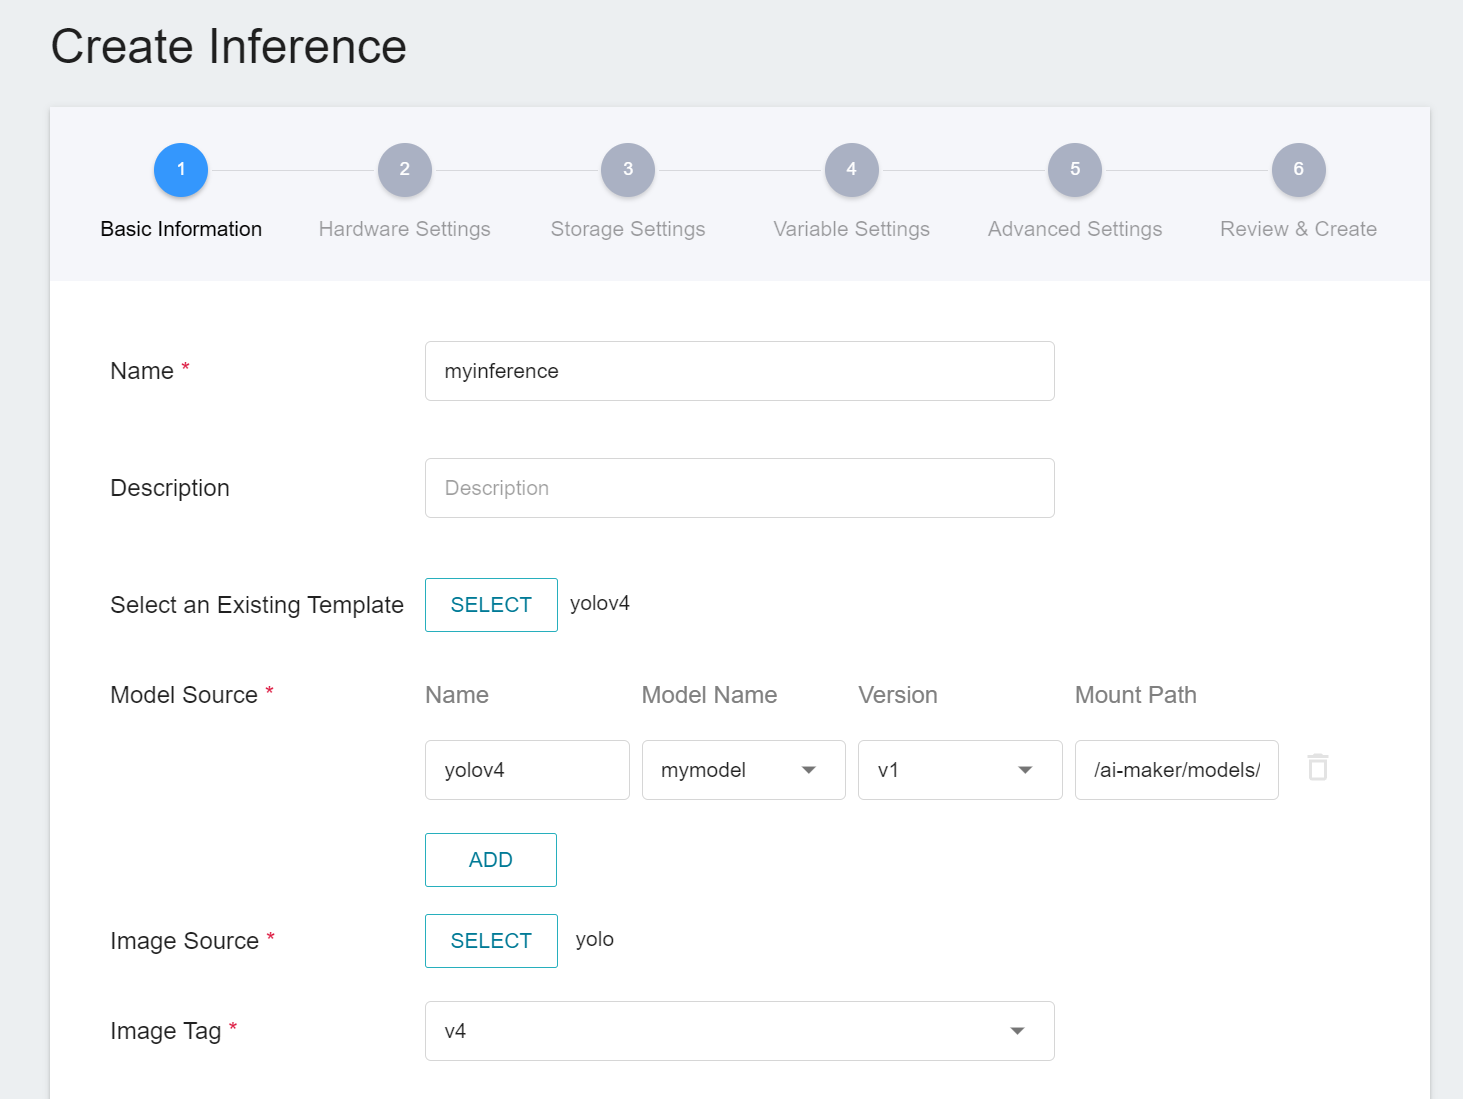
### Create Inference Tasks
* On the **Model Details** page, click the **Inference** icon above to create an inference for the model.
* You can also click **Inference** on the left, and then click **+CREATE**.

Complete the following settings:
#### 1. Basic Information
* Name: Set the name of the inference task.
* Description: Set a description for the inference task.
* Model source: Enter the model source name, model name, version and mount path. If you need multiple models for inference, click **ADD** to add other model sources.
* Select an Existing Template: Click **SELECT** to select a **PUBLIC** or **PRIVATE** template. The system will show the settings of the selected template, which can be directly applied or modified. You can also set it yourself if you prefer not to choose any.
* Image source: Click **SELECT** to select a **PUBLIC** or **PRIVATE** image.
* Image version: Select the image version.
Then click **NEXT: HARDWARE SETTINGS >**.
:::info
:bulb: **Tips:** Below is an example using the yolov4 template. New user of AI Maker can refer to the [**AI Maker Case Study - YOLOv4 Image Recognition Application**](/s/JyKyKQe1c).
:::
#### 2. Hardware Settings
* Select the appropriate hardware configuration according to your computing needs. You can also click **View Available Quota** to view the current resource quota and usage of your project, and then click **NEXT: STORAGE SETTINGS >**.
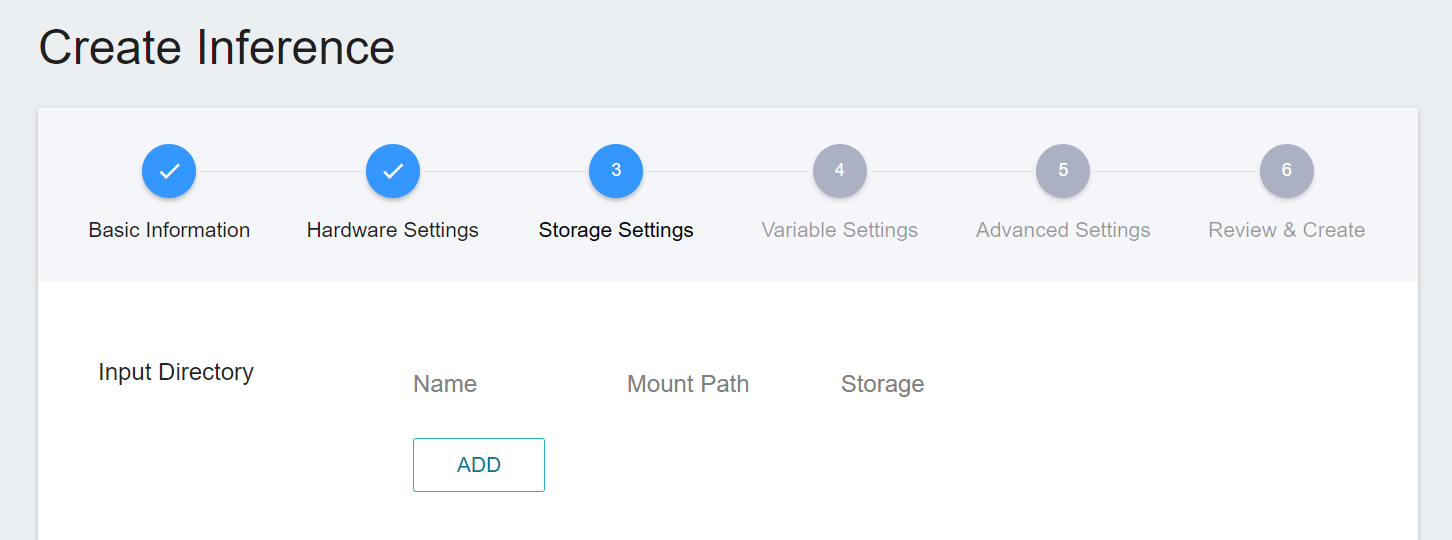
#### 3. Storage Settings
* Input directory: Click **ADD** to set the storage name, mount path or the path where the inference data is located. You can skip it if you like, and then click **Next: VARIABLE SETTINGS >**.
#### 4. Variable Settings
* Environment variables: Enter the name and value of the environment variables.
* Command: Enter the command or program name to be executed. For example: python $INPUT/app.py.
* Port: Set the port number of the inference service.
Click **Next: ADVANCED SETTINGS >** when finished.
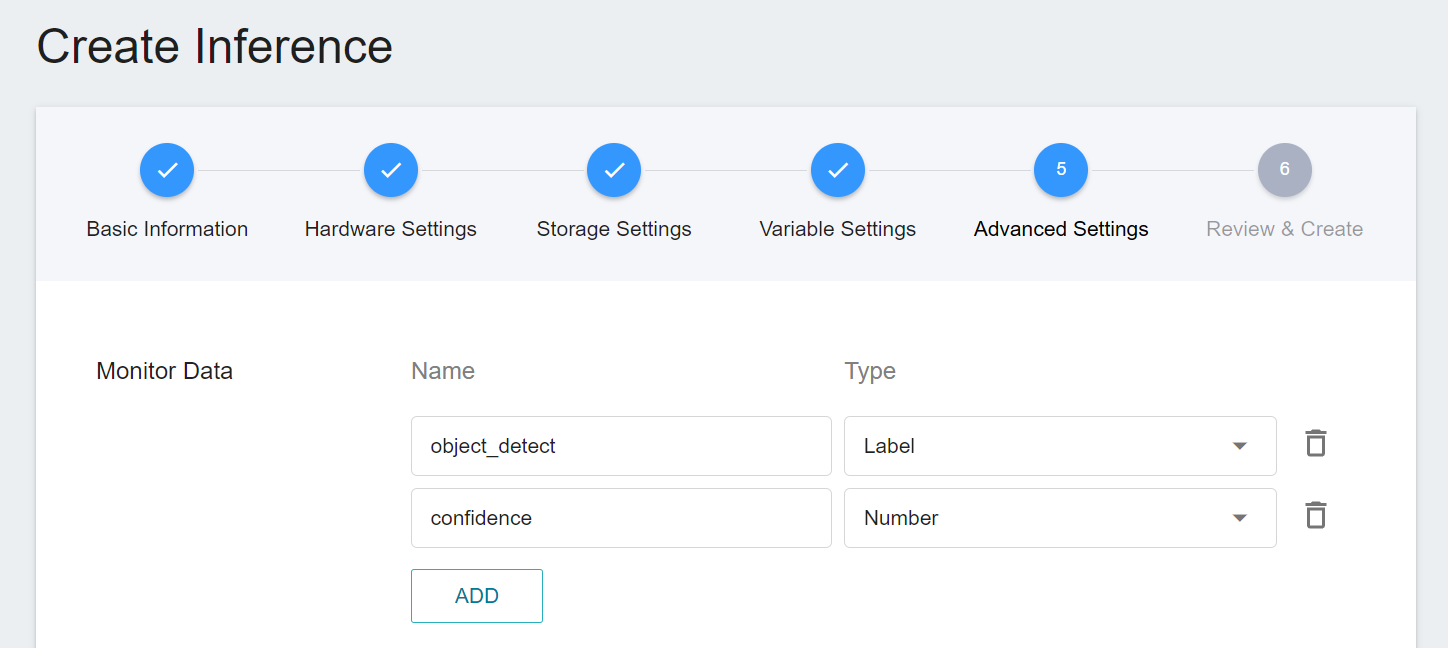
#### 5. Advanced Settings
* Monitor data: Click **ADD** to set the name and data type of the data to be monitored. You can skip it if you like, and click **NEXT: REVIEW & CREATE >**.
:::info
:bulb: **Tips:** The monitor data settings are related to your inference program. For related instructions, see [**Preparations > Send the Inference Results Back to AI Maker**](#32-Send-the-Inference-Results-Back-to-AI-Maker).
:::
#### 6. Review & Create
* Review the created inference task settings, and click **CREATE** after confirming.
### Inference Management
* After the inference task is created, it will appear at the top of the list. Click the list to enter the Inference Details page.
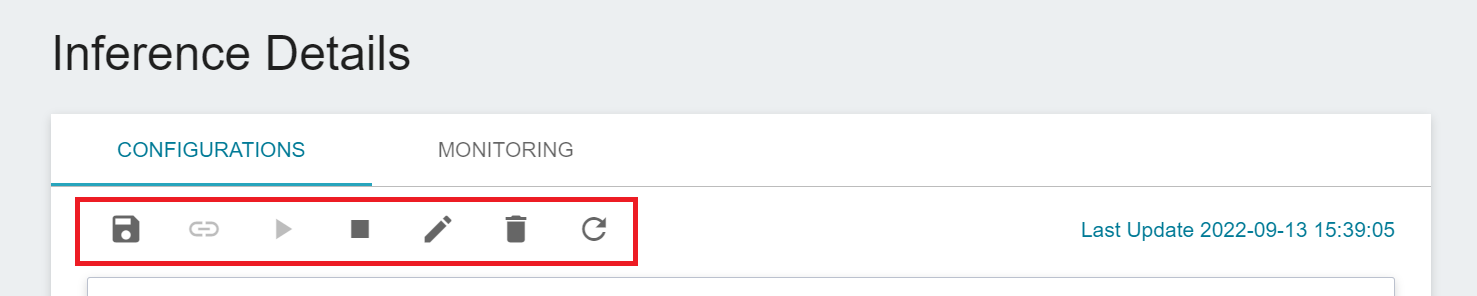
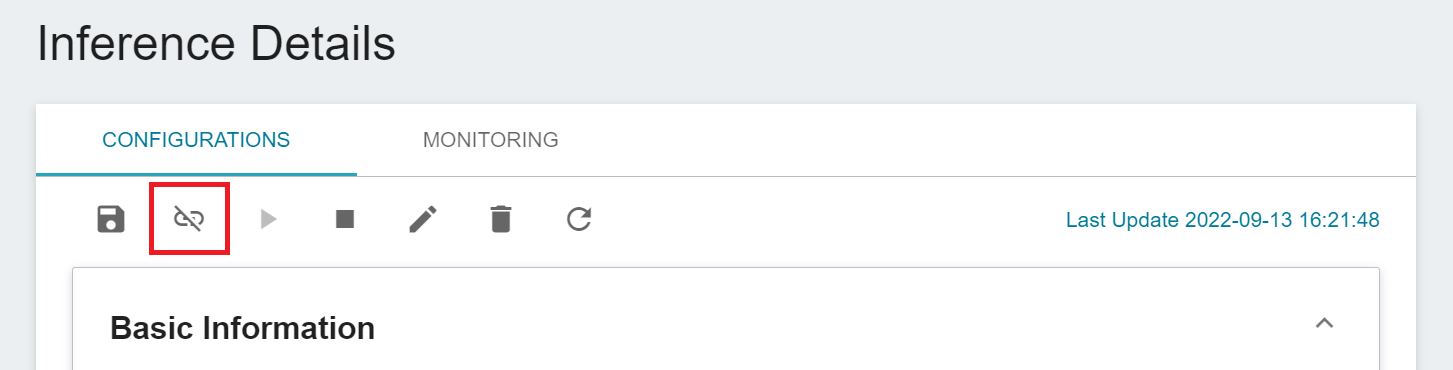
* On the Inference Details page, you can view the detailed settings of the inference task. Click the icon in the command bar to perform operations such as **Save**, **Connect to/Disconnect CVAT**, **Start**, **Stop**, **Edit**, **Delete** and **Refresh**, click **View Logs** to view the inference task running log.
### Perform Inference
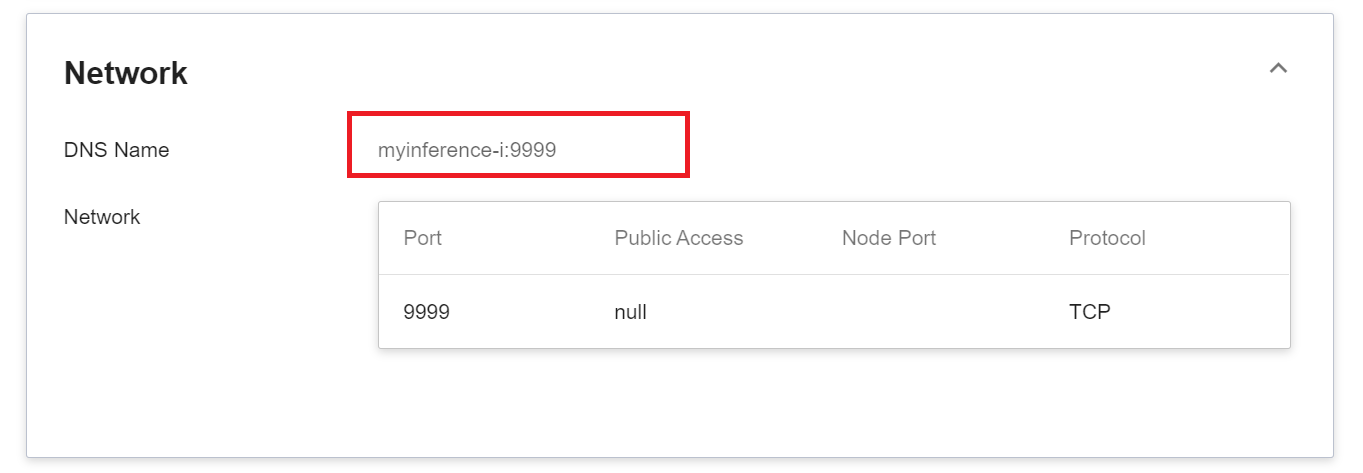
* When the state is displayed as **`Ready`** , you can connect to the inference service to perform inference, and the connection information will show the DNS name of the network block.
:::info
:bulb: **Tips:** The inference service is currently not externally accessible. If you need to provide external services, please create an external **Container Service** in the same project, and then connect to the inference service through the **DNS Name**. Please refer to the [**AI Maker Case Study**](/s/LiV2Pb1FB#Case-Study).
:::
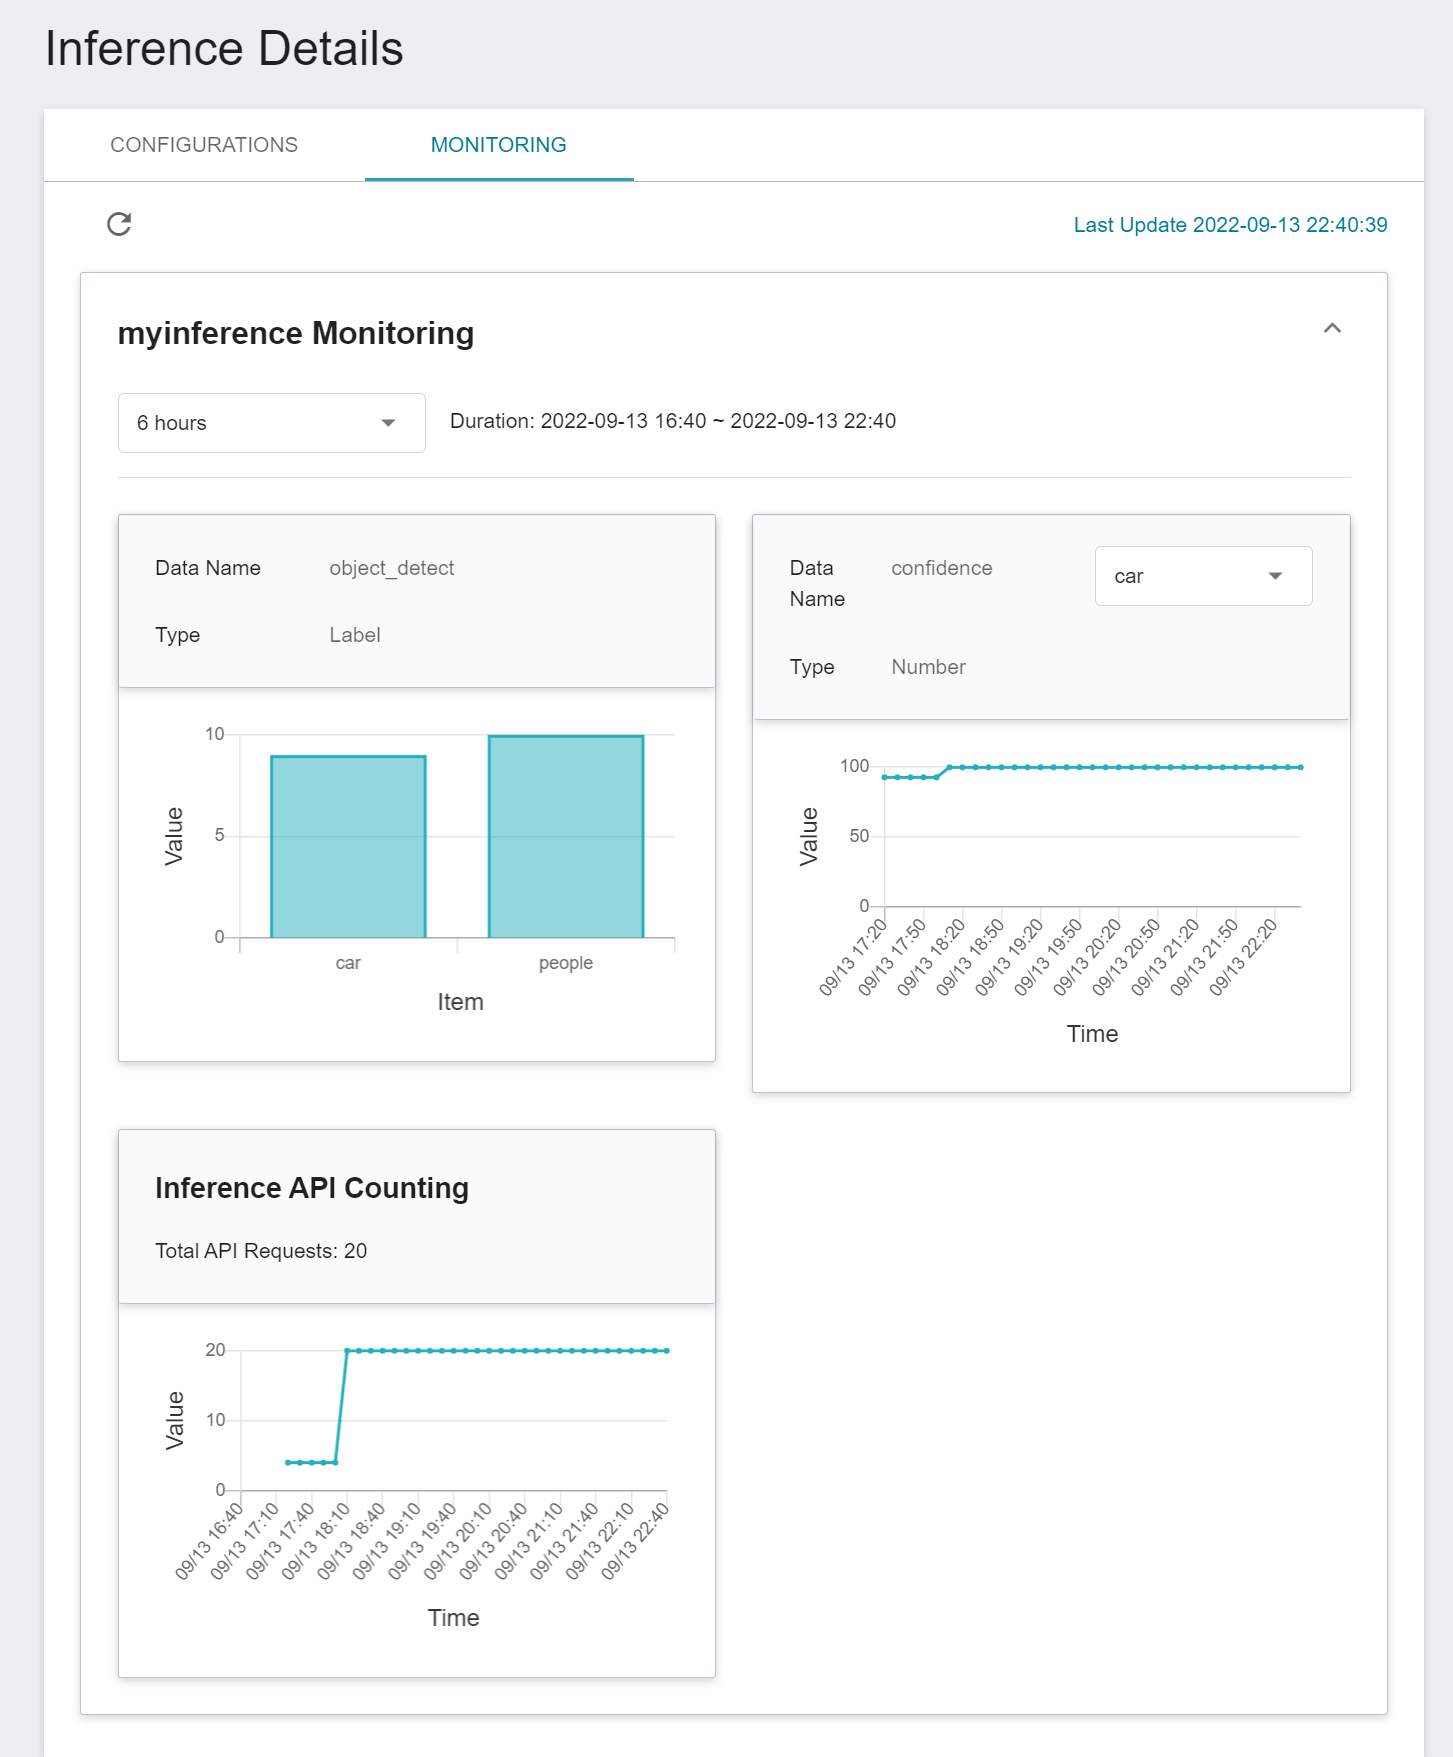
### Inference Monitoring
* Click **Monitor** above to view the monitoring information of the inference task and the inference API count.
:::info
:bulb: **Tips:** The presentation of the monitoring chart is related to your inference program and the advanced settings of the inference task. For related instructions, please refer to:
* [**Preparations > Send the Inference Results Back to AI Maker**](#32-Send-the-Inference-Results-Back-to-AI-Maker).
* [**Create Inference Tasks> Advanced Settings**](#5-Advanced-Settings).
:::
### Connect Inference Service to CVAT
If the inference service you created supports CVAT, you can connect the inference service to the CVAT annotation tool.
:::info
:bulb: **Tips:** Reference case studies
* [AI Maker Case Study - YOLOv4 Image Recognition Application](/s/JyKyKQe1c)
:::
#### Connect to CVAT
* Click **Inference** on the left menu bar to enter **Inference Management**, then click the inference task you want to connect to CVAT, enter the **Inference Details** page, and click the **Connect to CVAT** icon above.
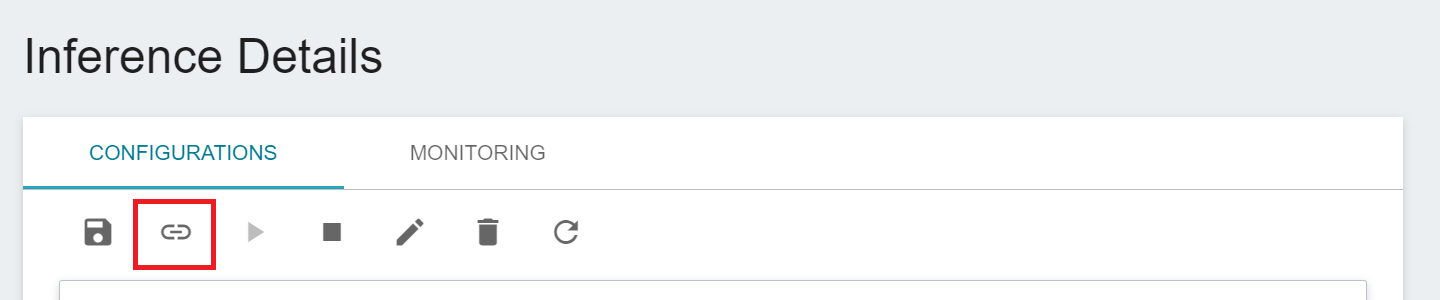
* You can also move the mouse to the more options icon on the right in the inference management list, and then click **Connect to CVAT**.
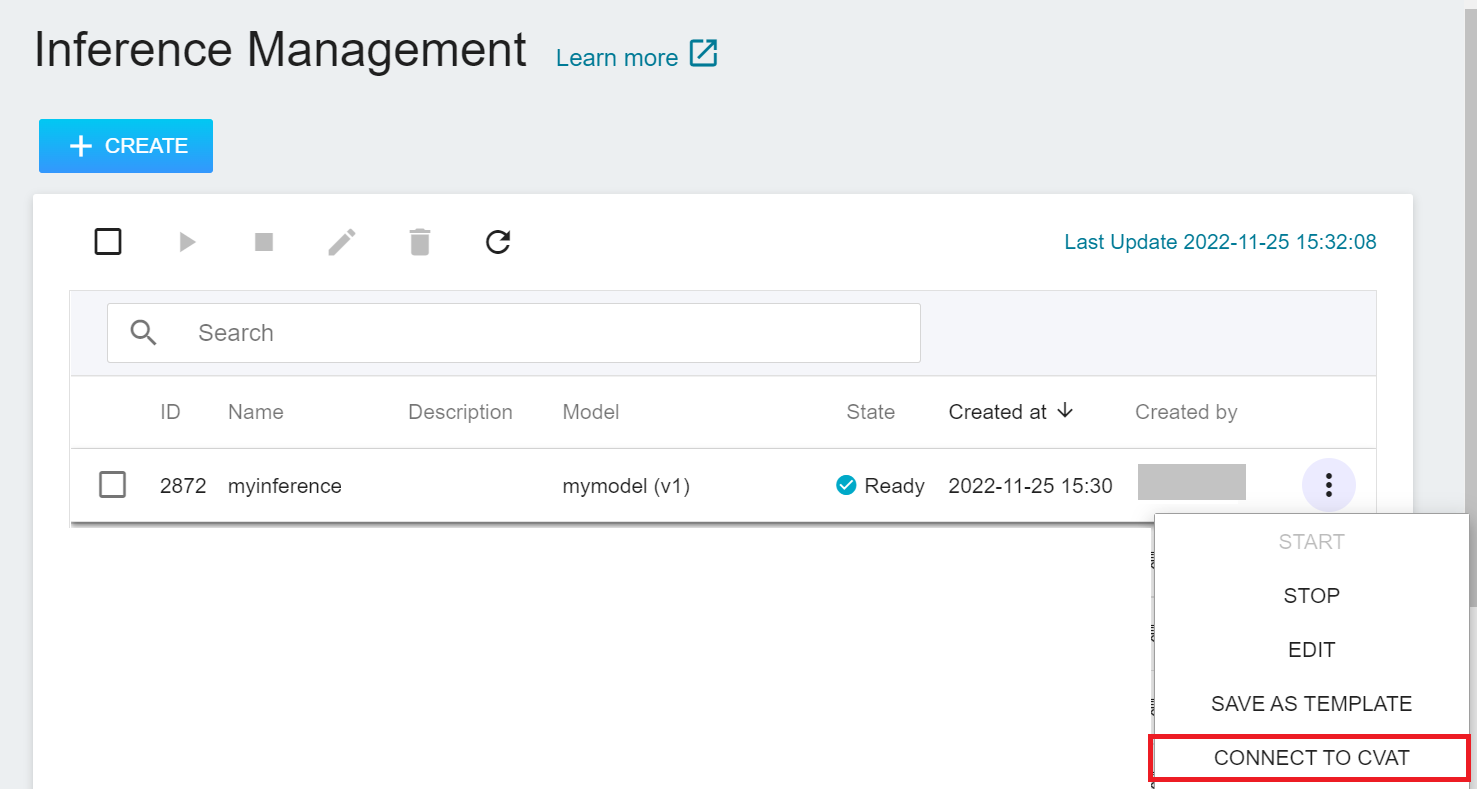
* Once successfully connected to CVAT, click **Annotation Tools** on the left menu bar to enter the CVAT service. The connected inference services will be listed at the bottom of the page. Click **OPEN** and log in to the CVAT service.
#### CVAT Automatic Annotation
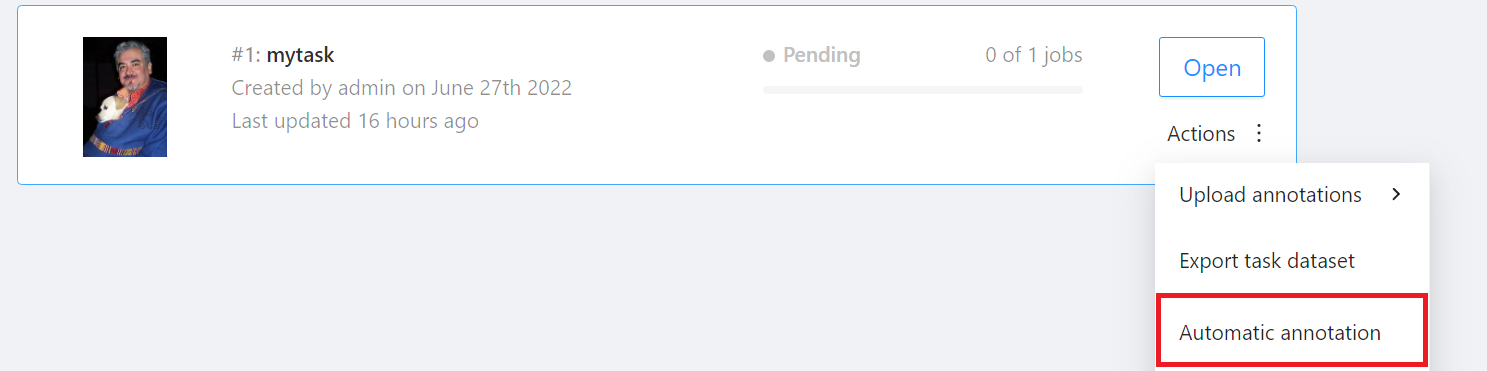
* Go to the **Tasks** page of the CVAT service, move the mouse to the more options icon of **Actions** on the right side of the task to be automatically annotated, and then click **Automatic annotation**.
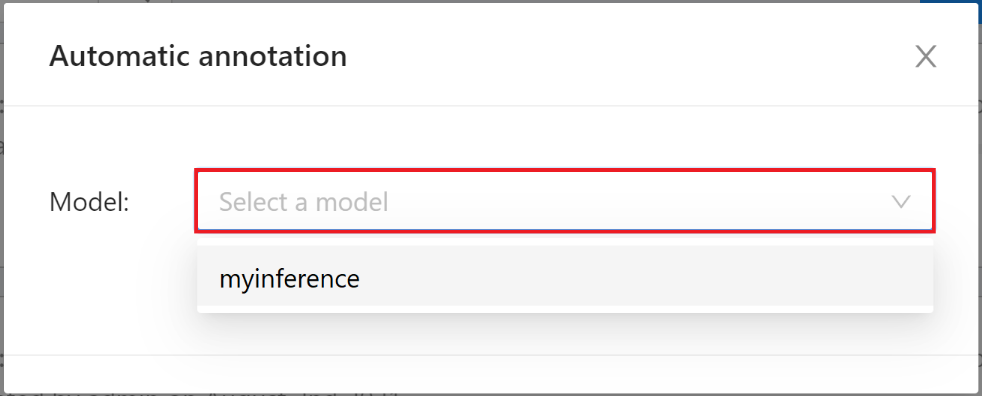
* On the **Automatic annotation** window that appears, click the **Model** drop-down menu and select the connected inference task model.
* Then set the model to correspond to the task Label, and finally click **Annotate** to perform automatic annotation.
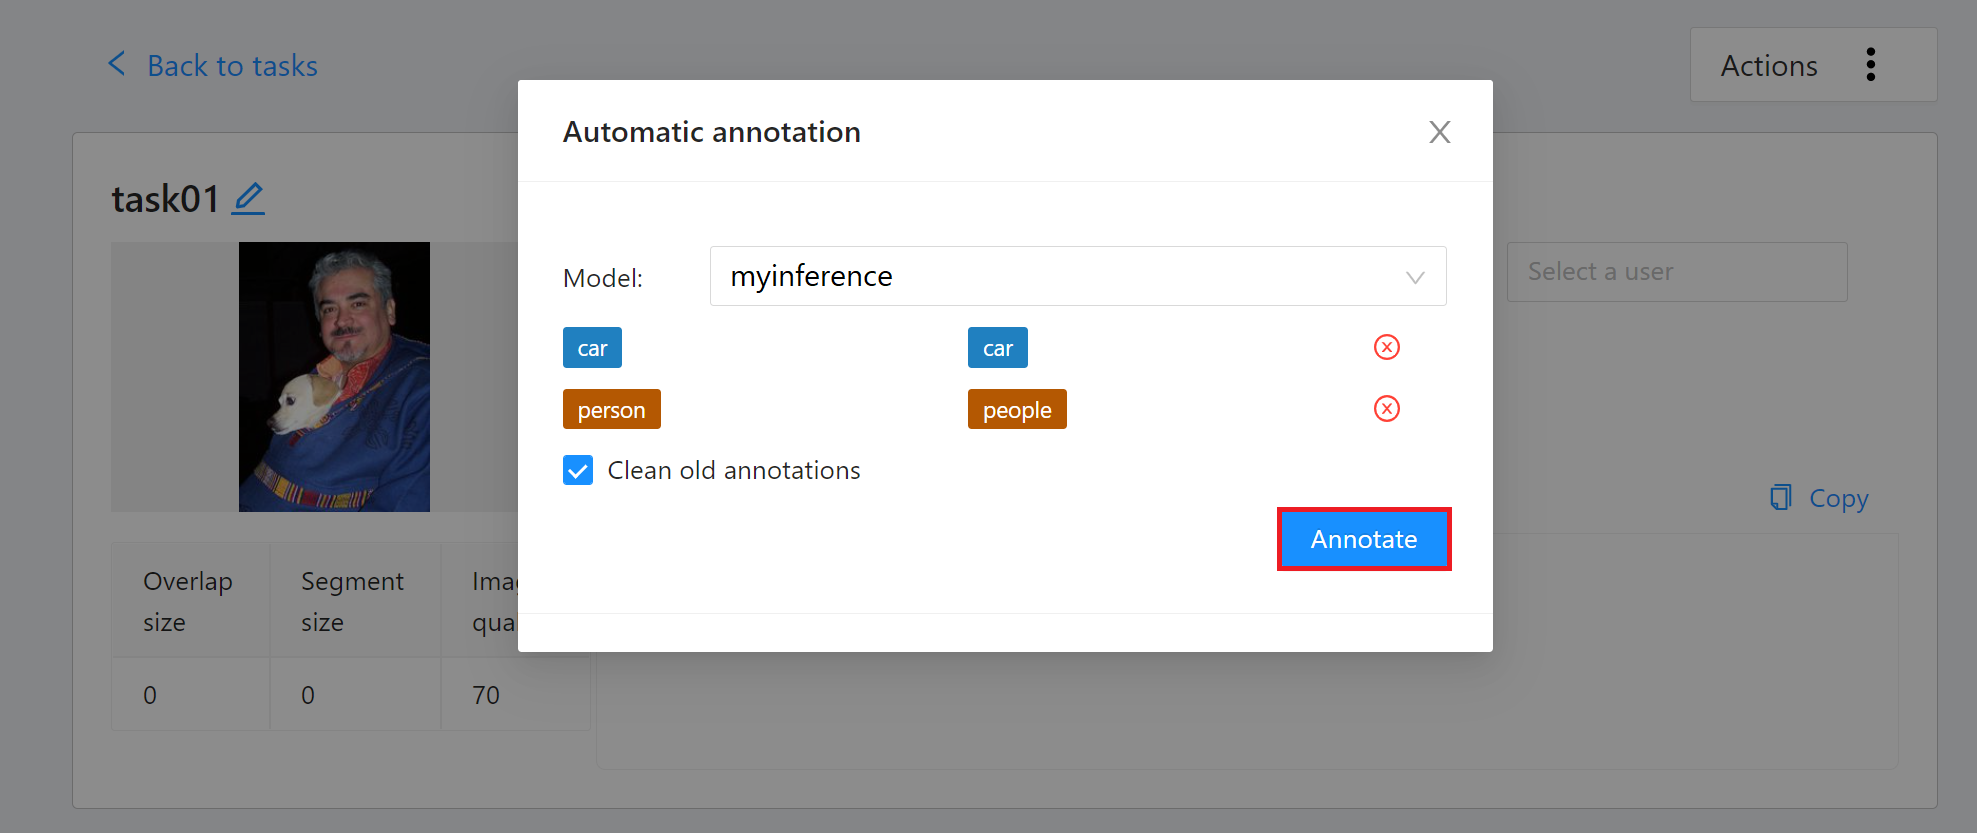
* After completion, a message will appear on the screen indicating that the annotation is completed.

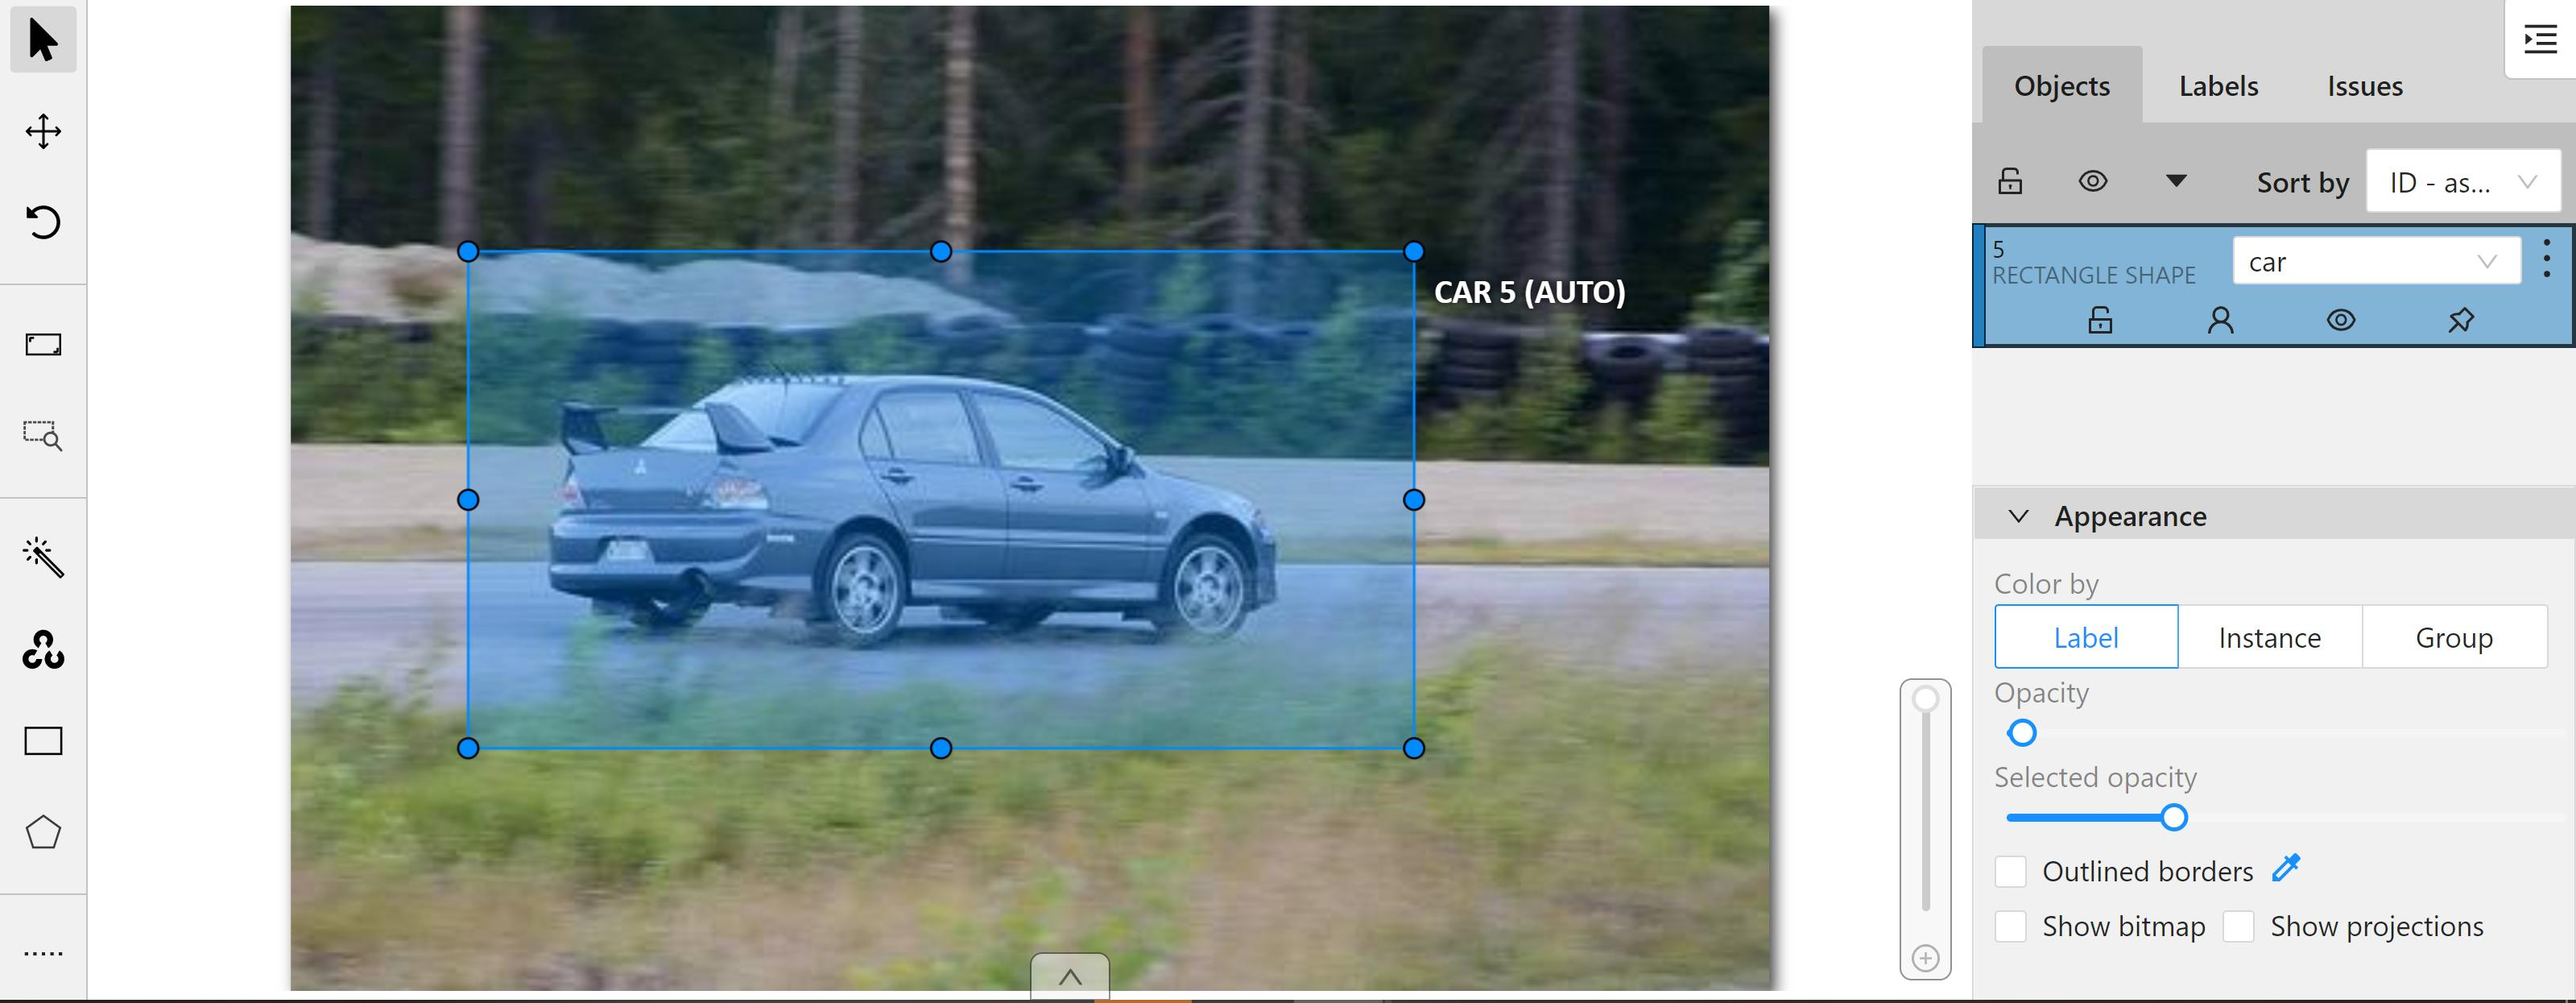
* After the annotation is completed, enter the CVAT Annotation Tools page to view the automatic annotation result. If you are not satisfied with the result, you can perform manual annotation correction or retrain and optimize the model.
#### Disconnect CVAT
* Go to the **Inference Details** page and click the **Disconnect CVAT** icon above. After successfully disconnecting CVAT, the top icon will change back to **Connect to CVAT**.
### Inference Service Resource Monitor
See the [**Resource Monitor**](/s/kaIfsskJb) documentation.
## [AI Maker Case Study](/s/LiV2Pb1FB#Case-Study)