---
title: AI Maker 案例教學 - CVAT 輔助推論模組實作
description: OneAI 文件
tags: 案例教學, CVAT
---
[OneAI 文件](/s/xKNcU3O5D)
# AI Maker 案例教學 - CVAT 輔助推論模組實作
[TOC]
## 1. 前言
AI Maker 整合了 CVAT(Computer Vision Annotation Tool)標註工具,可幫助您快速標註機器學習的訓練資料,或是將訓練好的模型透過推論服務與 CVAT 連結,進行自動標註。
在 [**AI Maker 案例教學 - YOLOv4 影像辨識應用**](/s/JyKyKQe1c) 範例中,我們學會了使用 AI Maker 訓練出自己的深度學習模型,並且將訓練出來的模型透過 AI Maker 提供 **`yolov4-cvat`** 推論範本,結合 CVAT 的自動標註功能,進行影像資料的輔助標註推論服務。本範例是一篇進階的教學,提供兩個 API 實作範例,說明如何以 YOLOv4 和 SiamMask 模型,實作串接 CVAT 輔助標註/自動標註的 API。
在開始學習本範例前,請先熟悉 AI Maker 及 CVAT(Computer Vision Annotation Tool)的基本操作,或是先閱讀下列的文件:
* [**容器映像檔**](/s/WAoPe4Au5)
* [**AI Maker > 推論服務**](/s/QFn7N5R-H#%E6%8E%A8%E8%AB%96)
* [**AI Maker 案例教學 - YOLOv4 影像辨識應用 > CVAT 輔助標註**](/s/JyKyKQe1c#6-CVAT-輔助標註)
* [**CVAT 官方文件**](https://opencv.github.io/cvat/docs/)
* [**CVAT GitHub**](https://github.com/opencv/cvat)
## 2. CVAT 輔助標註推論服務
CVAT 原生的模型部署功能是架構在 [**Nuclio**](https://nuclio.io/) 平台上,再實作其對應的 Serverless Functions。然而 [**建置 Nuclio 環境**](https://github.com/nuclio/nuclio/blob/development/docs/setup/k8s/getting-started-k8s.md) 以及 [**部署對應 Functions**](https://github.com/nuclio/nuclio/blob/development/docs/tasks/deploying-functions.md) 的步驟非常繁瑣且不友善。AI Maker 整合的 CVAT 標註工具改善了 CVAT 輔助標註在模型推論部署上的繁瑣操作,只要實作串接 CVAT 輔助標註推論服務的 API,即可透過 AI Maker 快速部署 CVAT 輔助標註推論服務。
### 2.1 架構說明
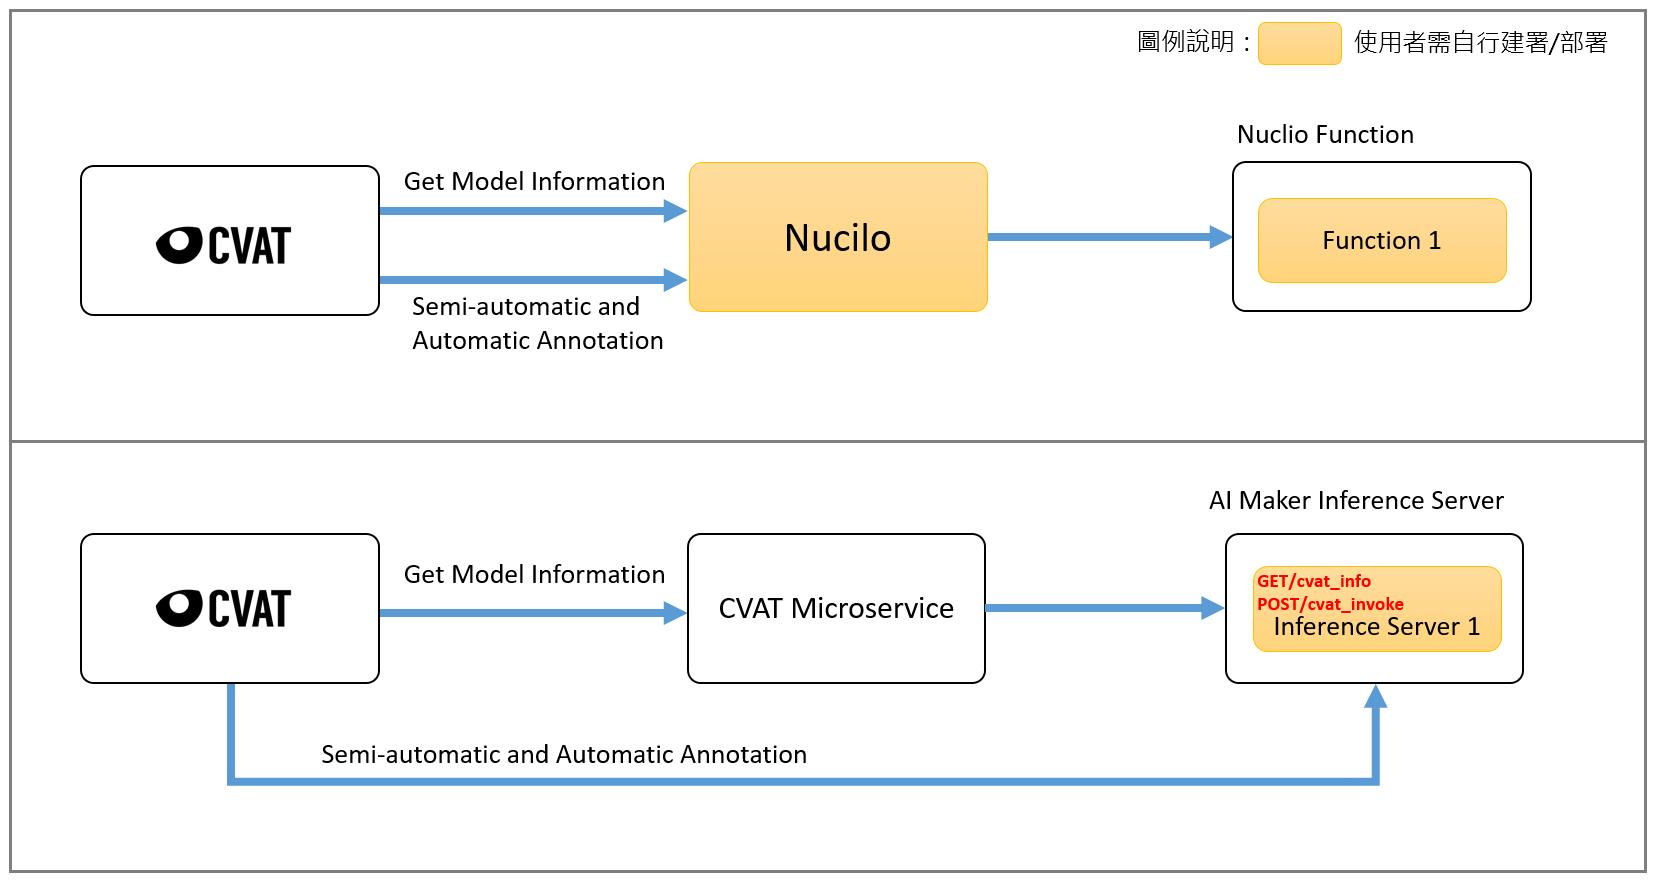
CVAT 輔助標註服務架構圖如下面所示,黃色方塊代表使用者要自行建置跟部署的功能,架構圖的上半部為原生 CVAT 與 Nuclio 平台,使用者需要建置 Nuclio 平台以及部署對應的 Functions;架構圖的下半部表示透過 AI Maker 整合 CVAT 的輔助標註及模型推論部署功能,使用者只需要部署對應的推論服務就可以串接 CVAT 的輔助標註服務。
:::info
:bulb: **提示:CVAT Microservice** 是內建於 AI Maker 中的微服務,其功能是 CVAT 與推論服務的橋樑,使 AI Maker 內建的 CVAT 可以查詢模型資訊以及讓 AI Maker 的推論服務串接 CVAT 的輔助標註/自動標註功能。
:::
### 2.2 API 說明
從上面的架構圖中可以看到要串接 CVAT 輔助標註與 AI Maker 推論服務有兩個 API 需要使用者自行實作:**`cvat_info`** 以及 **`cvat_invoke`**,以下將說明這兩個 API 的實作。
| API 名稱 | 說明 |
|-----|------------|
| **cvat_info** |定義模型的資訊,需要填寫 framework、type、description 及 spec 的資訊,CVAT 在查詢 Model 資訊時會呼叫此 API,如圖所示。 <br> <br> 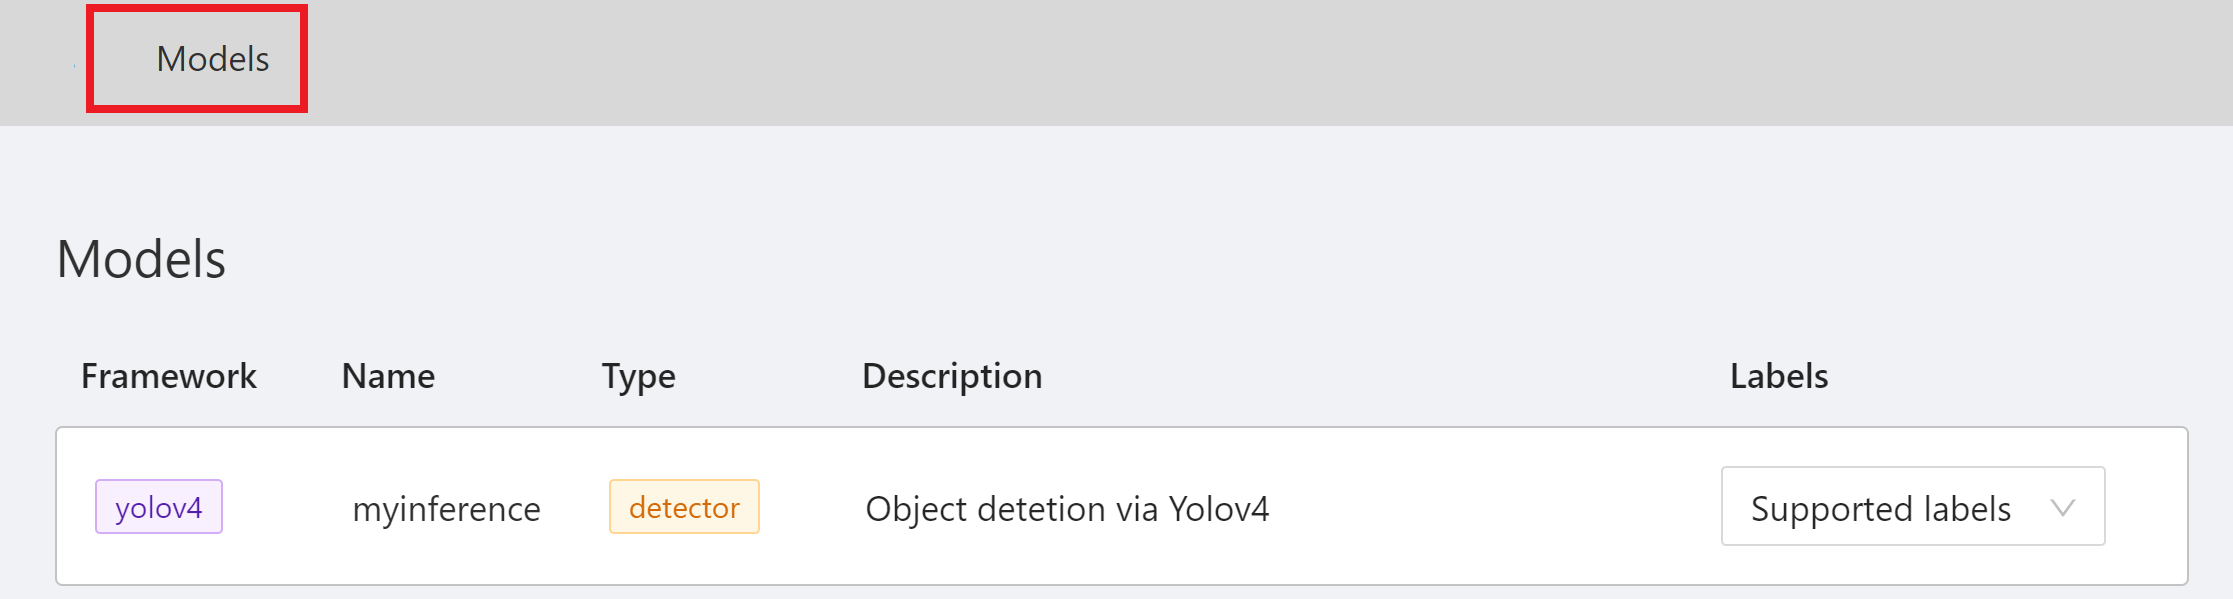
| **cvat_invoke** |實作推論的結果,CVAT 在執行 **輔助標註以及自動標註** 時會呼叫此 API。CVAT 會透過 HTTP POST Method 傳送一張經過 Base64 編碼的圖片,我們需要實作且回傳推論的結果給 CVAT,回傳的資料類型會依在定義模型的資訊中所填寫的 type 而不同,詳細資訊將會在下面的章節中介紹。
關於 **cvat_info** 需要實作模型的資訊,說明如下:
| 名稱 |說明 |
|-----|------------|
|framework|模型的框架。
|type|定義模型的辨識任務,有四種類型,詳細說明請參考括號中的連結。<br>**detector** - 用於自動標註(CVAT 的 [detectors](https://opencv.github.io/cvat/docs/manual/advanced/ai-tools/#detectors) 以及 [automatic annotation](https://opencv.github.io/cvat/docs/manual/advanced/automatic-annotation/))<br>**interactor** - 用於外框的輔助標註(CVAT 的 [interactors](https://opencv.github.io/cvat/docs/manual/advanced/ai-tools/#interactors)) <br>**tracker** - 用於追蹤的輔助標註(CVAT 的 [trackers](https://opencv.github.io/cvat/docs/manual/advanced/ai-tools/#trackers) )<br>**reid** - 用於行人重識別標註(CVAT 的 [automatic annotation](https://opencv.github.io/cvat/docs/manual/advanced/automatic-annotation/))
|description| 模型的說明描述。
|spec| 條列出所支援的標籤(當模型 type 為 detector 才需要填寫,若是其他 type 則此欄位請填 None)。
下表為常用的模型在 CVAT 中對應的 Type,更多資訊請參考 [**CVAT GitHub**](https://github.com/opencv/cvat#deep-learning-serverless-functions-for-automatic-labeling)。
| 名稱 |Type|
|-----|------------|
|Deep Extreme Cut|interactor
|Faster RCNN | detector
|Mask RCNN| detector
|YOLO v3/v4| detector
|Object reidentification|reid
|Semantic segmentation for ADAS|detector
|Text detection v4|detector
|SiamMask|tracker
|f-BRS|interactor
|HRNet|interactor
|Inside-Outside Guidance|interactor
|RetinaNet|detector
## 3. 範例一:Detector API
範例一將以 Yolov4 模型,實作串接 CVAT 自動標註的 Detector API,在開始前建議您先閱讀 [**AI Maker 案例教學 - YOLOv4 影像辨識應用 > CVAT 輔助標註**](/s/JyKyKQe1c#6-CVAT-輔助標註)。
<center>自動標註示意圖</center>
### 3.1 API 範例
下面以 Yolov4 模型實作 Detector API 為例,展示 cvat_info 及 cvat_invoke 這兩個 API 輸入資料以及需要回傳的資料結構。
**Request**
* URL: GET /cvat_info
**Response**
* Body:
```json=
HTTP/1.1 200 OK
{
"framework":"yolov4",
"spec":[
{ "id": 0, "name": "people" },
{ "id": 1, "name": "cat"}
],
"type": "detector",
"description":"Object detection via Yolov4"
}
```
**Request**
* URL: POST /cvat_invoke
* Body:
```json=
{
"image":"base64_encode_image"
}
```
**Response**
* Body:
```json=
HTTP/1.1 200 OK
[
{
"label": "people",
"points": [
286,
751,
432,
903
],
"type": "rectangle"
},
{
"label": "cat",
"points": [
69,
1112,
331,
1175
],
"type": "rectangle"
}
]
```
### 3.2 API 範例程式碼
本章節中提供 Detector 的範例程式,示範如何使用 **Python Flask** 輕量級的網頁框架實作 cvat_info 以及 cvat_invoke 這兩個 API。
本範例以 [**YOLOv4**](https://github.com/AlexeyAB/darknet) 為例,實作 Detector 的 API 程式,說明如下:
:::spoiler **範例程式碼:`main.py`**
```python=
# -*- coding: utf-8 -*-
import base64
from flask import Flask, request, jsonify
import logging
import json
from model_handler import ModelHandler
app = Flask(__name__)
logger = logging.getLogger('flask.app')
model_handler = ModelHandler()
model_handler.init()
@app.route('/cvat_info', methods=['GET'])
def cvat_info():
labels = model_handler.label()
resp = {
"framework": "yolov4",
"type": "detector",
"spec": labels,
"description": "Object detection via Yolov4"
}
return resp
@app.route('/cvat_invoke', methods=['POST'])
def cvat_invoke():
data = request.get_json()
img = base64.b64decode(data['image'].encode('utf8'))
detections = model_handler.detection(img)
results = []
for detection in detections:
obj_class = detection[0]
bbox = detection[2]
left, top, right, bottom = model_handler.bbox2points(bbox)
points = [left, top, right, bottom]
results.append({
"label": obj_class,
"points": points,
"type": "rectangle"
})
body=json.dumps(results)
return body
if __name__ == "__main__":
app.run(host="0.0.0.0", debug=True, port=9999)
```
:::
* 第 10 ~ 11 行:模型的初始化。
* 第 13 ~ 22 行:實作 cvat_info 這個 API,定義模型資訊並將這些資訊以 JSON 格式回傳。
* 第 24 ~ 41 行:實作 cvat_invoke 這個 API,主要是接收經過 Base64 編碼的圖片,將其解碼並輸入 YOLOv4 Model 做辨識,並將辨識出的資料包成 JSON 格式回傳。
:::spoiler **範例程式碼:`model_handler.py`**
```python=
import os
import glob
import random
import time
import shutil
import cv2
import numpy as np
import darknet
YOLO_SUB_FOLDER = os.environ.get('YOLO_SUB_FOLDER', 'yolov4')
YOLO_NAMES_FILENAME = os.environ.get('YOLO_NAMES_FILENAME', 'dataset.names')
YOLO_DATA_FILENAME = os.environ.get('YOLO_DATA_FILENAME', 'dataset.data')
YOLO_CFG_FILENAME = os.environ.get('YOLO_CFG_FILENAME', 'yolo.cfg')
YOLO_WEIGHTS_FILENAME = os.environ.get('YOLO_WEIGHTS_FILENAME', 'yolo_final.weights')
AIMAKER_FOLDER = os.environ.get('AI_MAKER_FOLDER', '/ai-maker/models/')
ORI_PATH = AIMAKER_FOLDER + YOLO_SUB_FOLDER
DST_PATH = "/output/" + "yolov4"
SEPARATE = "/"
EndLine = "\n"
DARKNET_NAME = DST_PATH + SEPARATE + YOLO_NAMES_FILENAME
DARKNET_DATA = DST_PATH + SEPARATE + YOLO_DATA_FILENAME
DARKNET_CFG = DST_PATH + SEPARATE + YOLO_CFG_FILENAME
DARKNET_WEIGHTS = ORI_PATH + SEPARATE + YOLO_WEIGHTS_FILENAME
class ModelHandler:
def __init__(self):
self.weights = DARKNET_WEIGHTS
self.config_file = DARKNET_CFG
self.data_file = DARKNET_DATA
self.name_file = DARKNET_NAME
self.batch_size = 1
self.thresh = 0.3
self.network = None
self.class_names = None
self.class_colors = None
def copyFile(self):
print("copy:--------------------", flush=True)
fileNames = [
YOLO_DATA_FILENAME,
YOLO_NAMES_FILENAME,
YOLO_CFG_FILENAME
]
for fileName in fileNames:
src = ORI_PATH + SEPARATE + fileName
dst = DST_PATH + SEPARATE + fileName
shutil.copyfile(src, dst)
def createFolder(self):
dirs = [
DST_PATH,
]
for dir in dirs:
if not os.path.exists(dir):
os.makedirs(dir)
else:
print(dir + 'already exist')
def updateNameInData(self):
src = DST_PATH + SEPARATE + YOLO_DATA_FILENAME
labelPath = DST_PATH + SEPARATE + YOLO_NAMES_FILENAME
dst = src + ".bak"
key = "names"
with open(src, 'r', encoding='utf-8') as f:
with open(dst, 'w', encoding='utf-8') as f2:
for line in f.readlines():
find = line.startswith(key, 0, len(key))
if (find):
line = key + "=" + labelPath + EndLine
f2.write(line)
os.remove(src)
os.rename(dst, src)
def init(self):
self.createFolder()
self.copyFile()
self.updateNameInData()
self.network, self.class_names, self.class_colors = darknet.load_network(
self.config_file,
self.data_file,
self.weights,
batch_size=self.batch_size)
self.width = darknet.network_width(self.network)
self.height = darknet.network_height(self.network)
def image_detection(self, data):
npimg = np.frombuffer(data,'u1')
source = cv2.imdecode(npimg, cv2.COLOR_BGR2RGB)
img_height, img_width, channels = source.shape
darknet_image = darknet.make_image(img_width, img_height, 3)
darknet.copy_image_from_bytes(darknet_image, source.tobytes())
detections = darknet.detect_image(self.network, self.class_names, darknet_image, self.thresh)
darknet.free_image(darknet_image)
return detections
def detection(self,img):
detections = self.image_detection(img)
return detections
def bbox2points(self,bbox):
"""
From bounding box yolo format
to corner points cv2 rectangle
"""
x, y, w, h = bbox
xmin = int(round(x - (w / 2)))
xmax = int(round(x + (w / 2)))
ymin = int(round(y - (h / 2)))
ymax = int(round(y + (h / 2)))
return xmin, ymin, xmax, ymax
def label(self):
index = 0
labels = []
for line in open(self.name_file):
labels.append({"id":index,"name":line.rstrip('\n')})
index = index +1
return labels
```
:::
* 主要是負責模型的載入以及實作模型的推論。
### 3.3 建立及上傳容器映像檔
前面的章節中我們介紹實作 CVAT 輔助標註在模型推論部署的程式範例,接著需把程式包裝成 **容器映像檔** 以便部署到 AI Maker 的推論服務。
以下提供建立 Detector API 容器映像檔的 Dockerfile,請您將對應的範例程式(`main.py` 及 `model_handler.py`)和 Dockerfile 放在同一個資料夾中,再使用 **`docker build`** 指令建立容器映像檔並將建立好的容器映像檔上傳,詳細操作請參閱 [**容器映像檔說明文件**](/s/WAoPe4Au5)。
:::spoiler **Detector Dockerfile**
```dockerfile=
From nvidia/cuda:11.0.3-cudnn8-devel-ubuntu18.04
ENV PATH "/root/miniconda3/bin:${PATH}"
RUN apt update \
&& apt install -y --no-install-recommends \
wget \
git \
ca-certificates \
libglib2.0-0 \
libsm6 \
libxrender1 \
libxext6 \
vim \
&& rm -rf /var/lib/apt/lists/*
RUN wget https://repo.continuum.io/miniconda/Miniconda3-latest-Linux-x86_64.sh \
&& chmod +x Miniconda3-latest-Linux-x86_64.sh && ./Miniconda3-latest-Linux-x86_64.sh -b \
&& rm -f Miniconda3-latest-Linux-x86_64.sh
RUN conda create -y -n yolov4 python=3.6
# Override default shell and use bash
SHELL ["conda", "run", "-n", "yolov4", "/bin/bash", "-c"]
RUN pip install flask \
Cython \
colorama \
numpy \
requests \
fire \
matplotlib \
numba \
scipy \
h5py \
pandas \
tqdm \
opencv_python==3.4.8.29 \
&& conda install -y gcc_linux-64
RUN git clone https://github.com/AlexeyAB/darknet.git
WORKDIR /darknet
RUN sed -i 's/LIBSO=0/LIBSO=1/g' Makefile
RUN make
COPY main.py /darknet/
COPY model_handler.py /darknet/
ENTRYPOINT ["conda", "run","--no-capture-output", "-n", "yolov4", "python", "-u","/darknet/main.py"]
```
:::
### 3.4 模型準備
若您是使用 yolov4 範本所訓練出來的模型請跳過此步驟;如果您使用自己的 YOLOv4 模型檔案或是從其他來源取得的模型檔案(例如:[**YOLOv4 model zoo**](https://github.com/AlexeyAB/darknet/wiki/YOLOv4-model-zoo)),此處以 YOLOv4 的 COCO 預訓練模型為例,請依照下列步驟準備模型。
1. 下載模型相關的檔案
* 點此下載 [**yolov4.cfg**](https://drive.google.com/open?id=1hSrVqiEbuVewEIVU4cqG-SqJFUNTYmIC)
* 點此下載 [**yolov4.weights**](https://drive.google.com/open?id=1L-SO373Udc9tPz5yLkgti5IAXFboVhUt)
* 點此下載 [**coco.names**](https://raw.githubusercontent.com/AlexeyAB/darknet/master/cfg/coco.names)
* 點此下載 [**coco.data**](https://raw.githubusercontent.com/AlexeyAB/darknet/master/cfg/coco.data)
2. 修改對應的檔案名稱
* yolov4.cfg 請重新命名為 yolo.cfg
* coco.names 請重新命名為 dataset.names
* coco.data 請重新命名為 dataset.data
* yolov4.weights 請重新命名為 yolo_final.weights
3. 壓縮檔案並上傳
* 新增一個為 yolov4 的資料夾。
* 將上述四個檔案放到 yolov4 資料夾並且壓縮成 ZIP 檔,資料夾結構如下:
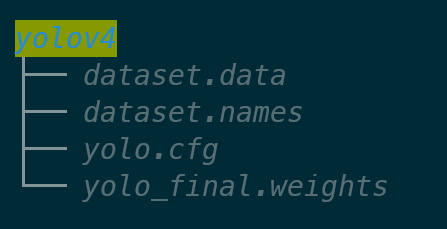
* 接著將此 ZIP 檔上傳至 OneAI 的「**儲存服務**」中,再到 AI Maker 的模型管理滙入此模型,詳細步驟請參考 [**AI Maker 滙入模型說明**](/s/QFn7N5R-H#匯入模型)。
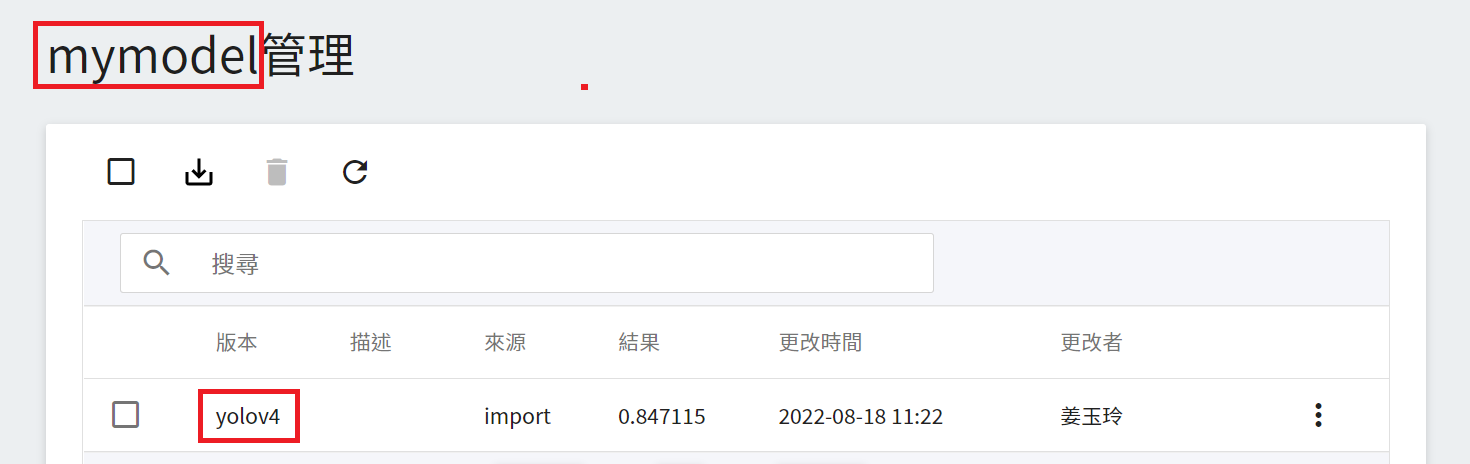
* 模型滙入完成後,請記住模型名稱和版本,接下來會以此模型部署推論服務。
### 3.5 部署推論服務
完成推論映像檔及模型的準備工作後,接著就可以部署到 AI Maker 的推論服務。在建立推論服務時需選擇您的模型和此映像檔,我們僅針對部分重要的設定加以說明,其他步驟請參閱 [**建立推論任務說明文件**](/s/QFn7N5R-H#建立推論任務)。
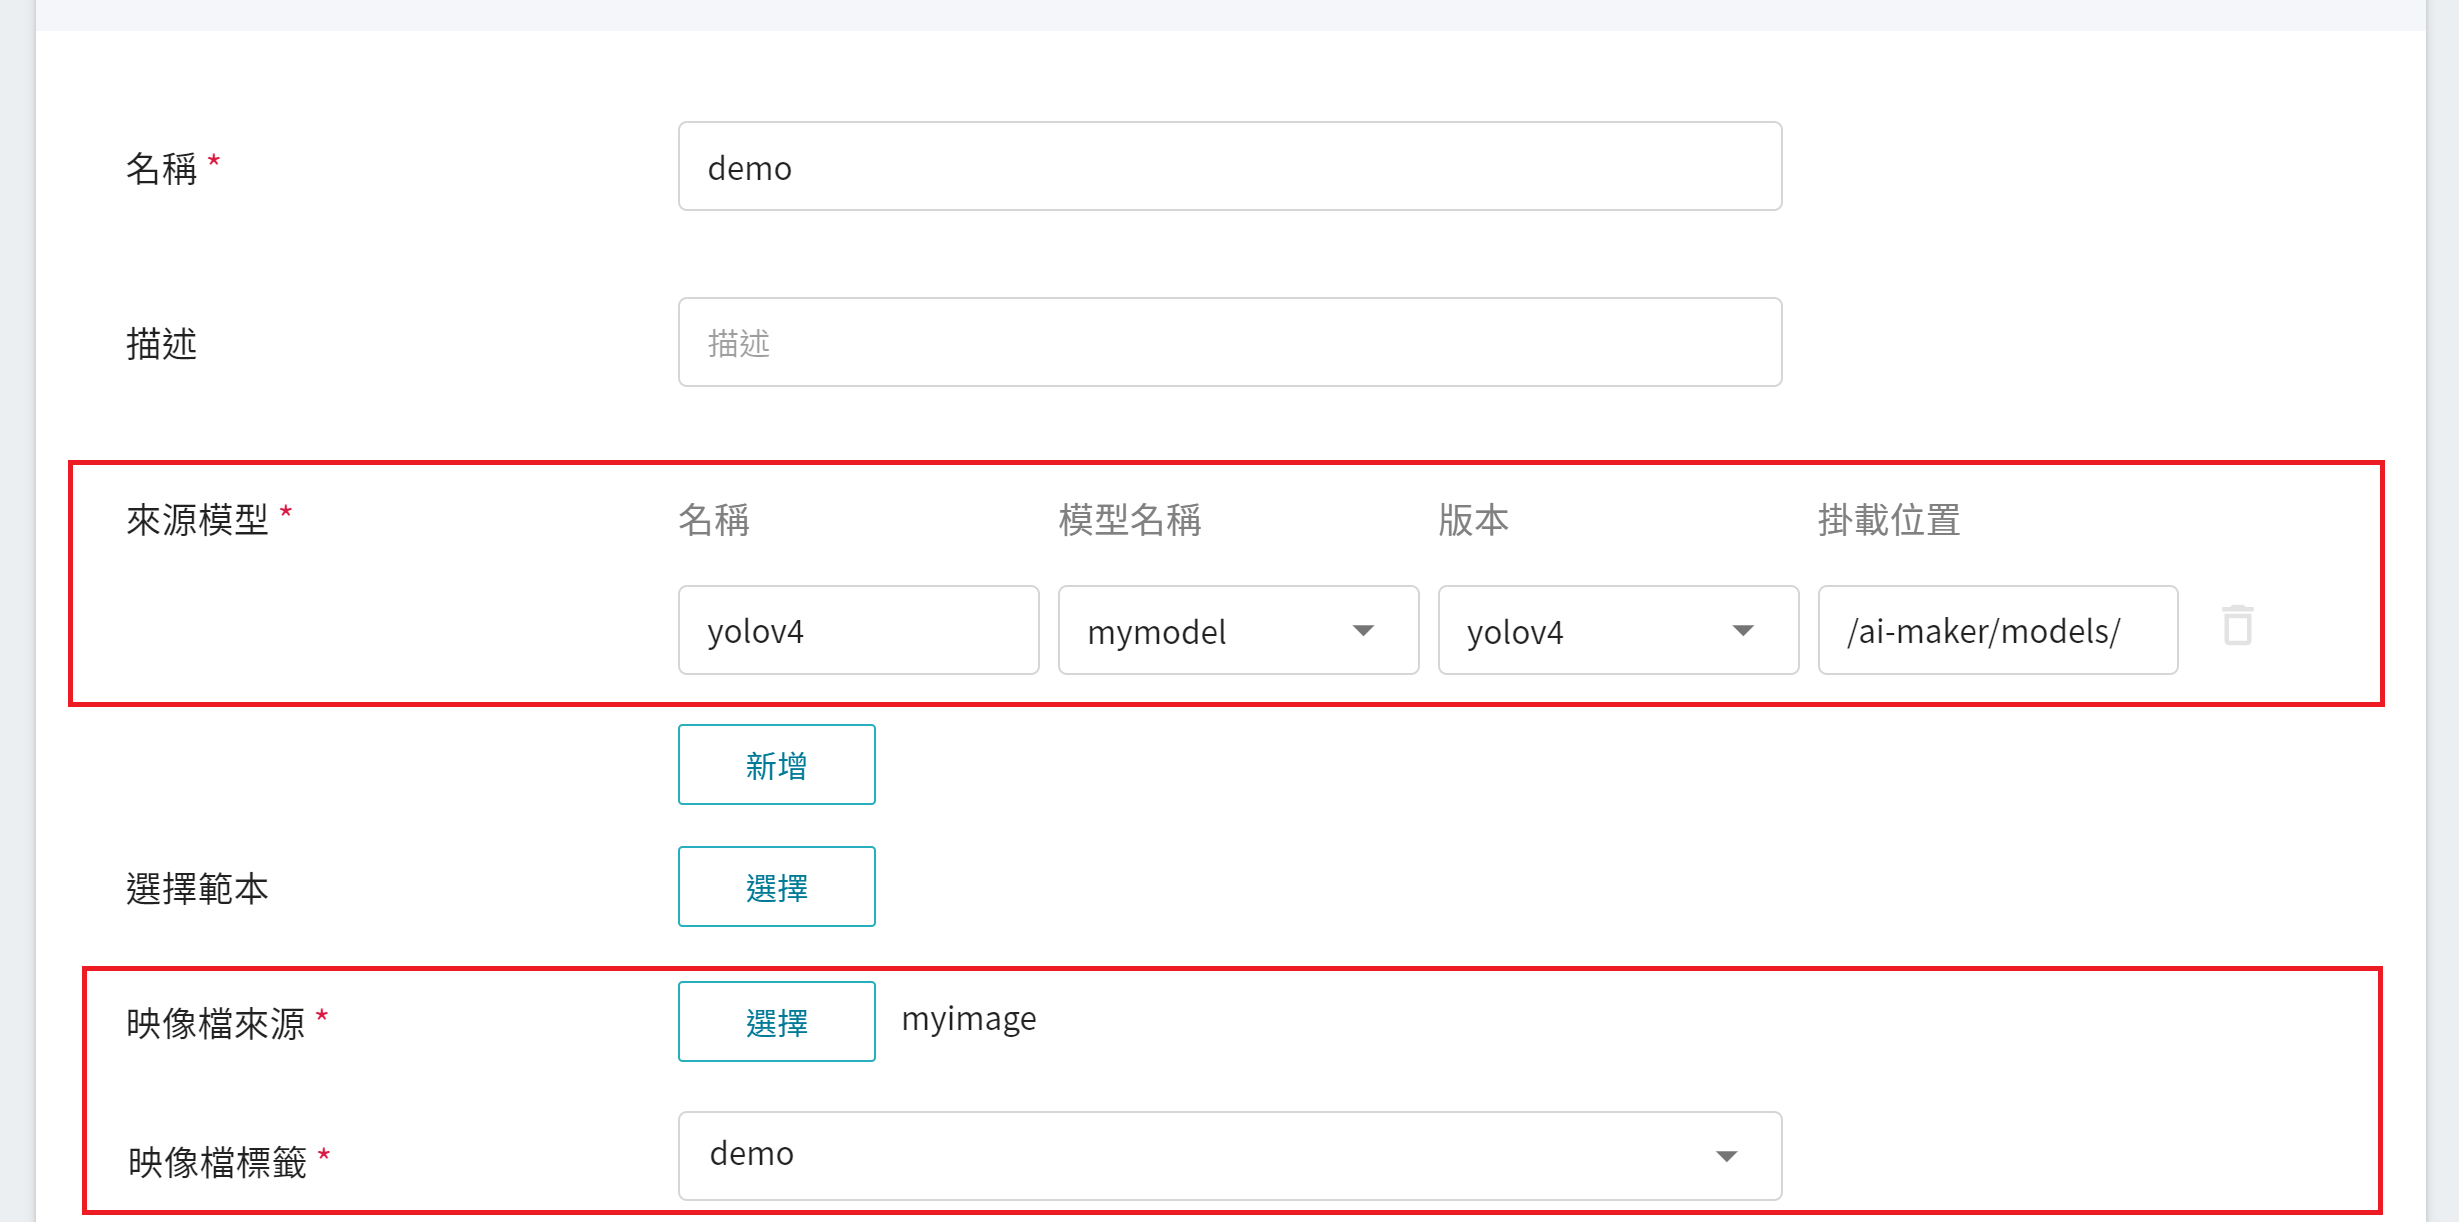
1. **基本設定**
* **來源模型**
- 名稱:請輸入 **`yolov4`**。
- 類別:請選擇 **私人**。
- 模型名稱:請選擇您要載入的模型名稱。
- 版本:請選擇您要載入的模型版本。
- 掛載位置:請輸入 **`/ai-maker/models/`**。
* **映像檔來源**:請選擇您剛上傳的映像檔和標籤。
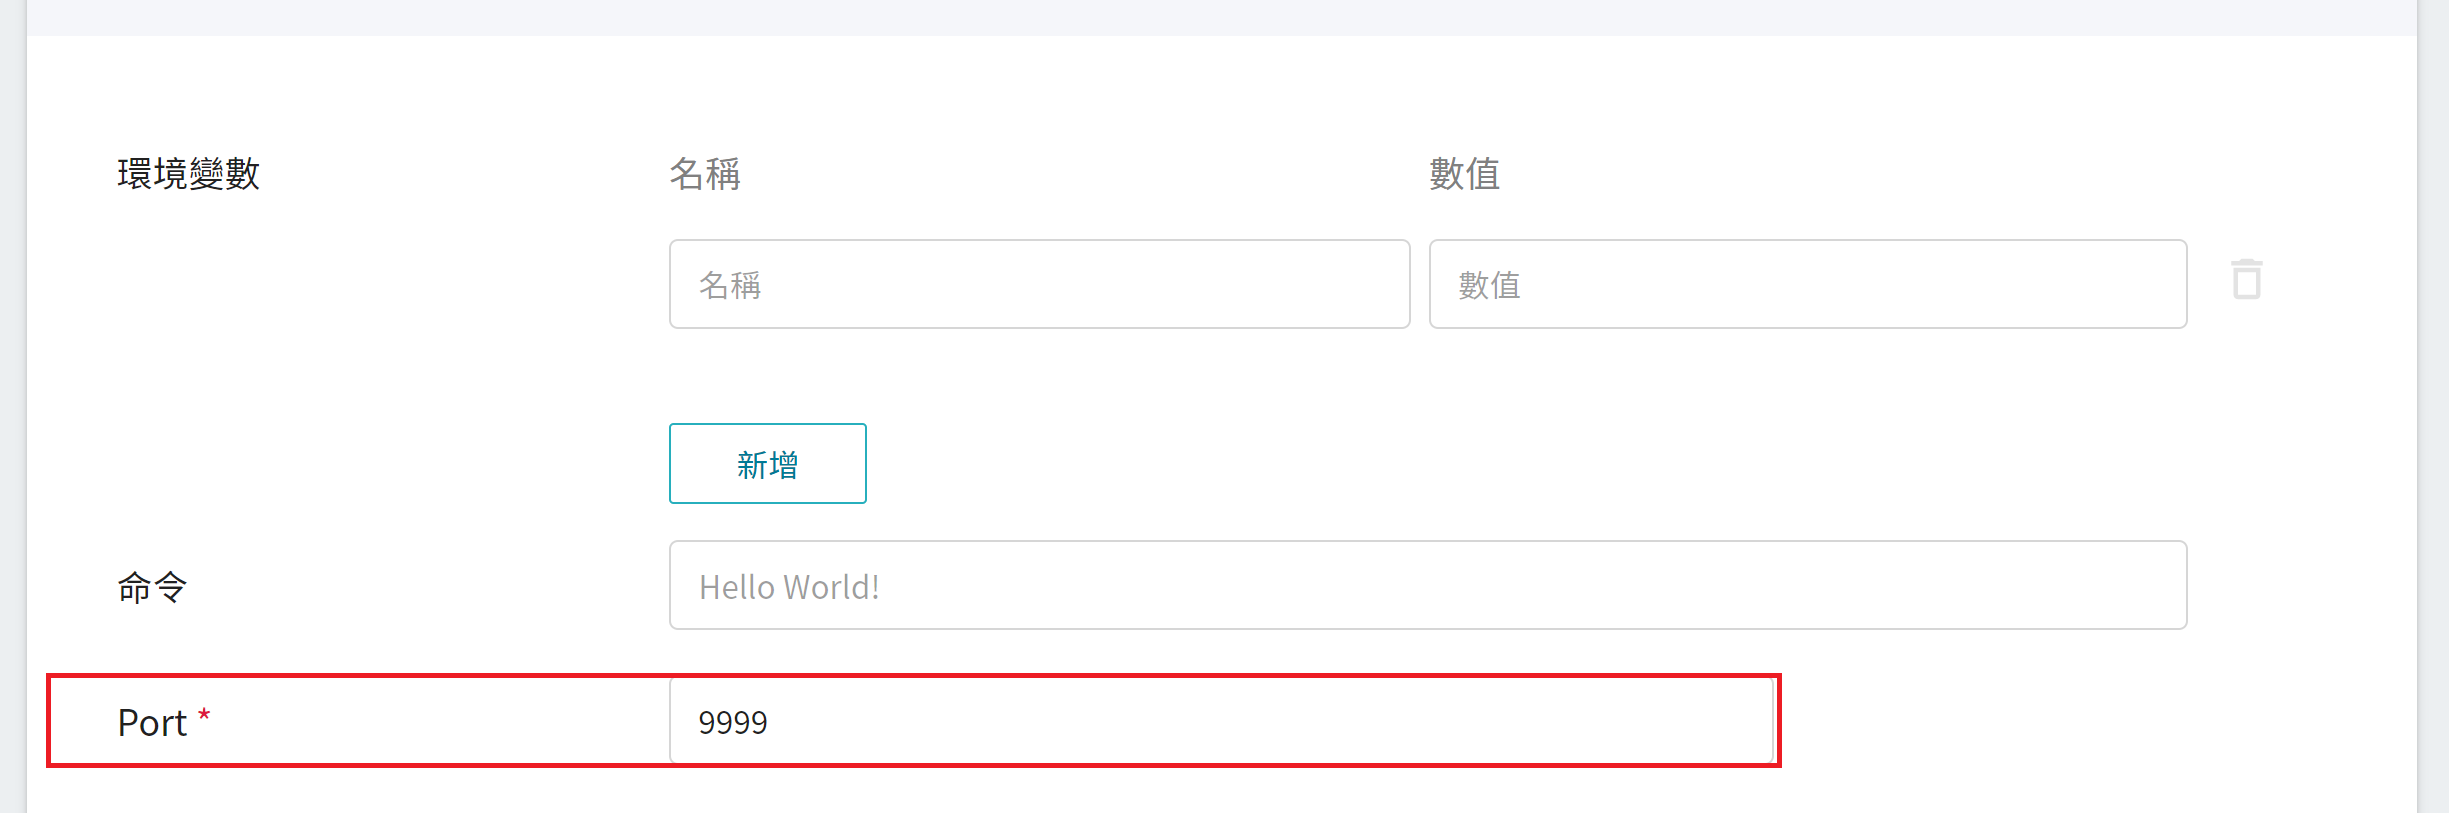
2. **變數設定**:Port 請設定為 **`9999`**。
### 3.6 連結至 CVAT
當推論服務的狀態為 **`Ready`** 時,我們還需要再做最後一個步驟,點擊上方 **連結至 CVAT** 圖示,即可連結至 CVAT 做輔助標註。

完成連結至 CVAT 後,進入 CVAT 服務就可以在 CVAT 的 **Models** 頁面看到連結至 CVAT 的推論服務模型。
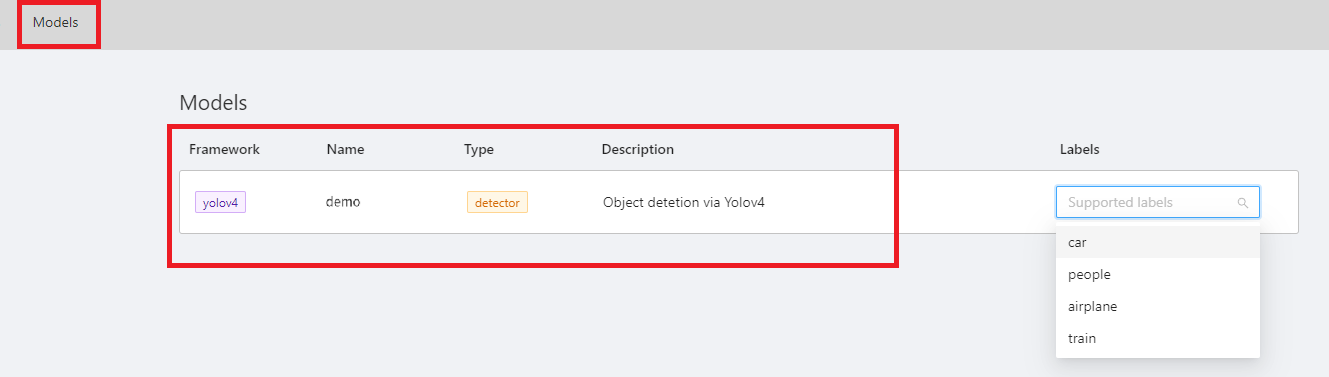
恭喜您,接下來就可以開始使用 CVAT 輔助標註/自動標註功能了。

### 3.7 使用 CVAT 輔助標註/自動標註
使用 CVAT 輔助標註/自動標註功能的方式可以分成兩種:
1. 對整個 Task 中的所有圖片進行輔助標註/自動標註
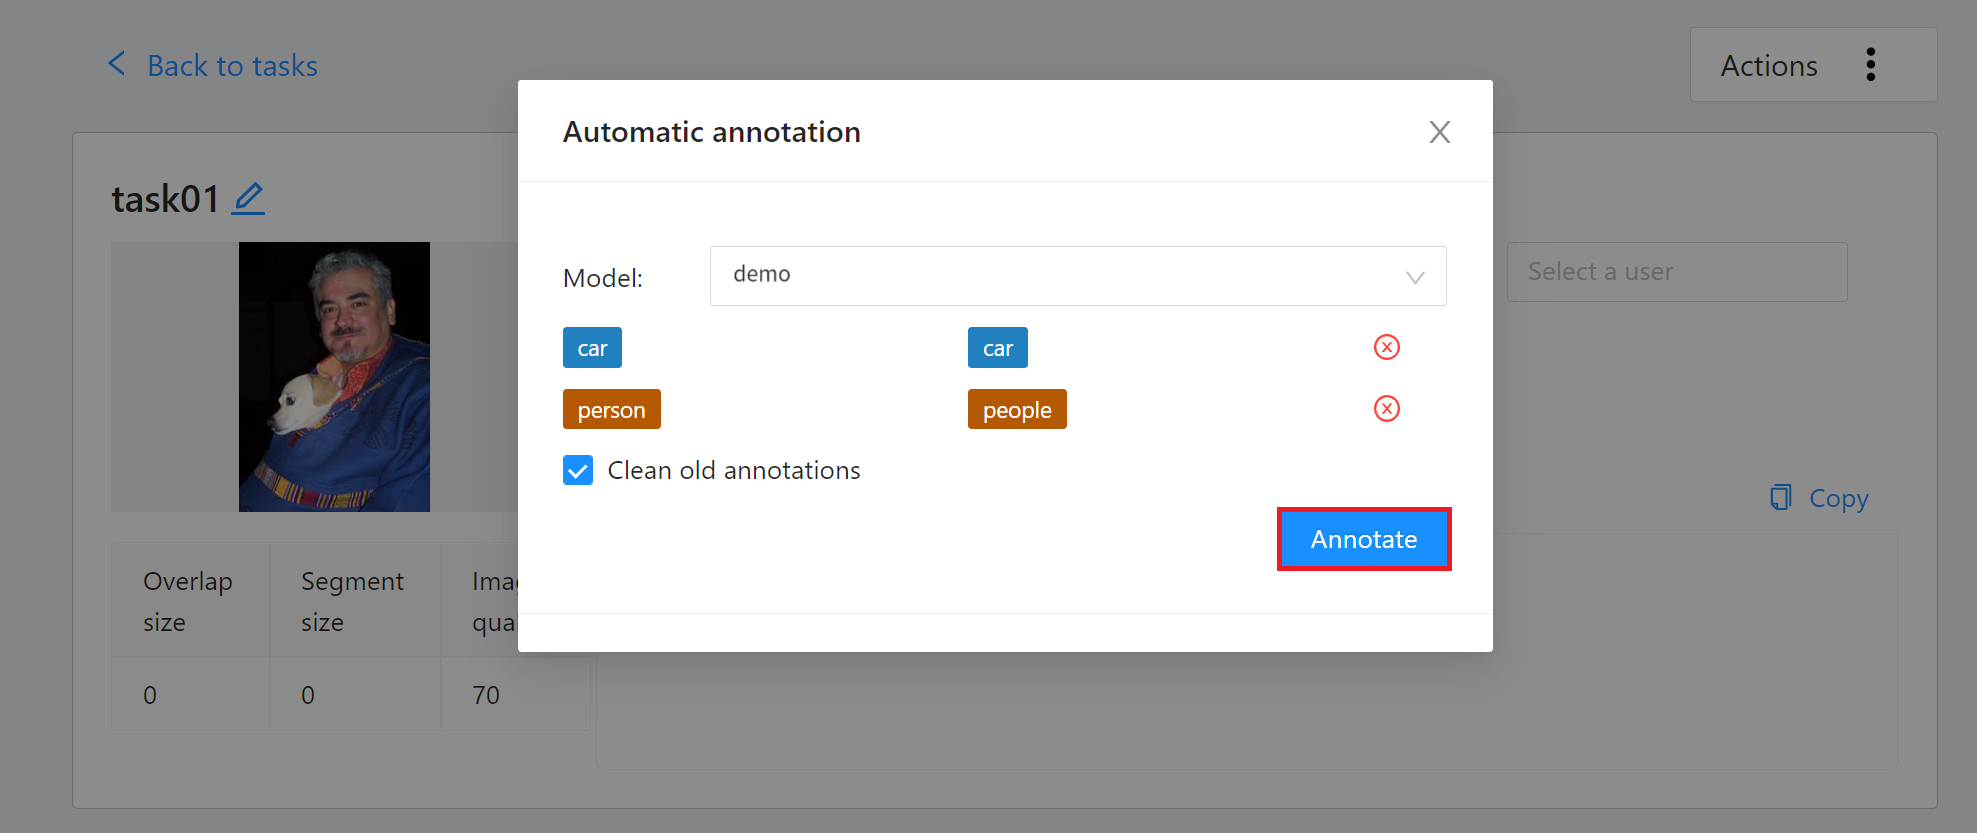
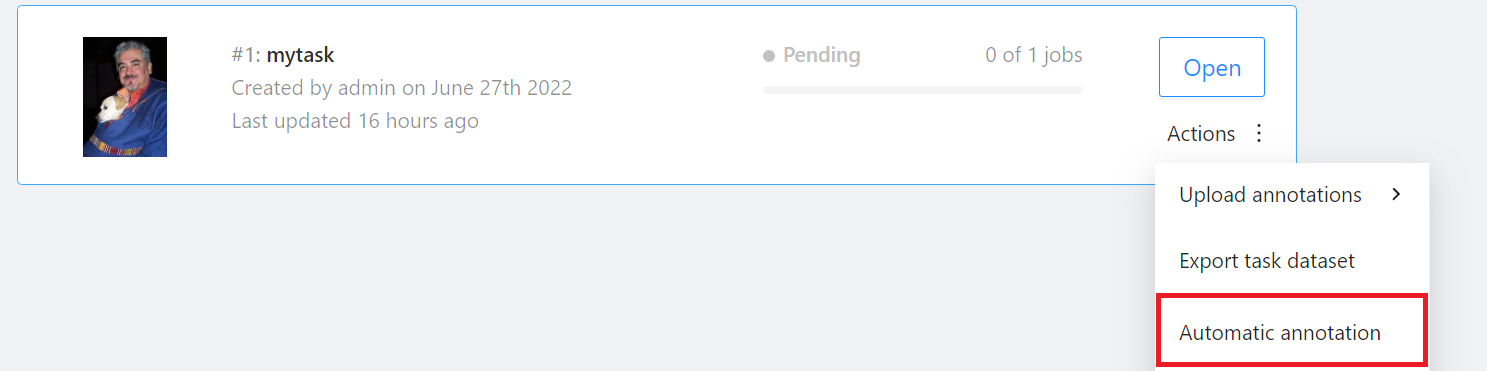
進入「**Tasks**」頁面後找到要標註的 Task,然後將滑鼠移動到欲進行自動標註的任務右側「**Actions**」的更多選項圖示,接著點選「**Automatic annotation**」。
出現「**Automatic annotation**」視窗後點擊「**Model**」下拉選單,選取已連結的推論任務。接著設定模型與任務 Label 對應,最後點擊「**Annotate**」執行自動標註。

標註完成後,進入 CVAT 標註工具頁面檢視自動標註的結果,若對自動標註的結果不滿意,可再進行人工標註校正。
2. 對單張圖片進行輔助標註/自動標註
進入標註頁面後,選擇欲標註的圖片,若圖中有目標物件,即可依下列步驟進行標註。
* 點選左側工具列的魔術棒(AI Tools)。
* 選擇「**Detectors**」
* 選擇您剛剛連結的 Model。

## 4. 範例二:Tracker API
範例二我們將以 siamMask 模型,實作串接 CVAT 自動標註的 Tracker API,在開始前建議您先瞭解 [**CVAT Tracker Mode 使用說明**](https://opencv.github.io/cvat/docs/manual/advanced/ai-tools/#trackers)。
### 4.1 Tracker API 範例
**Request**
* URL: GET /cvat_info
**Response**
* Body:
```json=
HTTP/1.1 200 OK
{
"framework":"pytorch",
"spec": None,
"type": "tracker",
"description": "Fast Online Object Tracking and Segmentation"
}
```
**Request**
* URL: POST /cvat_invoke
* Body:
```json=
{
"image":"base64_encode_image",
"state":"tracker_state",
"shape":"[303.61328125, 112.201171875, 469.88011169433594, 380.6956787109375]"
}
```
**Response**
* Body:
```json=
HTTP/1.1 200 OK
{
"state":"tracker_state",
"shape":"[303.61328125, 112.201171875, 469.88011169433594, 380.6956787109375]"
}
```
### 4.2 API 範例程式碼
本章節中以 [**SiamMask**](https://github.com/foolwood/SiamMask) 為例,提供 Tracker 的範例程式,示範如何使用 **Python Flask** 輕量級的網頁框架實作 cvat_info 以及 cvat_invoke 這兩個 API。
:::spoiler **範例程式碼:`main.py`**
```python=
# -*- coding: utf-8 -*-
import json
import base64
from PIL import Image
import io
from flask import Flask, request
from model_handler import ModelHandler
app = Flask(__name__)
model = ModelHandler()
@app.route('/cvat_info', methods=['GET'])
def cvat_info():
resp = {
"framework":"pytorch",
"spec": None,
"type": "tracker",
"description": "Fast Online Object Tracking and Segmentation"
}
return resp
@app.route('/cvat_invoke', methods=['POST'])
def cvat_invoke():
data = request.get_json()
buf = io.BytesIO(base64.b64decode(data["image"]))
shapes = data.get("shapes")
states = data.get("states")
image = Image.open(buf)
results = {
'shapes': [],
'states': []
}
for i, shape in enumerate(shapes):
shape, state = model.infer(image, shape, states[i] if i < len(states) else None)
results['shapes'].append(shape)
results['states'].append(state)
return json.dumps(results)
if __name__ == "__main__":
app.run(host="0.0.0.0", debug=True, port=9999)
```
:::
* 第 9 行:模型的初始化。
* 第 10 ~ 18 行:實作 cvat_info 這個 API,定義模型資訊並將這些資訊以 JSON 格式回傳。
* 第 20 ~ 28 行:實作 cvat_invoke 這個 API,主要是接收經過 Base64 編碼的圖片,將其解碼並輸入 SiamMask Model 做辨識再將辨識出的資料包成 JSON 格式回傳。
:::spoiler **範例程式碼:`model_handler.py`**
```python=
# Copyright (C) 2020 Intel Corporation
#
# SPDX-License-Identifier: MIT
from tools.test import *
import os
from copy import copy
import jsonpickle
import numpy as np
class ModelHandler:
def __init__(self):
# Setup device
self.device = torch.device('cuda' if torch.cuda.is_available() else 'cpu')
torch.backends.cudnn.benchmark = True
base_dir = os.path.abspath(os.environ.get("MODEL_PATH",
"/workdir/SiamMask/experiments/siammask_sharp"))
class configPath:
config = os.path.join(base_dir, "config_davis.json")
self.config = load_config(configPath)
from custom import Custom
siammask = Custom(anchors=self.config['anchors'])
self.siammask = load_pretrain(siammask, os.path.join(base_dir, "SiamMask_DAVIS.pth"))
self.siammask.eval().to(self.device)
def encode_state(self, state):
state['net.zf'] = state['net'].zf
state.pop('net', None)
state.pop('mask', None)
for k,v in state.items():
state[k] = jsonpickle.encode(v)
return state
def decode_state(self, state):
for k,v in state.items():
state[k] = jsonpickle.decode(v)
state['net'] = copy(self.siammask)
state['net'].zf = state['net.zf']
del state['net.zf']
return state
def infer(self, image, shape, state):
image = np.array(image)
if state is None: # init tracking
xtl, ytl, xbr, ybr = shape
target_pos = np.array([(xtl + xbr) / 2, (ytl + ybr) / 2])
target_sz = np.array([xbr - xtl, ybr - ytl])
siammask = copy(self.siammask) # don't modify self.siammask
state = siamese_init(image, target_pos, target_sz, siammask,
self.config['hp'], device=self.device)
state = self.encode_state(state)
else: # track
state = self.decode_state(state)
state = siamese_track(state, image, mask_enable=True,
refine_enable=True, device=self.device)
shape = state['ploygon'].flatten().tolist()
state = self.encode_state(state)
return shape, state
```
:::
* 主要是負責模型的載入以及實作模型的推論。
### 4.3 建立及上傳容器映像檔
前面的章節中我們介紹實作 CVAT 輔助標註在模型推論部署的程式範例,接著需把程式包裝成 **容器映像檔** 以便部署到 AI Maker 的推論服務。
以下提供建立 Tracker API 容器映像檔的 Dockerfile,請您將對應的範例程式(`main.py` 及 `model_handler.py`)和 Dockerfile 放在同一個資料夾中,再使用 **`docker build`** 指令建立容器映像檔並將建立好的容器映像檔上傳,詳細操作請參閱 [**容器映像檔說明文件**](/s/WAoPe4Au5)。
:::spoiler **Tracker Dockerfile**
```dockerfile=
From nvidia/cuda:11.0.3-cudnn8-devel-ubuntu18.04
ENV PYTHONPATH "/workdir/SiamMask:/workdir/SiamMask/experiments/siammask_sharp"
ENV PATH "/root/miniconda3/bin:${PATH}"
RUN apt update \
&& apt install -y --no-install-recommends \
wget \
git \
ca-certificates \
libglib2.0-0 \
libsm6 \
libxrender1 \
libxext6 \
&& rm -rf /var/lib/apt/lists/*
RUN wget https://repo.continuum.io/miniconda/Miniconda3-latest-Linux-x86_64.sh \
&& chmod +x Miniconda3-latest-Linux-x86_64.sh && ./Miniconda3-latest-Linux-x86_64.sh -b \
&& rm -f Miniconda3-latest-Linux-x86_64.sh
RUN mkdir -p /workdir
WORKDIR /workdir
RUN conda create -y -n siammask python=3.6
# Override default shell and use bash
SHELL ["conda", "run", "-n", "siammask", "/bin/bash", "-c"]
RUN pip install torch==1.8.0 \
jsonpickle \
flask \
Cython \
colorama \
numpy \
requests \
fire \
matplotlib \
numba \
scipy \
h5py \
pandas \
tqdm \
tensorboardX \
opencv_python==3.4.8.29 \
torchvision==0.9.0 \
&& conda install -y gcc_linux-64
RUN git clone https://github.com/foolwood/SiamMask.git
RUN cd /workdir/SiamMask && bash make.sh
RUN wget -P /workdir/SiamMask/experiments/siammask_sharp http://www.robots.ox.ac.uk/~qwang/SiamMask_DAVIS.pth
COPY main.py /workdir/
COPY model_handler.py /workdir/
ENTRYPOINT ["conda", "run","--no-capture-output", "-n", "siammask", "python", "-u","/workdir/main.py"]
:::
### 4.4 模型準備
您可以使用自己的模型或是由 https://github.com/foolwood/SiamMask 下載公開的 SiamMask 模型檔至本機端,指令如下:
```shell=
wget http://www.robots.ox.ac.uk/~qwang/SiamMask_DAVIS.pth
wget https://raw.githubusercontent.com/foolwood/SiamMask/master/experiments/siammask_sharp/config_davis.json
```
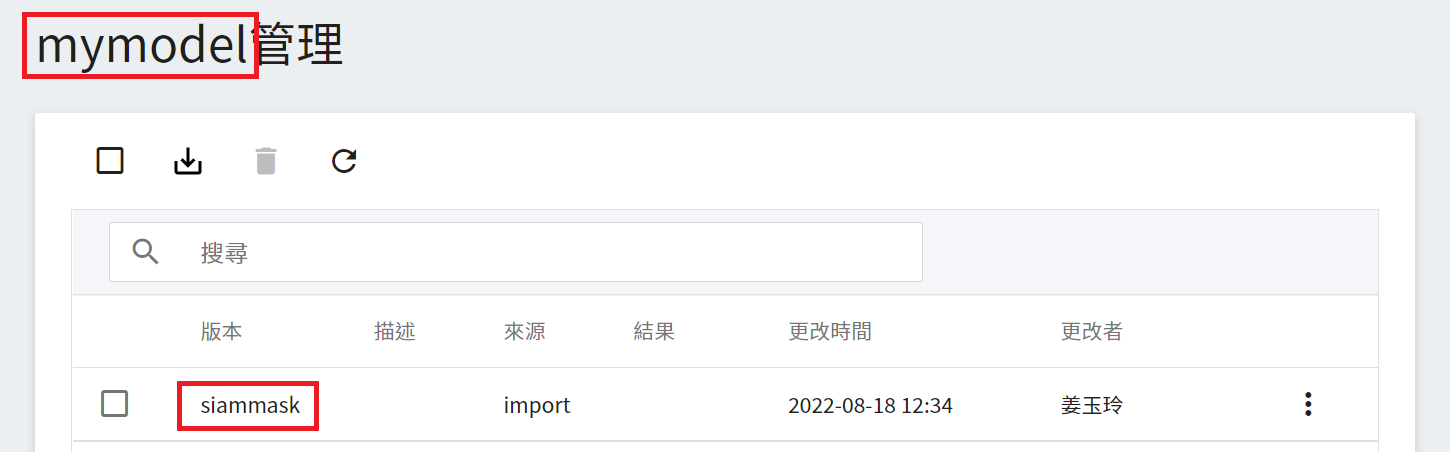
下載完畢後請將模型檔壓縮成 ZIP 檔,接著將此 ZIP 檔上傳至 OneAI 的「**儲存服務**」中,再到 AI Maker 的模型管理滙入此模型,請參考 [**AI Maker 滙入模型說明**](/s/QFn7N5R-H#匯入模型)。
模型滙入完成後,請記住模型名稱和版本,接下來會以此模型部署推論服務。
### 4.5 部署推論服務
完成推論映像檔及模型的準備工作後,接著就可以部署 AI Maker 的推論服務。在建立推論服務時需選擇您的模型和此映像檔,我們僅針對部分重要的設定加以說明,其他步驟請參閱 [**建立推論任務說明文件**](/s/QFn7N5R-H#建立推論任務)。
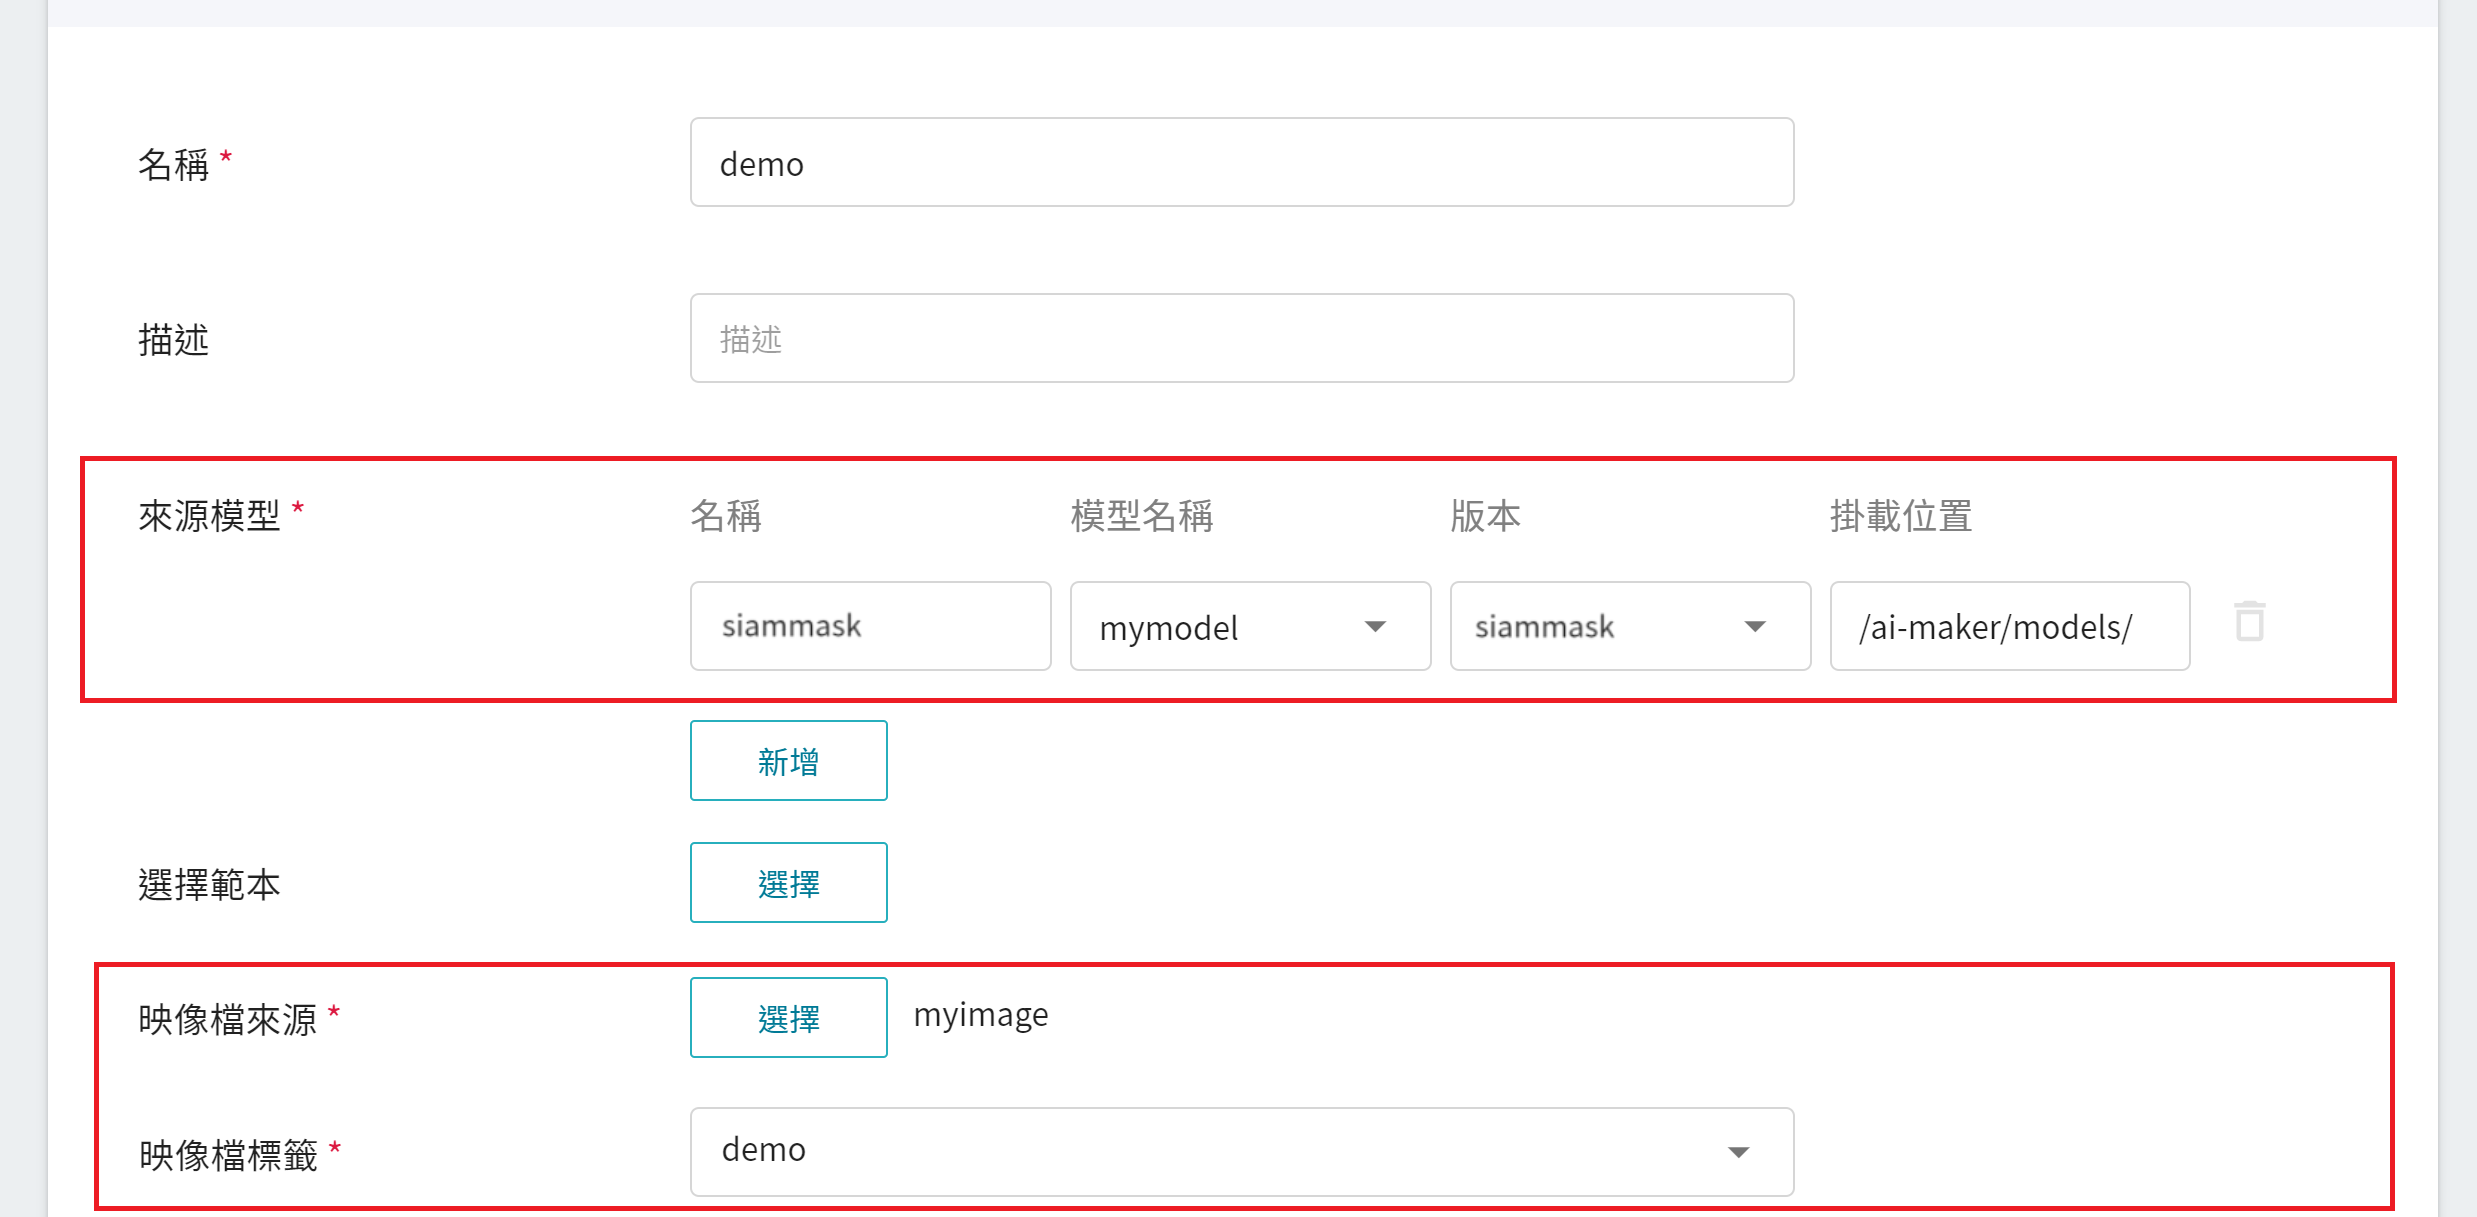
建立推論服務的步驟中,請依照以下設定:
1. **基本設定**
* **來源模型**
- 名稱:請輸入 **`siammask`**。
- 類別:請選擇 **私人**。
- 模型名稱:請選擇您要載入的模型名稱。
- 版本:請選擇您要載入的模型版本。
- 掛載位置:請輸入 **`/ai-maker/models/`**。
* **映像檔來源**:請選擇您剛上傳的映像檔和標籤。
2. **變數設定**:Port 請設定為 **`9999`**。

### 4.6 連結至 CVAT
當推論服務的狀態為 **`Ready`** 時,我們還需要再做最後一個步驟,點擊上方 **連結至 CVAT** 圖示,即可連結至 CVAT 做輔助標註。

完成連結至 CVAT 後,進入 CVAT 服務就可以在 CVAT 的 **Models** 頁面看到連結至 CVAT 的推論服務模型。

恭喜您,接下來就可以開始使用 CVAT 輔助標註/自動標註功能了。

學會了以 YOLOv4 和 SiamMask 模型串接 CVAT 輔助標註/自動標註的 API 之後,依此類推,您可以參考 [**CVAT GitHub**](https://github.com/opencv/cvat),練習使用自己的深度學習模型,實作串接 CVAT 輔助標註/自動標註的 API。
:::warning
:warning: **注意事項:** AI Maker 整合的 CVAT 版本為 [**V2.1.0**](https://github.com/opencv/cvat/tree/v2.1.0),相關功能及參考文件請以此版為準。
:::