---
description: OneAI Documentation
tags: Case Study, EN
---
[OneAI Documentation](/s/user-guide-en)
# AI Maker Case Study - Image Classification Model Application
[TOC]
<br>
## 0. Deploy Image Classification Model
In this example, we will use the **image-classification** template provided by AI Maker to build an image classification application step by step. This template defines the environment variables, images, programs, and other settings required by the training job and inference service. You only need to upload the dataset you want to train or infer, and modify the relevant settings to quickly perform training jobs and inference service.
The main steps are as follows:
- **Dataset Preparation**
At this stage, we prepare the image set for the computer to learn and upload the dataset to the specified location.
- **Train the Model**
At this stage, we will configure the training job to train and fit the neural network, and store the trained model.
- **Create Inference Service**
At this stage, we deploy the stored model to the service to perform inference.
<br><br>
## 1. Prepare Dataset and Upload
Before the official start, please prepare the training dataset, such as: cats, dogs, flowers...etc. The dataset used in this example is [**Flowers Recognition (Flower dataset)**](https://www.kaggle.com/alxmamaev/flowers-recognition) provided by Alexander Mamaev in kaggle , but to speed up the operation we have reduced the number of categories from the previously provided 5 to 3.
If you want to use your own dataset, please also follow the steps below to store the dataset according to the **specified directory structure**, and then upload it to the bucket of the storage service provided by the system.
:::info
:bulb: **Tips: Dataset Size Recommendations**
At least 300 training images and 100 testing images should be prepared for each category to train a model with the lowest feasible accuracy.
:::
<br>
### 1.1 Adjust the Directory Sturcture of the Dataset
After preparing the dataset, follow the steps below to adjust the directory structure.
1. **Create a Folder Named `dataset`**
Before we start tweaking the dataset structure, please first create a folder named **`dataset`** which will be used to store our image data later.
2. **Prepare the Image Data**
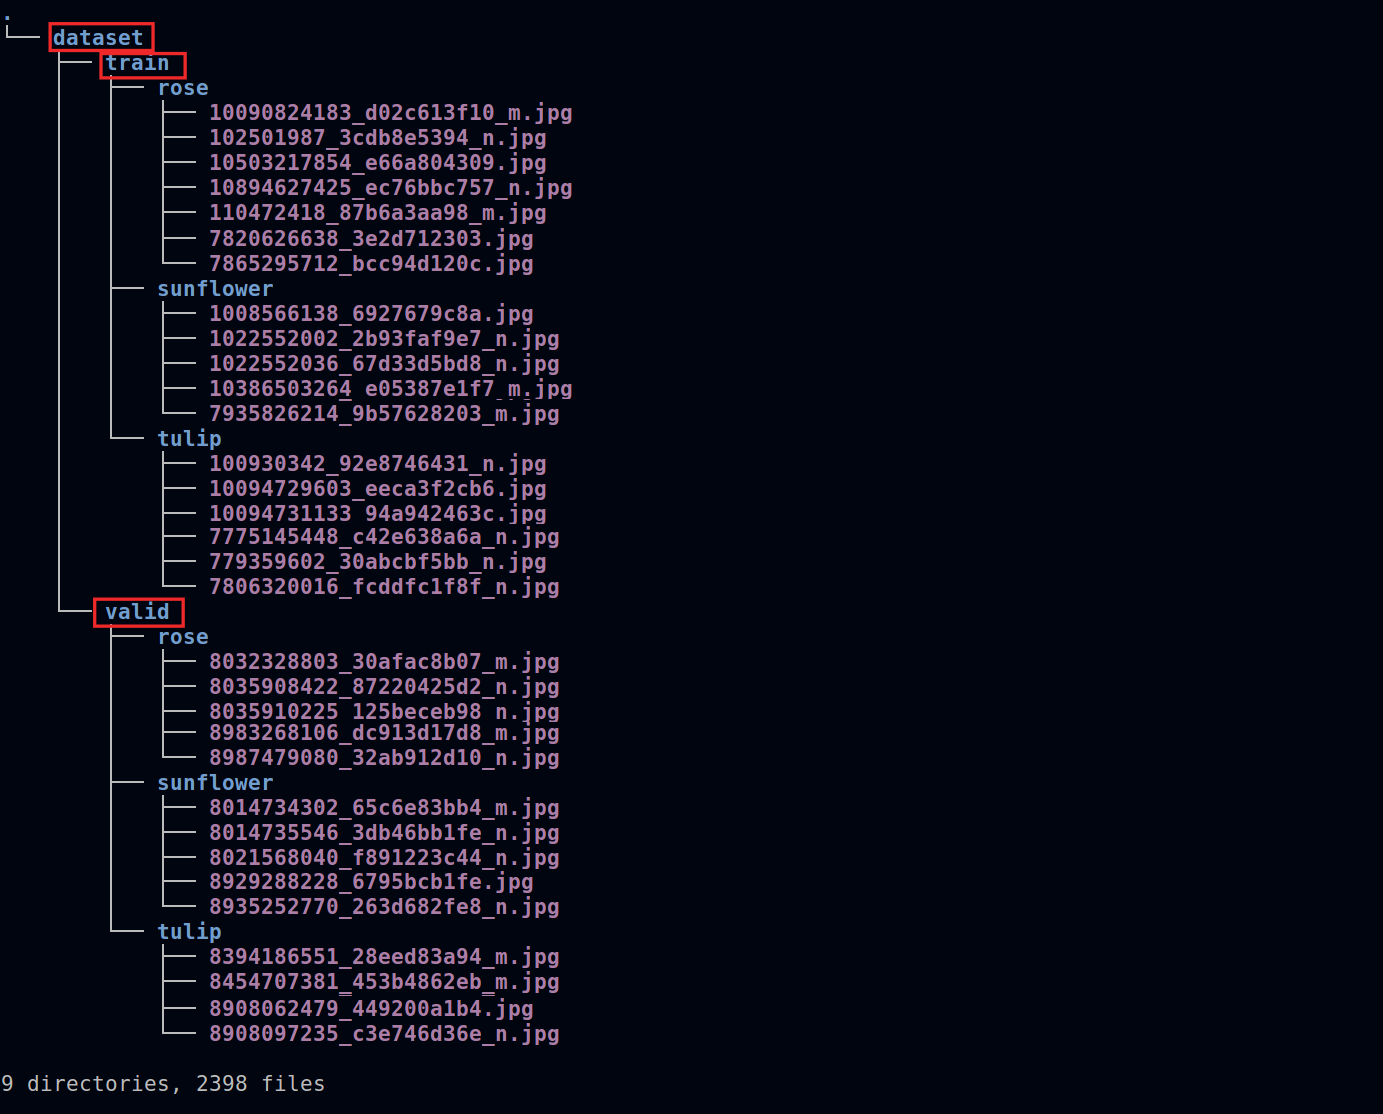
Enter the **dataset** folder and divide the image data into two sub-folders, **train** and **valid**. The images in the subfolders (**train** and **valid**) are classified by creating **Folders** with **Labels**.
When complete, the dataset structure is as follows. Among them, `rose`, `sunflower` and `tulip` are the flower tags to be classified:
:::warning
:warning: **Note: Do Not Change the Folder Name**
Please note that the folder names such as **`dataset`**, **`train`** and **`valid`** are related to the read operation of the program, that is, the folder framed by the red line in the figure above. Do not change the folder name arbitrarily, otherwise the program may not be able to read the dataset smoothly.
:::
<br>
### 1.2 Create a Bucket
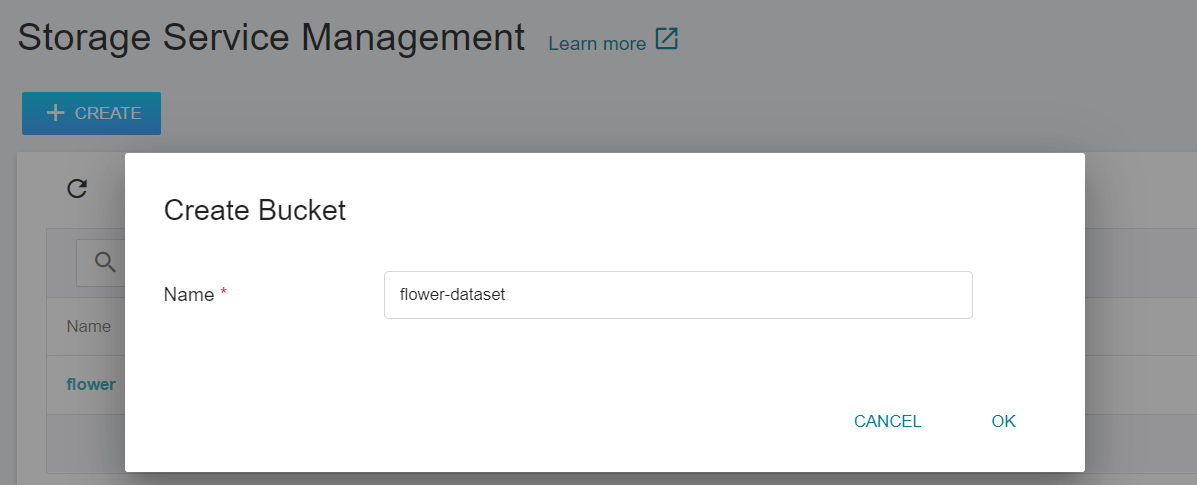
After completing the adjustment of the dataset directory structure, we must first create a bucket named **`flowers-dataset`** in **Storage Service** to store our dataset.
For detailed operation steps, please refer to [**Storage Service > Create a Bucket**](/s/storage-en#Create-a-Bucket).
<br>
### 1.3 Upload Dataset
After completing the preparation of the dataset and the creation of the storage bucket, we can store the dataset, which is the folder named **`dataset`**, into the storage bucket **`flowers-dataset`**. If the dataset is not large, you can directly click Upload and drag and drop the dataset to upload.
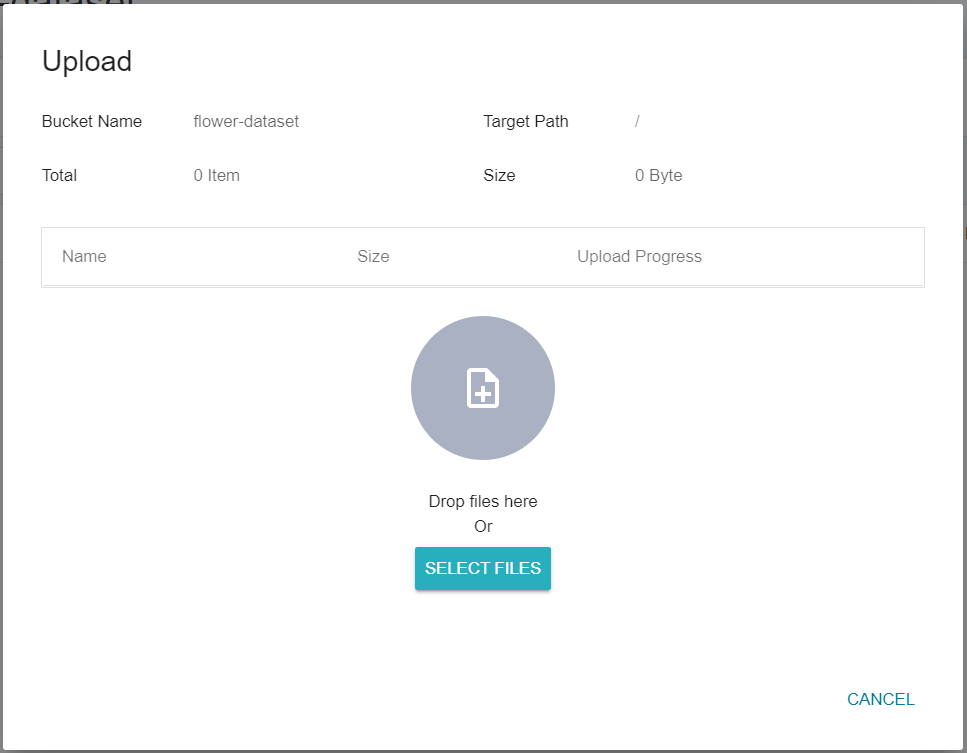
If the dataset is too large, you can upload it folder by folder; or use third-party software such as [**S3 Browser**](http://s3browser.com/) or [**Cyberduck**](https://cyberduck.io/) to upload.
<br>
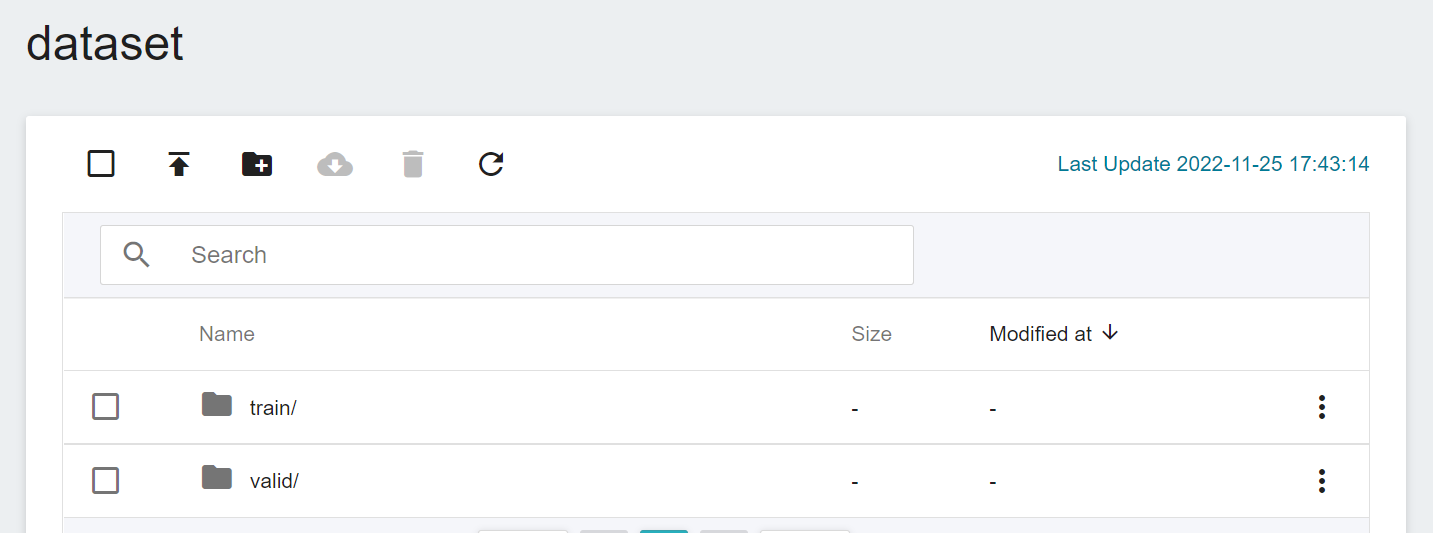
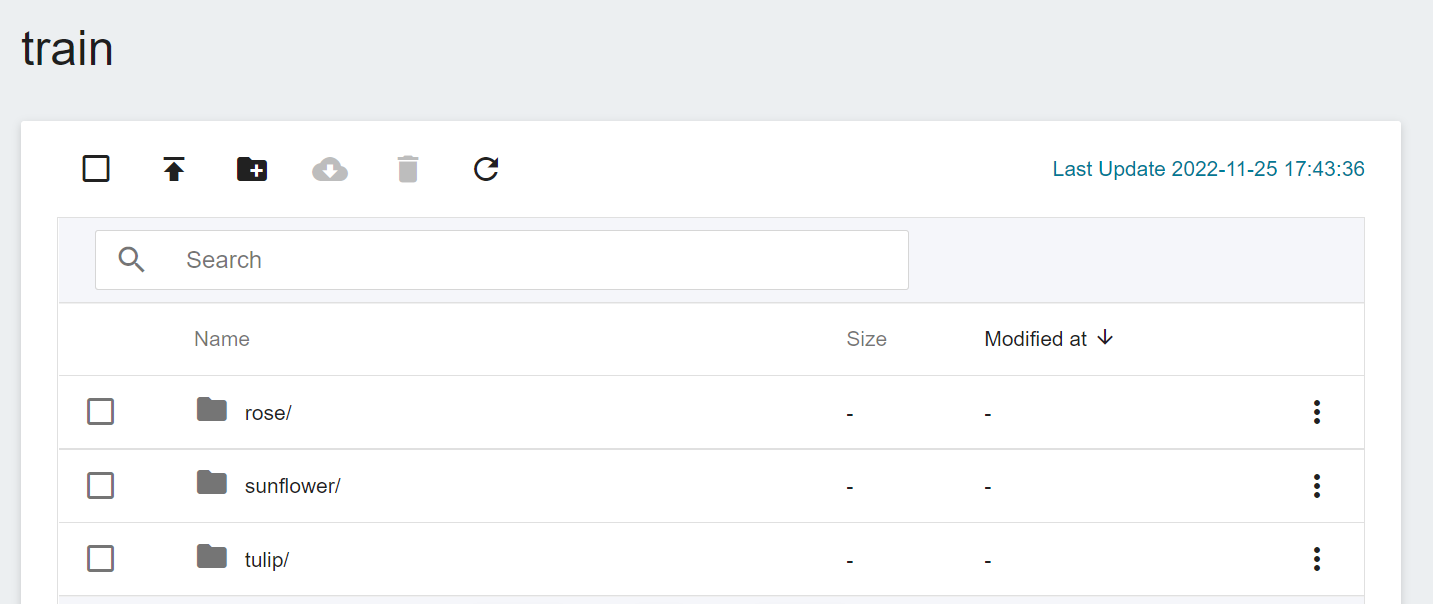
After the upload is complete, the results will be displayed as follows:

<br><br>
## 2. Training Classification Task Model
After completing the [**Upload Your Own Dataset**](#1-Prepare-Dataset-and-Upload), you can use these data to train and fit our classification task model.
<br>
### 2.1 Create Training Job
Select **AI Maker** from the OneAI service list, and then click **Training Job** to enter the Training Job Management page. AI Maker provides two training methods: **Smart ML Training Job** and **Normal Training Job**. Different parameters must be set for different training methods.

- **Normal Training Job**
Perform a one-time training session based on your given training parameters.
- **Smart ML Training Job**
Hyperparameters can be automatically adjusted, and computing resources can be efficiently used for multiple model training to save you time and cost in analyzing and adjusting model training parameters.
<br>
In this example we choose **Normal Training Job** to create a new training job. The steps to create a training job are as follows. For detailed instructions, please refer to the [**AI Maker > Training Job**](/s/ai-maker-en#Training-Job).
1. **Basic Information**
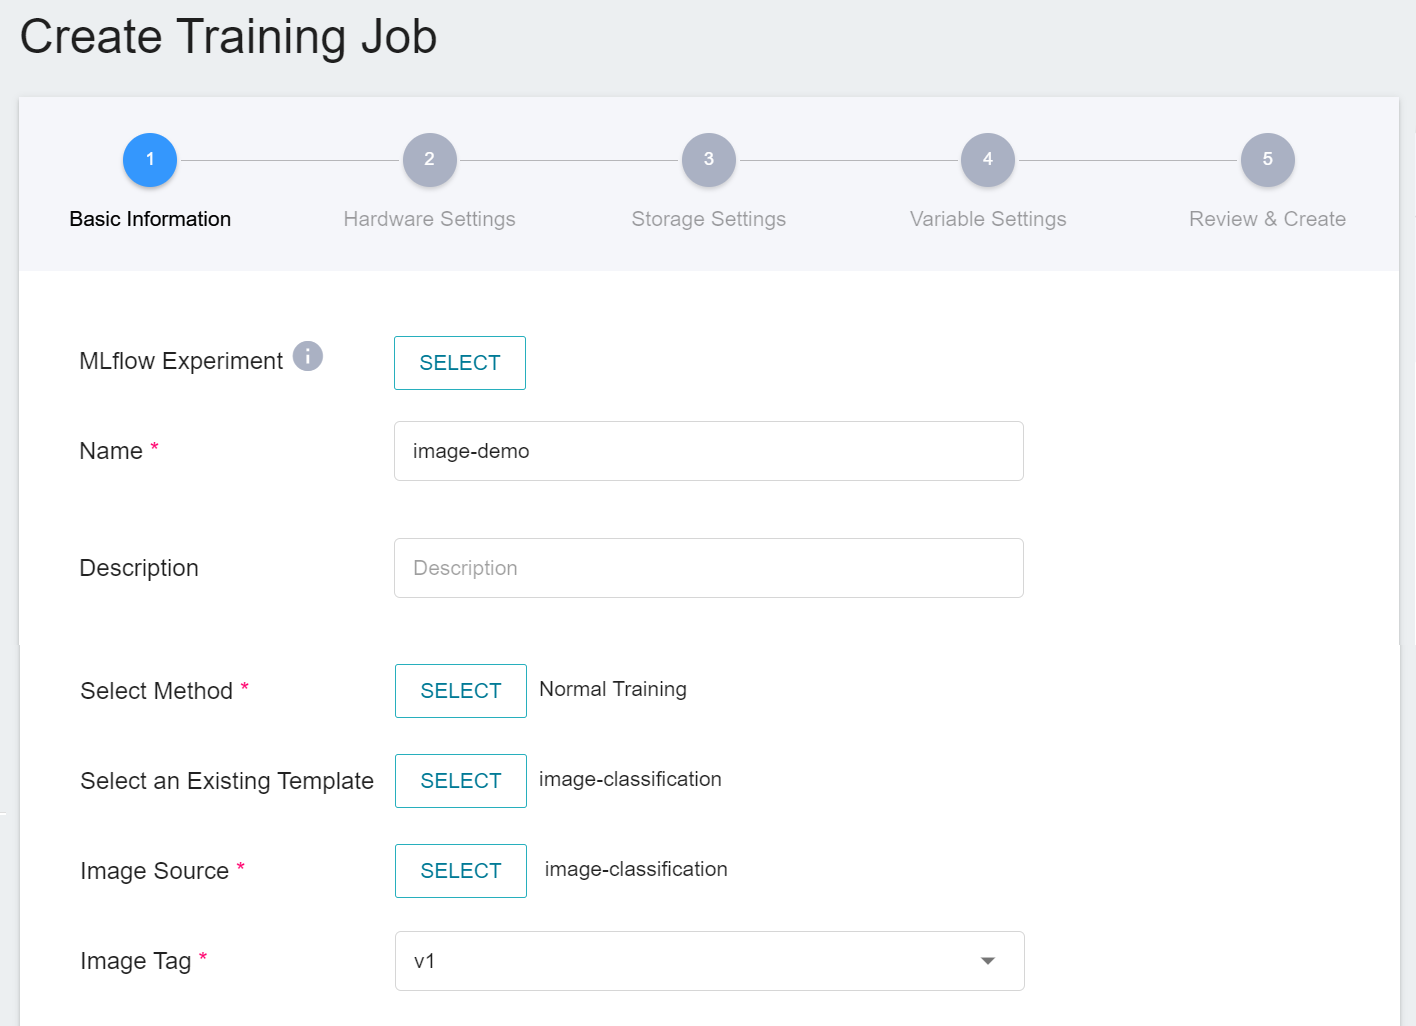
AI Maker provides an **`image-classification`** template for image classification training. After entering the name and description, you can select the **`image-classification`** template provided by the system to automatically bring up the public image **`image-classification:v1`** and parameter settings for subsequent steps.
2. **Hardware Settings**
Select the appropriate hardware resource from the list with reference to the current available quota and training program requirements. However, it should be noted that the machine learning framework used in the image of this example is **tensorflow-gpu**, so when selecting hardware, please select the specification that includes **GPU**.
3. **Storage Settings**
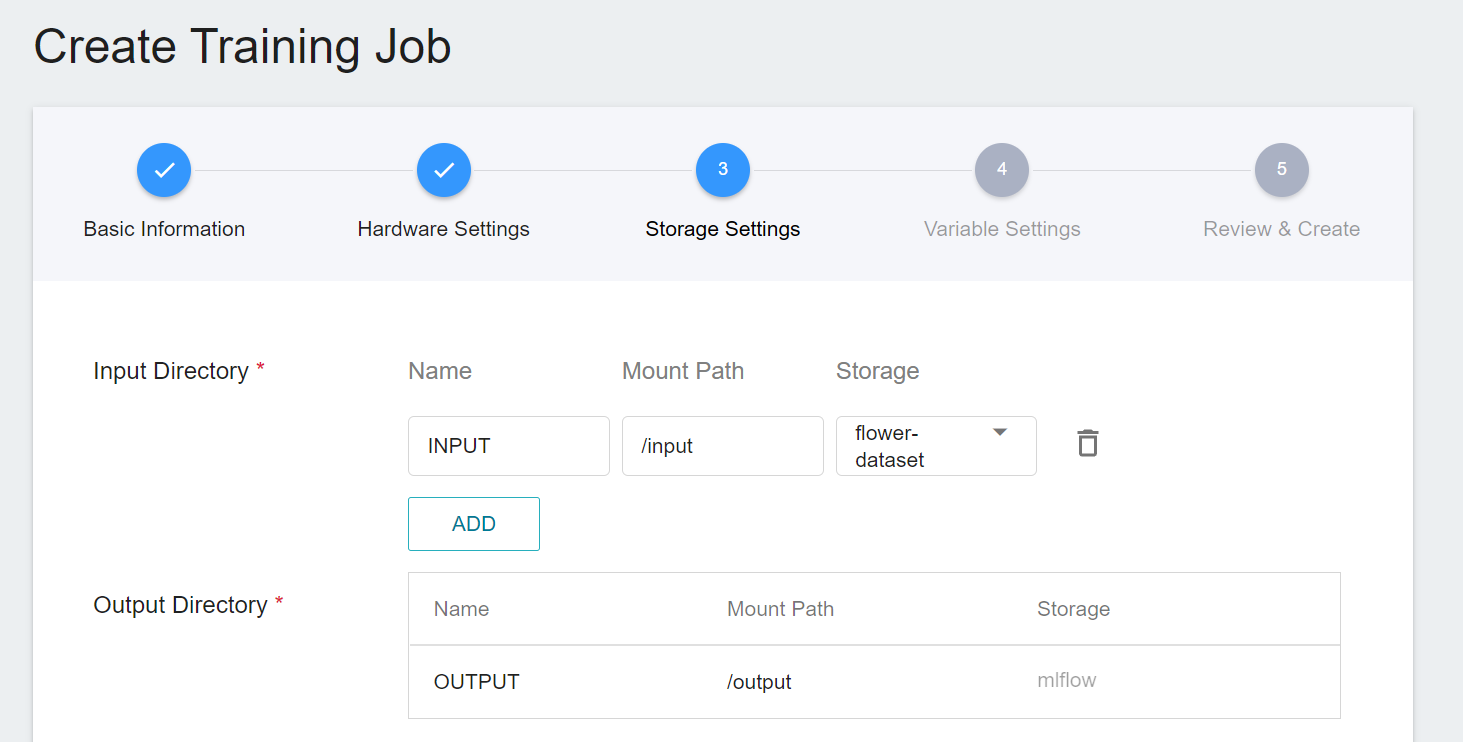
This stage is to mount the bucket where our training data is stored into a container. The mount path and environment variables are already set in the template. Here, you only need to select the bucket created in [**Create Bucket**](#12-Create-a-Bucket).
4. **Variable Settings**
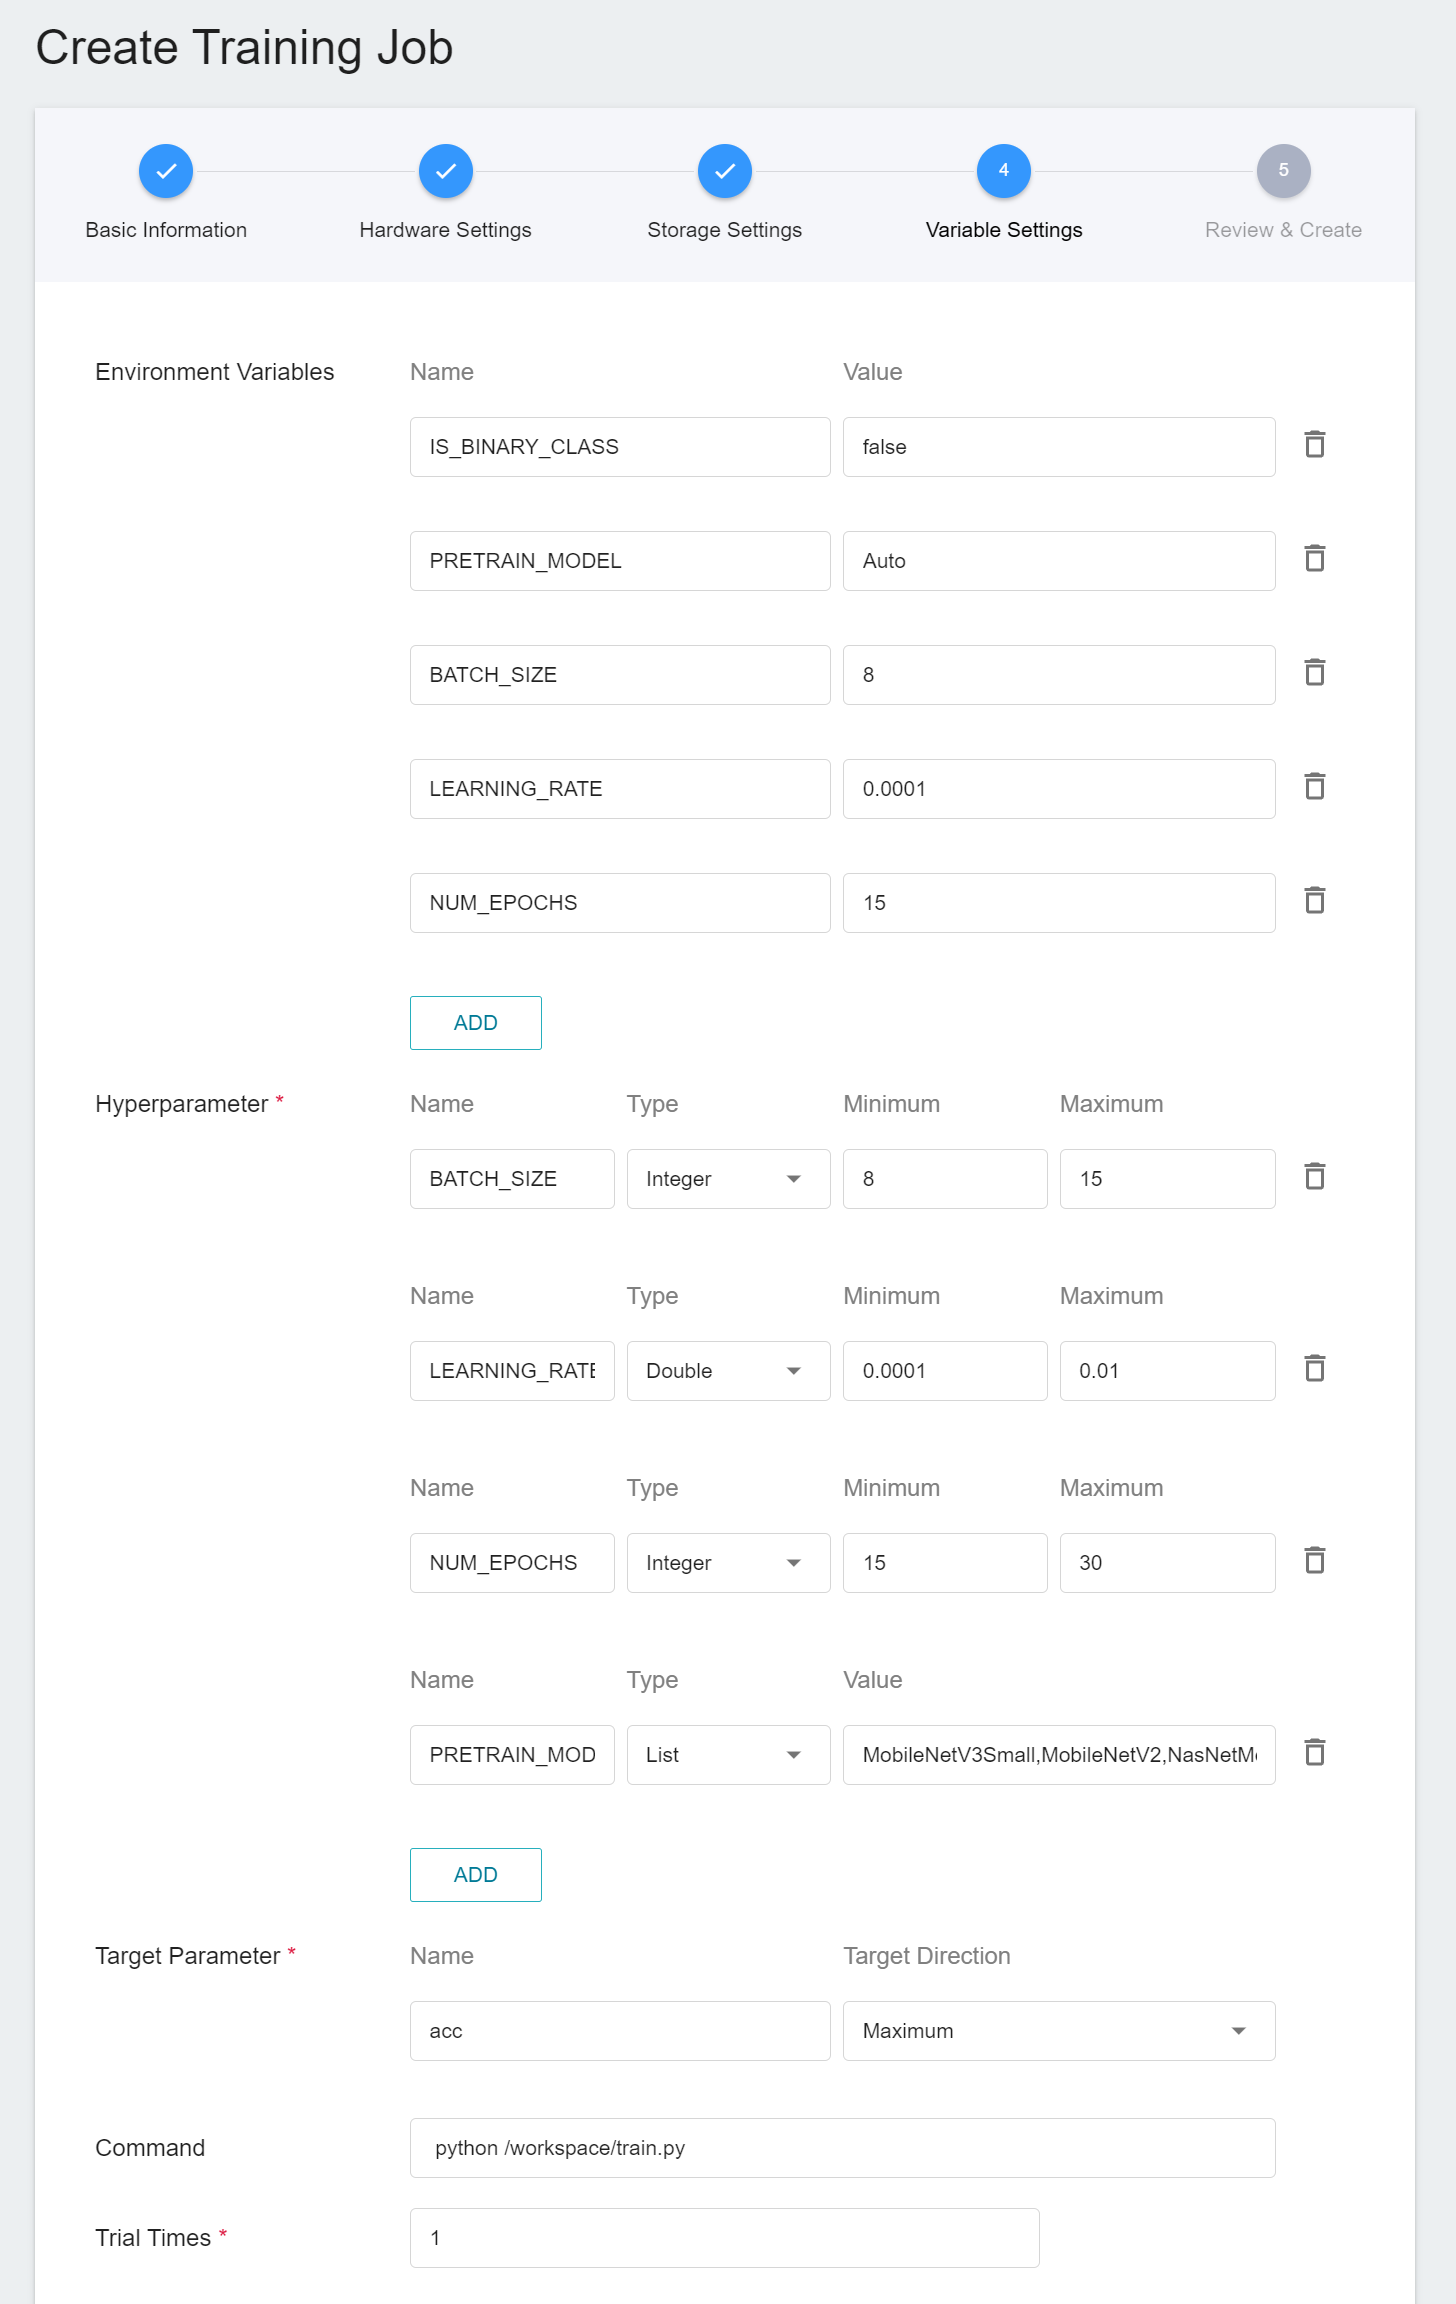
The parameters provided by the image **`image-classification:v1`** are described here:
|Variable |Default |Introduction|
|--|--|--|
|IS_BINARY_CLASS | false |Set this value to `1` / `true` if the data type is **Binary Class**, as this is a Yes/No question; if not, set this value to `0` / `false` ` , which means that the data is **Multi Class**.|
|PRETRAIN_MODEL |Auto |The model to be trained, currently supports `MobileNetV3Small, MobileNetV2, NasNetMobile, EfficientNetB0, MobileNetV3Large, DenseNet121, Xception, InceptionV3, ResNet50, InceptionResNetV2, EfficientNetB7, VGG16`, and `VGG19`, a total of 13 models. If `Auto` is selected, the model will be selected from the supported list according to the dataset size.|
|BATCH_SIZE |8 |The size of each batch of data, it should be not larger than the total number of images in the dataset.|
|NUM_EPOCHS |15 |The number of training sessions for all samples in the specified training set.|
|LEARNING_RATE |0.0001 |Learning rate|
When you choose to use the **`image-classification`** template while entering the basic information, the above variables and the usual commands will be brought in automatically, but the value of each variable should be adjusted according to the development requirements.
#### **Additional Parameters Description**
1. **IS_BINARY_CLASS**
If it can be distinguished according to the type of data: **Binary Class** and **Multi Class**:
* **Binary Class**
It is mainly used to solve problems with only two results, which is simply an answer to a **Yes/No** question. For example: is this a picture of a cat?
:::danger
:no_entry_sign: **Data Restrictions**
If IS_BINARY_CLASS is set to `1`, that is, binary classification mode, but there are more than two types of data provided, the task will be forcibly interrupted!
:::
* **Multi Class**
As the name suggests, it can be used to solve problems with multiple answers. When more than two data types are provided, set the value `IS_BINARY_CLASS` to `0`. For example: Is this a picture of a cat, a dog, or a flower?
2. **Environment Variables and Hyperparameters**
Depending on the training method selected at [**Create Training Job**](#21-Create-Training-Job), that is, whether it's **Smart ML Training Job** or **Normal Training Job**, the variable settings will be slightly different:
|Field name |Description|
| --------|--------- |
| Environment Variables | Enter the name and value of the environment variables. The environment variables here include not only the settings related to the training execution, but also the parameters required for the training network. |
| Hyperparameters<sup style="color:red"><b>\*</b></sup> | **(Smart ML Training Job)** This tells the job what parameters to try. Each parameter must have a name, type, and value (or range of values) when it is set. After selecting the type (integer, float, and array), enter the corresponding value format when prompted. |
| Target Parameter | After training, a value will be returned as the final result. Here, the name and target direction need to be set for this value. For example, if the returned value is the accuracy rate, you can name it accuracy and set its target direction to the maximum value; if the returned value is the error rate, you can name it error and set its direction to the minimum value. |
| Command | Enter the command or program name to be executed. The command provided in this image is: `python /workspace/train.py`.|
| Trial Times<sup style="color:red"><b>\*</b></sup> | **(Smart ML Training Job)** That is, the number of training sessions, the training task is executed multiple times to find a better parameter combination.|
Here, **Environment Variables** and **Hyperparameters** can be moved to each other. If you want to fix a parameter, you can remove it from the hyperparameter setting and add it to the environment variable with a fixed value; conversely, if you want to add the parameter to the trial, remove it from the environment variable and add it to the hyperparameter settings below.
Please note that if a parameter exists in both the environment variable area and the hyperparameter area, the parameter values in the hyperparameter area will overwrite the parameter values in the environment variable area.
5. **Review & Create**
Finally, confirm the entered information and click **CREATE**.
<br>
### 2.2 Start a Training Job
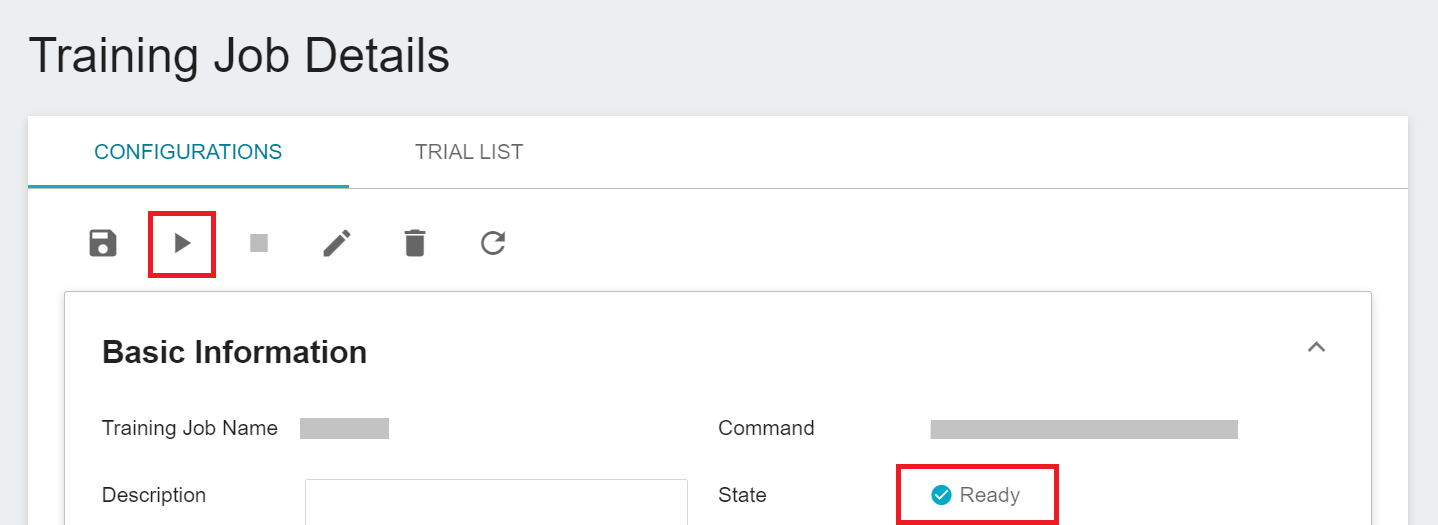
After completing the setting of the training job, go back to the training job management page, and you can see the job you just created. Click the job to view the detailed settings of the training job. If the job state is displayed as **`Ready`** at this time, you can click **START** to execute the training job.
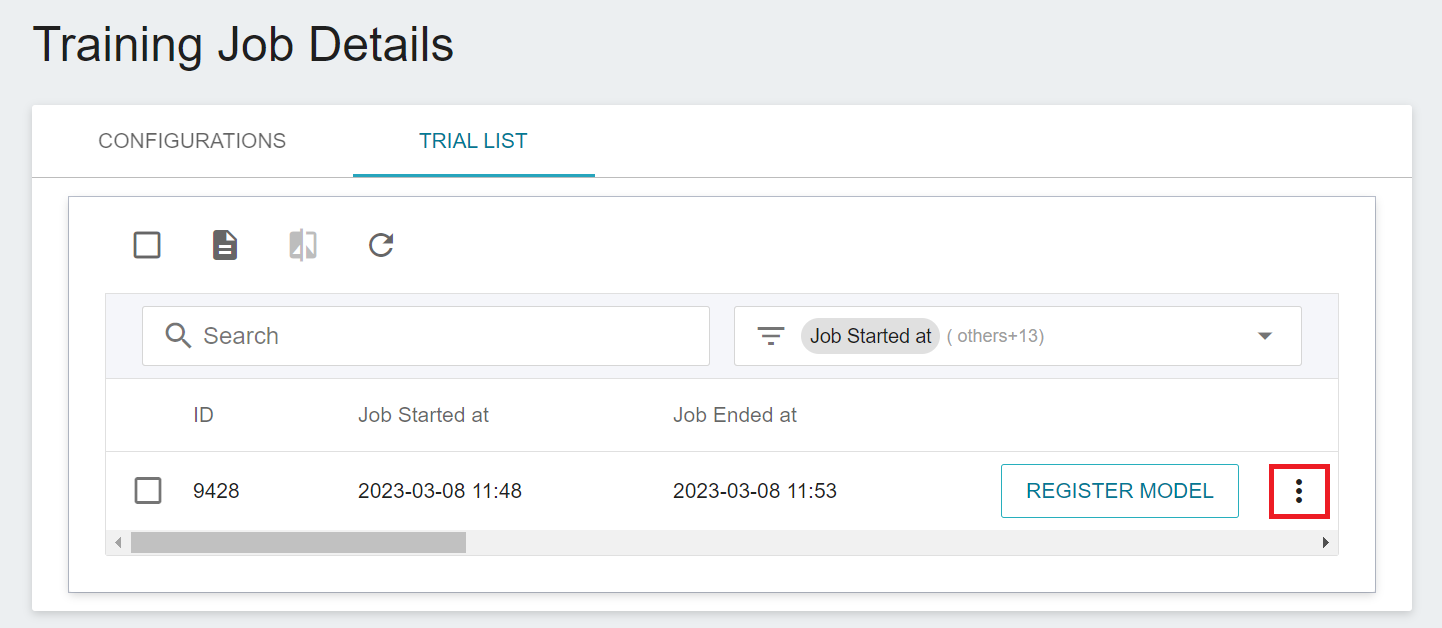
Once started, click the **TRIAL LIST** tab above to view the execution status and schedule of the job in the list. During training, you can click **VIEW LOG** or **VIEW DETAIL STATE** in the menu on the right of the job to know the details of the current job execution.
<br>
### 2.3 View Training Results
Please refer to [**AI Maker > View Training Results**](/s/ai-maker#View-Training-Results) document, click on **TRIAL LIST** to view all metrics recorded by MLflow.
Metrics records the loss and accuracy on the training set and the validation set respectively. In this example, the result with better performance in the validation set is preferred, that is, the lower the **val_loss, the higher the val_accuracy**, because usually the performance of the training set and the validation set will be directly proportional; but if the two The results are inversely proportional, and the phenomenon of overfit may occur. It is recommended to adjust the parameters and retrain.

<br>
### 2.4 Model Registration
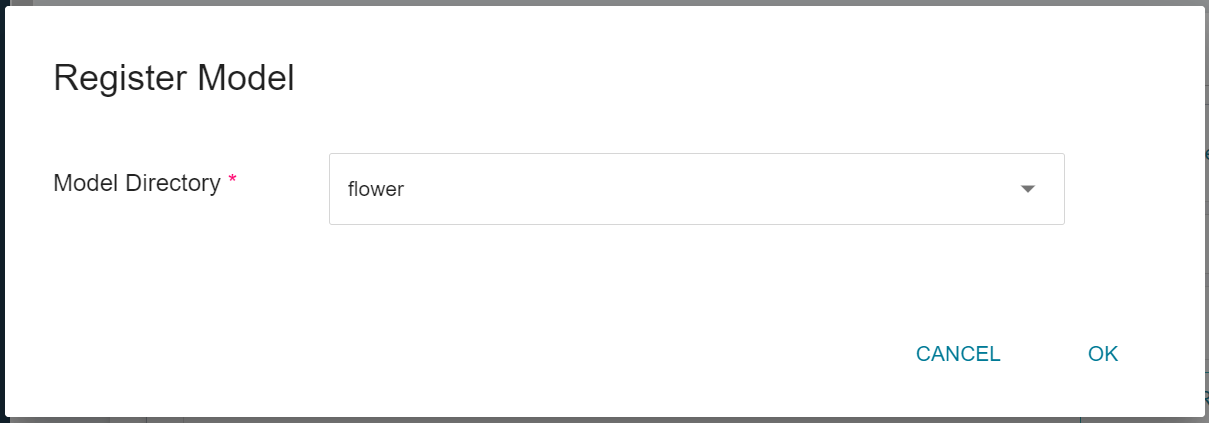
Select the result that meets expectation from one or more trial results, and then click **REGISTER MODEL** on the right to save them to Model Management; if no results meet expectation, then re-adjust the value or value range of environment variables and hyperparameters.

In the **Register Model** window, you can enter the desired model directory name. For example, you can input `flower` to create a new model directory, or choose an existing model directory.
<br>
After saving, go back to the **Model Management** page. Find the model in the list, click to enter the version list of the model, you can see all the versions, descriptions, sources and results of the stored model.
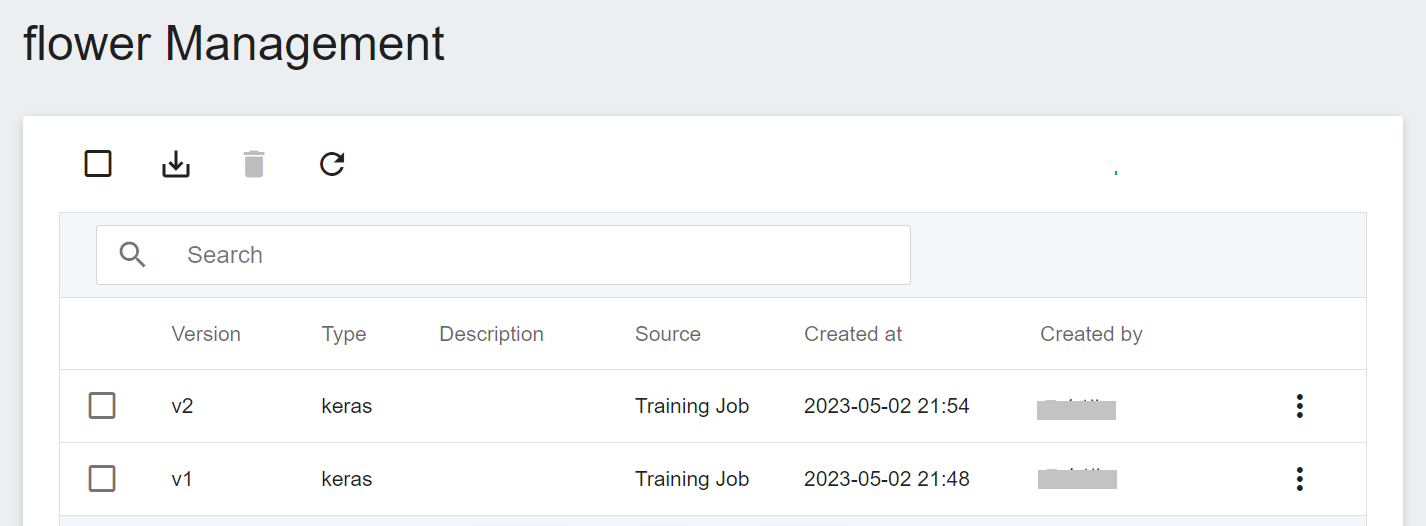
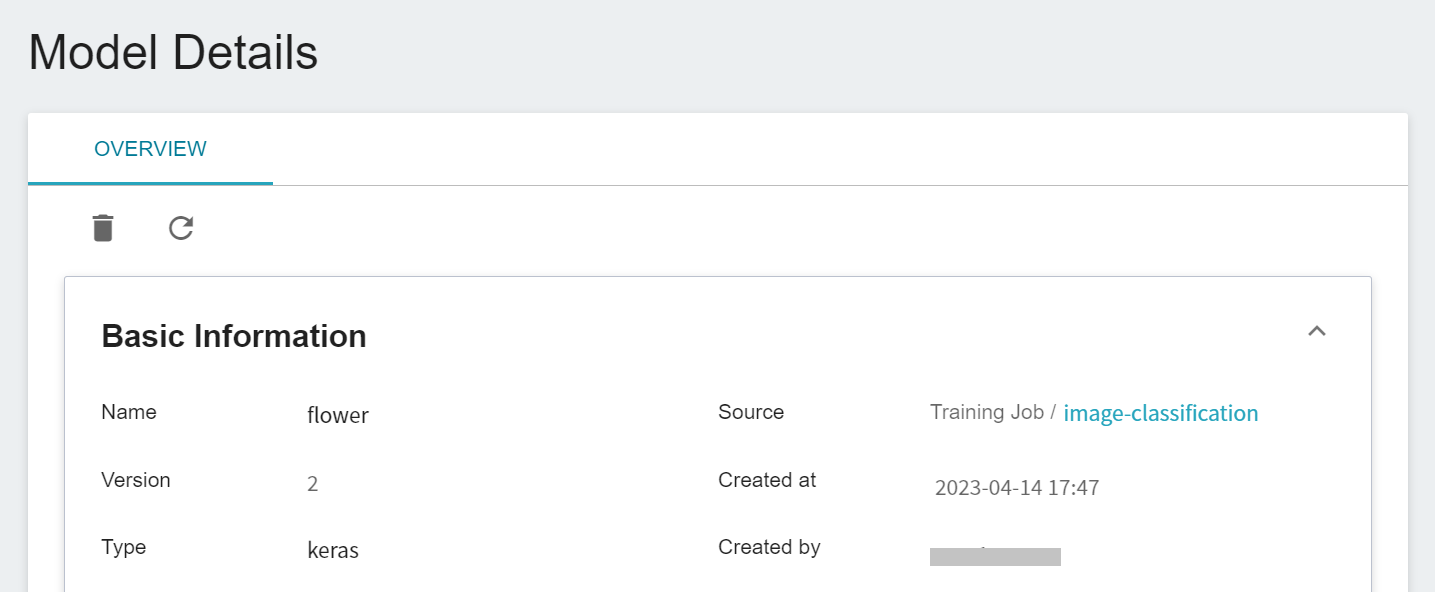
Clicking on the version list will display the detailed information of the model version, such as: model framework, image, environment variable... etc. Among them, **model framework** will be automatically identified by the system when registering the model, and displayed in the column of **Type**. This example uses tf.keras as impllementation framework, so the category is displayed as keras.
<br><br>
## 3. Create Inference Service
Once you have trained the network for image classification tasks and stored the trained model, you can deploy it to an application or service to perform inference using the **Inference** function.
<br>
### 3.1 Create Inference
Please refer to [**Inference Service**](/s/ai-maker-en#Inference) in the AI Maker User Guide to start building an inference service and fine-tune it for this template.
1. **Basic Information**
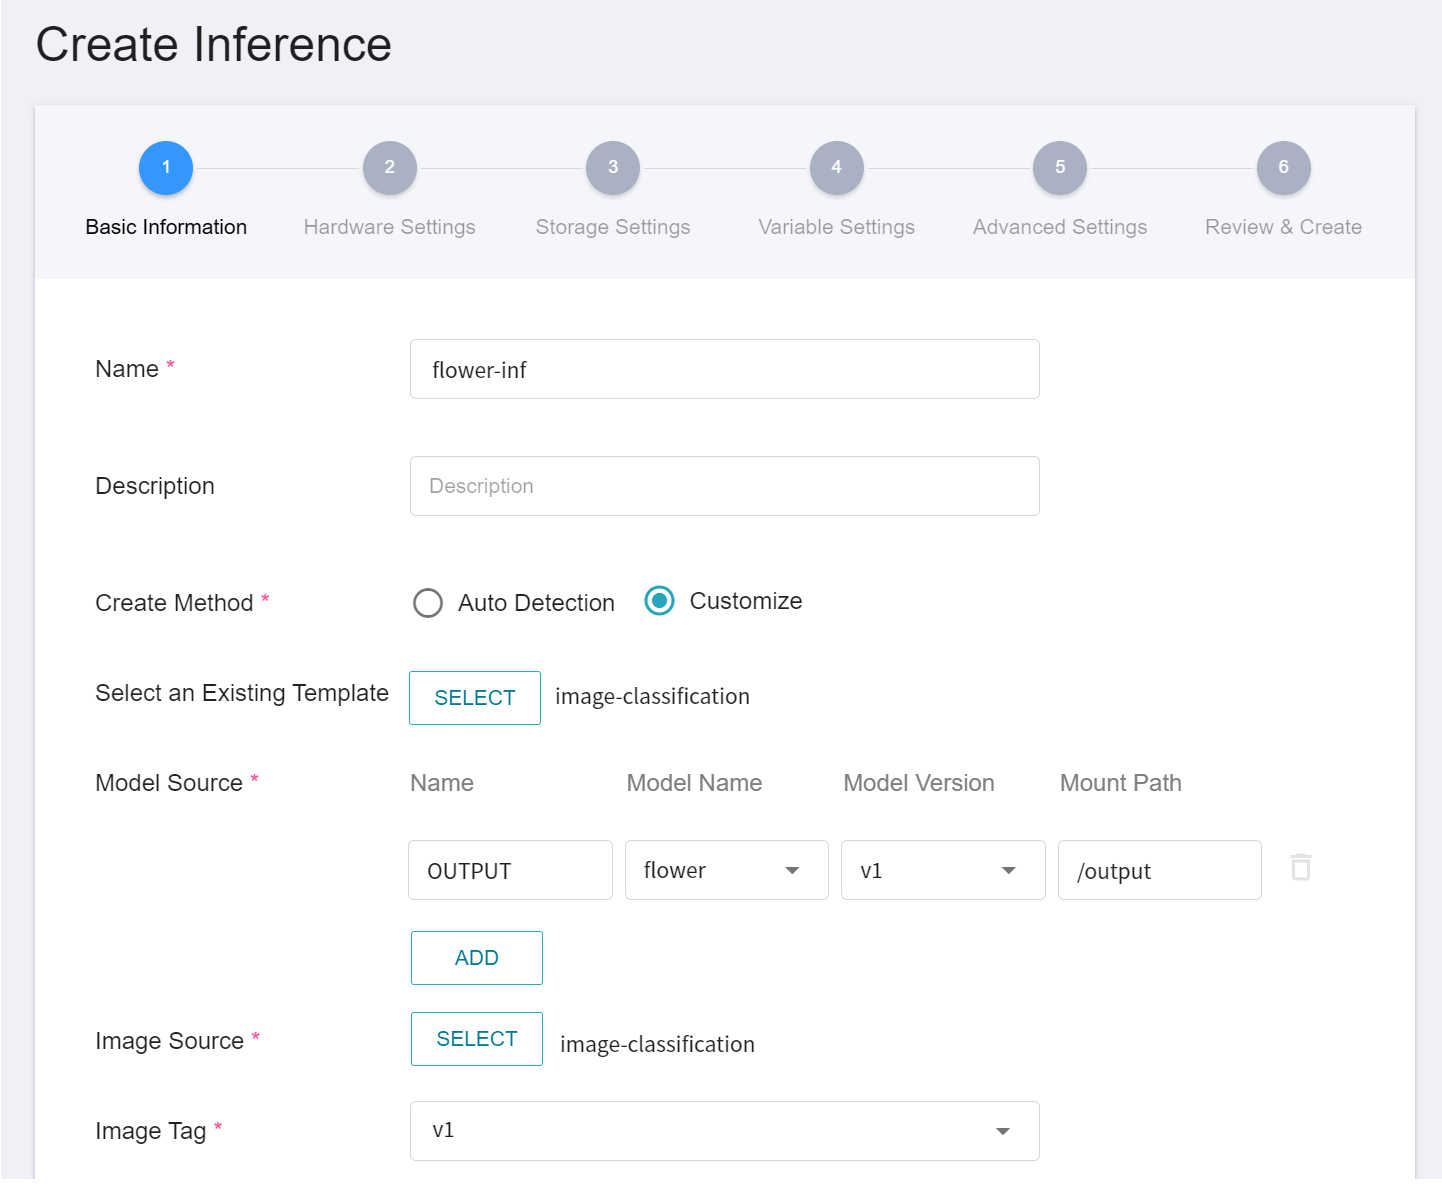
First, change the **Create Method** to **Customization** and Similar to the previous settings, we also use the **`image-classification`** template for the task. However, the model name and version number to be loaded still need to be set manually.
- **Name**
The file name of the loaded model relative to the program's ongoing read. This value is set by the `image-classification` inference template.
- **Model Name**
The name of the model to be loaded, that is, the model we saved in [**2.4 Model Registration**](#24-Model-Registration).
- **Version**
The version number of the model to be loaded is also the version number set in [**2.4 Model Registration**](#24-Model-Registration).
- **Mount Path**
Location of the loaded model relative to the program's ongoing read. This value is set by the `image-classification` inference template.
2. **Hardware Settings**
Select the appropriate hardware resource from the list with reference to the current available quota and requirements. However, it should be noted that the machine learning framework used in the image of this example is **tensorflow-gpu**, so when selecting hardware, please select the specification that includes **GPU**.
3. **Storage Settings**
No configuration is required for this step.
4. **Variable Settings**
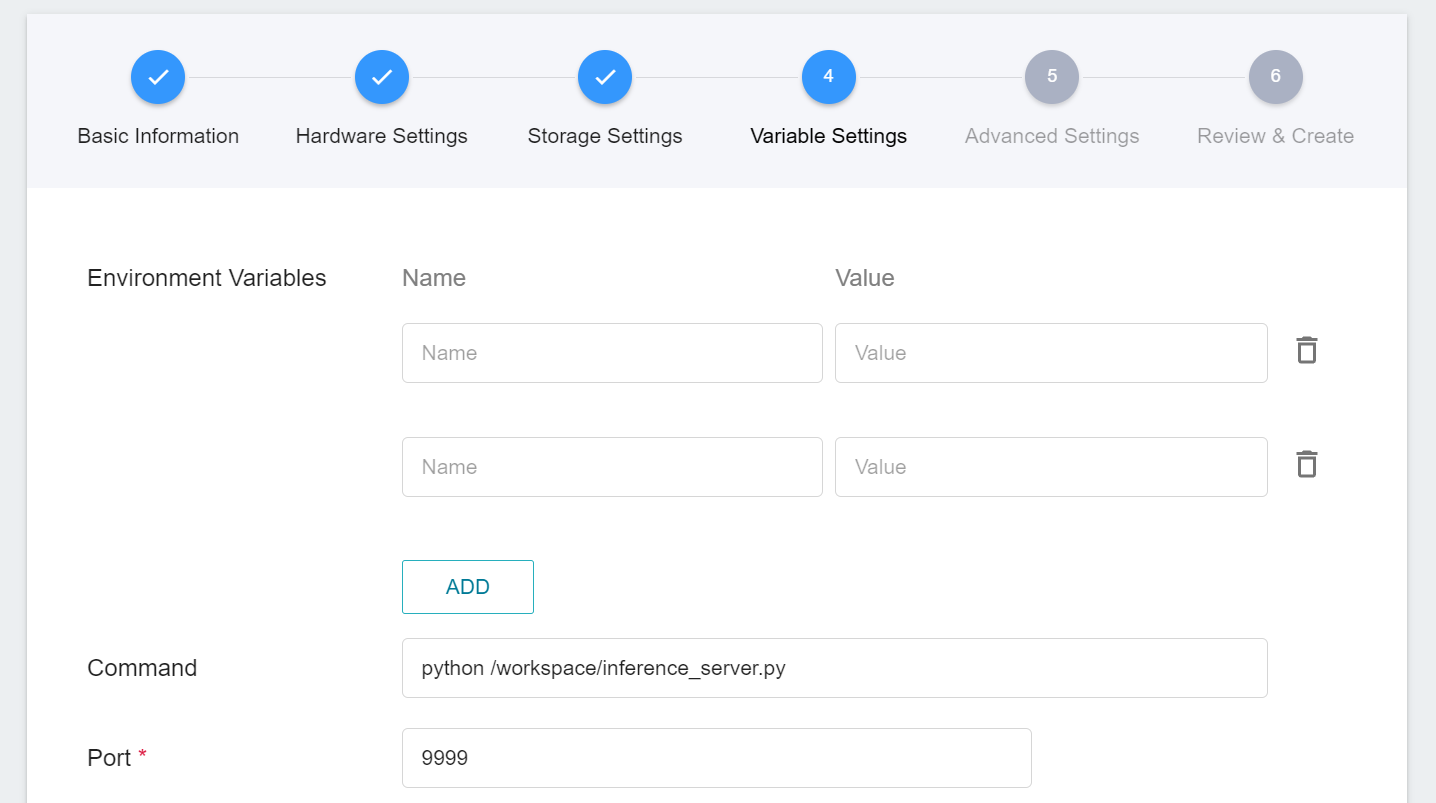
In the Variable Settings step, the usual commands and parameters are automatically brought in when the template is applied.
5. **Advanced Settings**
* **Monitor Data**
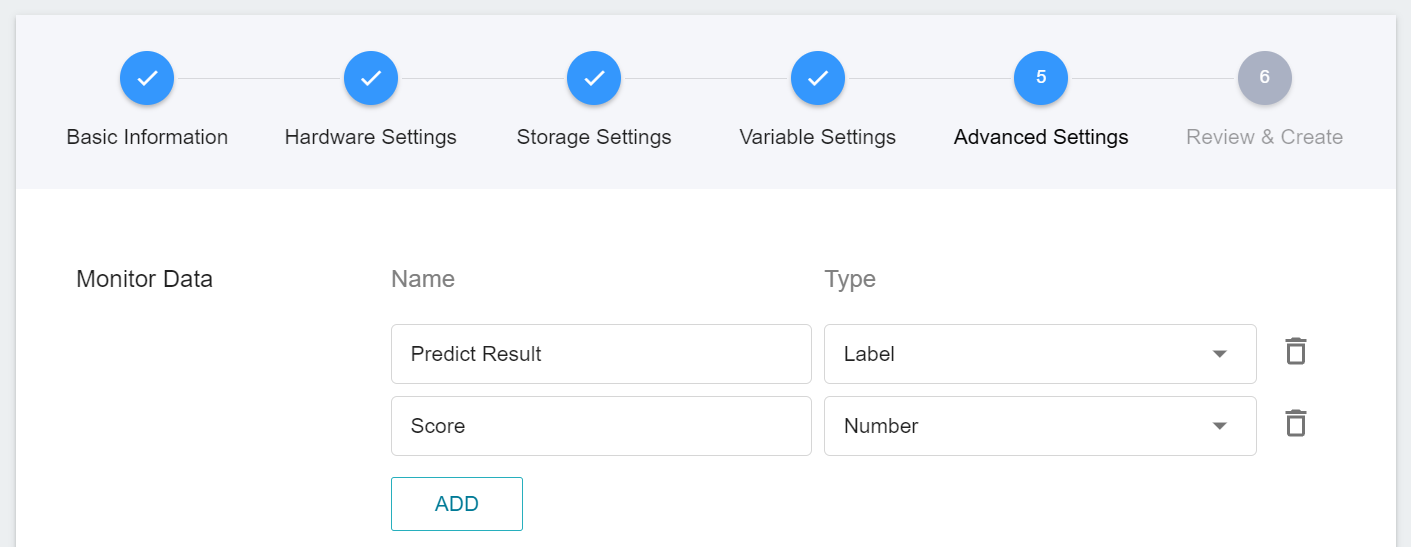
The purpose of monitoring is to observe the number of API calls and inference statistics over a period of time for the inference service.
| Name | Type | Description |
|-----|-----|------------|
|Predict Result | Tag | The total number of times the object has been detected in the specified time interval.<br> In other words, the distribution of the categories over a period of time.<br> 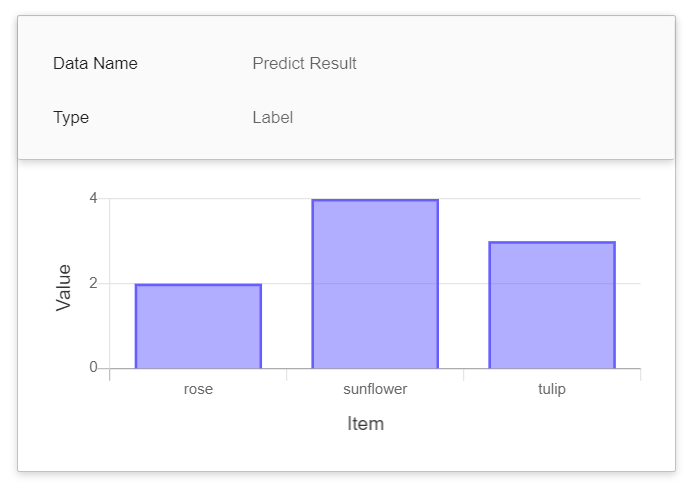
|Score | Number | The confidence value of the object being detected when the inference API is called once at a certain point in time.<br>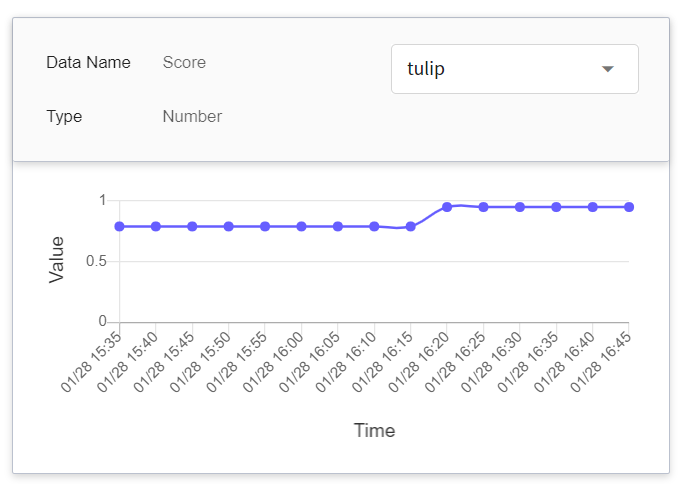|
<br>
6. **Review & Create**
Finally, confirm the entered information and click **CREATE**.
<br>
### 3.2 Making Inference
After completing the setting, please go to the inference service's detailed settings to confirm whether it is successfully started. When the service state shows as **`Ready`**, you can start connecting to the inference service for inference.
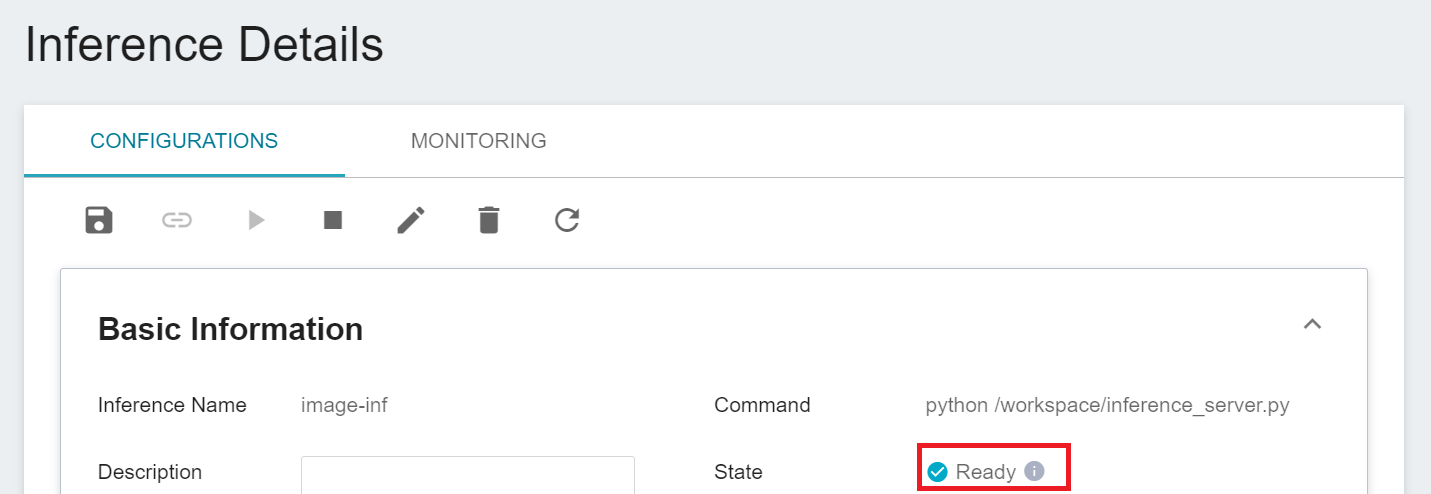
You can also click **VIEW LOG**. If you see the following message in the log, the inference service is already running.
> * Running on http://{ip}:{port}/ (Press CTRL+C to quit)

<br>
Note that the URL http://{ip}:{port} displayed in the log is only the internal URL of the inference service and is not accessible from outside. Since the current inference service does not have a public service port for security reasons, we can communicate with the inference service we created through the **Notebook Service**.The way to communicate is through the **Network** information displayed at the bottom of the **Inference Details** page.
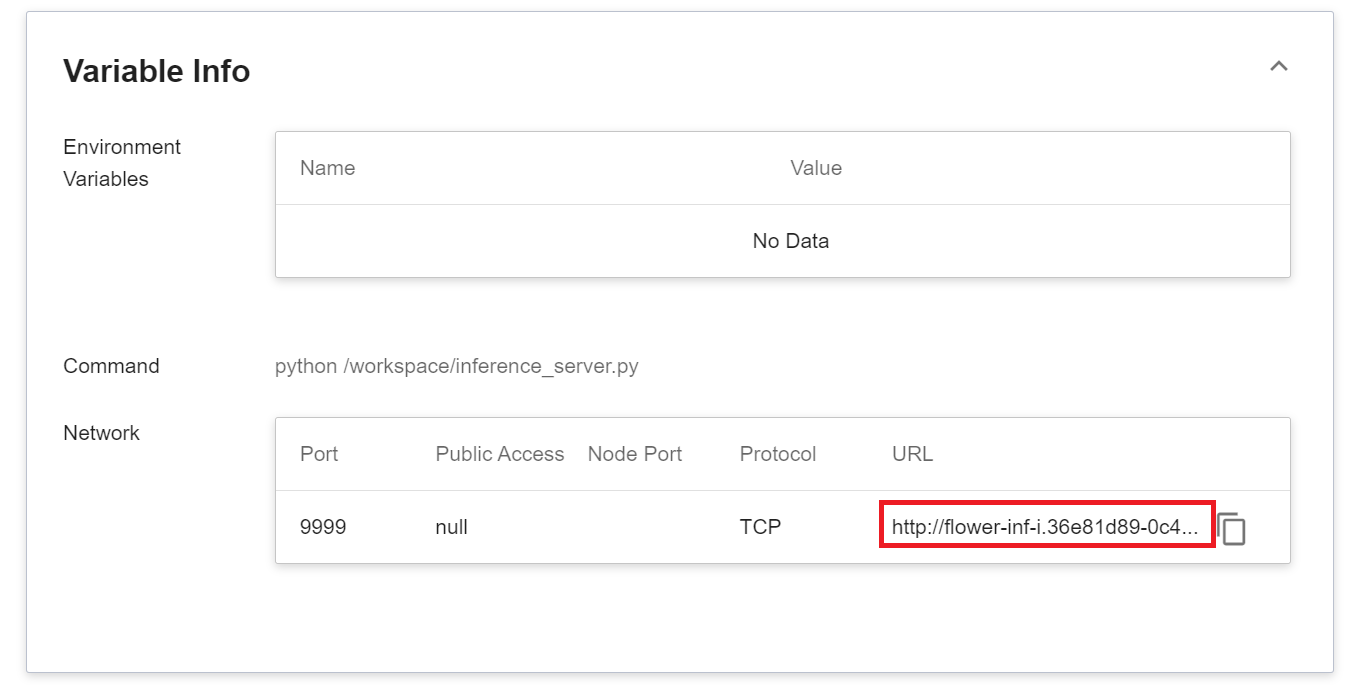
:::info
:bulb: **Tips: Inference Service URL**
- The URLs in the document are for reference only, and the URLs you got may be different.
- For security reasons, the **URL** provided by the inference service can only be used in the system's internal network, and cannot be accessed through the external Internet.
- To provide this Inference Service externally, please refer to [**Endpoint Service**](/s/endpoint-en) for instructions.
:::
<br>
You can click on the **MONITORING** tab to see the relevant monitoring information on the monitoring page, and the following figure shows the inference results after a period of time.
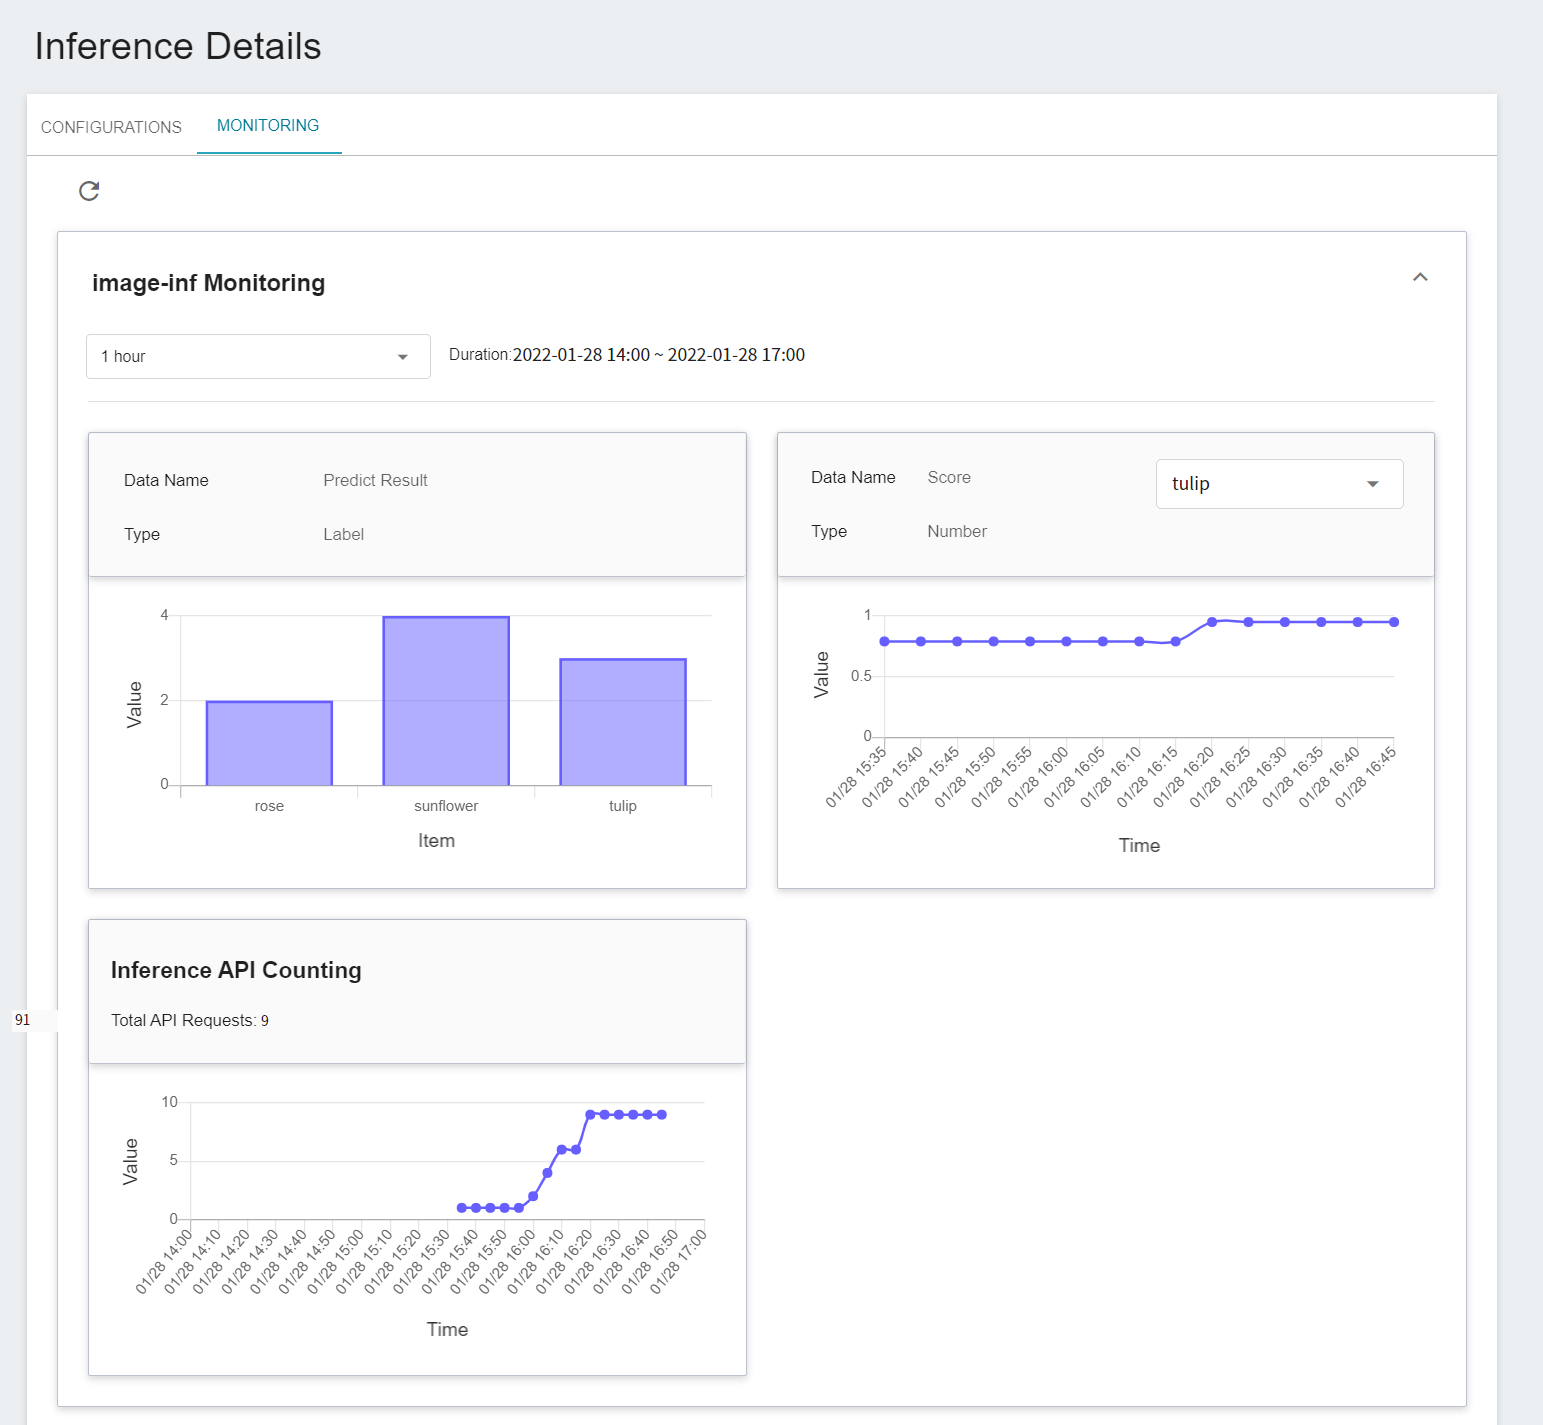
Click the Period menu to filter the statistics of the Inference API Call for a specific period, for example: 1 hour, 3 hours, 6 hours, 12 hours, 1 day, 7 days, 14 days, 1 month, 3 months, 6 months, 1 year, or custom.

:::info
:bulb: **About the start and end time of the observation period**
For example, if the current time is 15:10, then.
- **1 Hour** refers to 15:00 ~ 16:00 (not the past hour 14:10 ~ 15:10)
- **3 Hours** refers to 13:00 ~ 16:00
- **6 Hours** refers to 10:00 ~ 16:00
- And so on.
:::
<br>
### 3.3 Making Inference
After starting the inference service, you can create a client through [**Notebook Service**](/s/notebook-en) for inference.
When creating a notebook service, please apply **py3** environment, for example: TensorFlow-22.08-tf2-py3, PyTorch-21.02-py3, and mount the dataset to be inferred into the notebook:
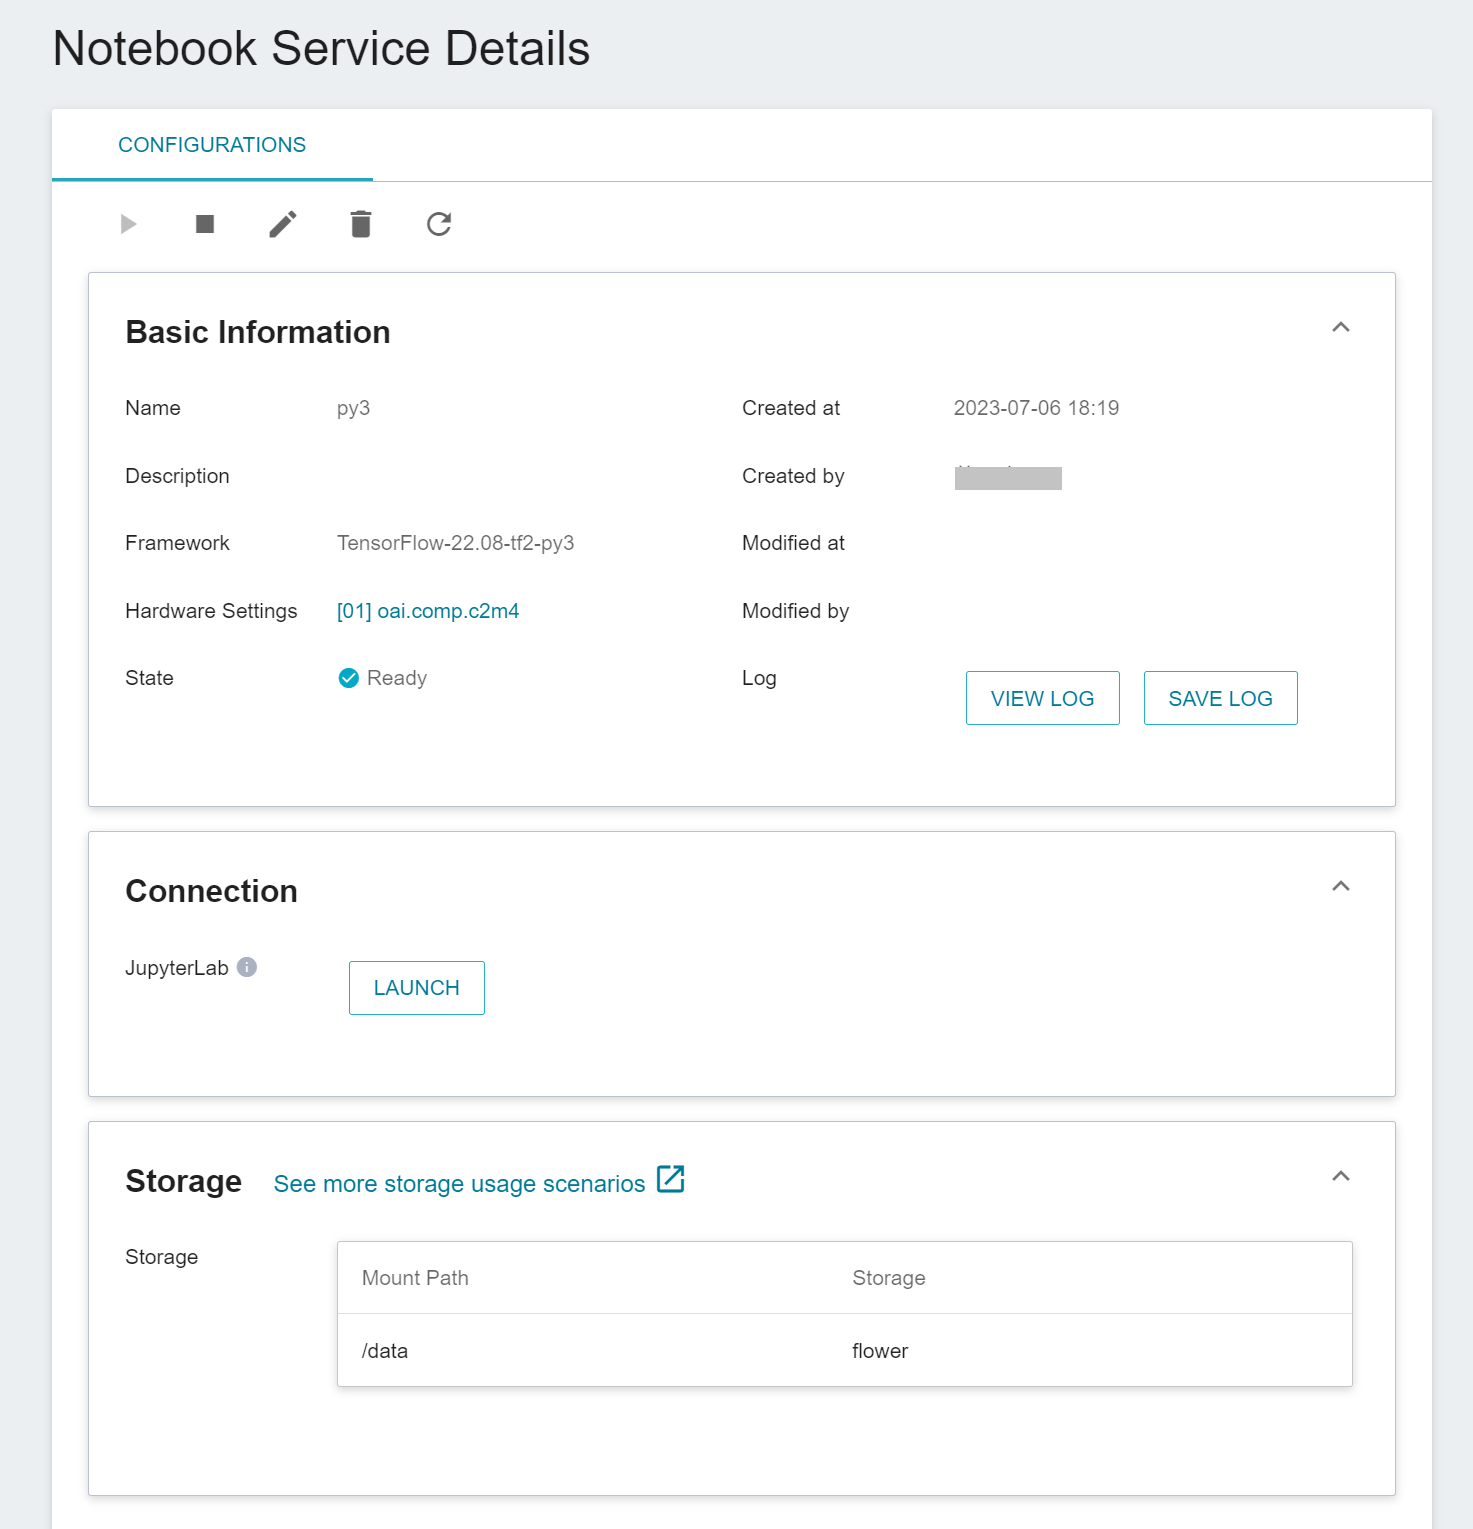
After starting the Jupyter notebook, there are two ways to do inference:
1. **Test the Inference Service with the curl Command**
One is to use Jupyter's Terminal to infer with curl.
```bash=
curl -X GET {Inference Service URL}/hello
```
Where `{Inference Service URL}` is the URL displayed in the **Network** information at the bottom of the **Inference Details** page. According to the obtained detailed information, execute after replacing each parameter, and you can see the returned text message:
```bash=
$> curl -X GET http://flower-inf-i.36e81d89-0c43-4e89-a7d8-a58705042436:9999/hello
Hello World!
```
The actual execution results are as follows:

<br>
If the service starts successfully, you can call the `predict` API to make inference:
```bash=
$> curl -X POST {Inference Service URL}/predict \
-H 'Content-Type: multipart/form-data' \
-F file=@{The location of the image to be passed on the local side}
```
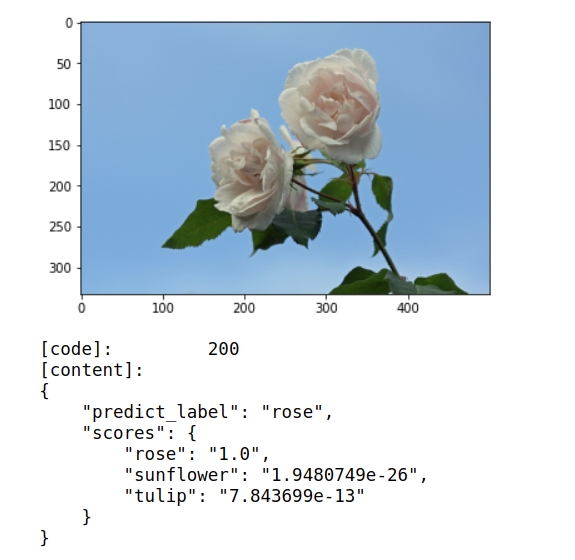
The server will predict after receiving the image, and finally return the confidence score of the image in each category:

If it is Binary Class, it returns the meaning and confidence score of Label 0 and 1. Generally speaking, a confidence score greater than 0.5 will be regarded as Label 1, and less than 0.5 will be regarded as Label 0. However, the threshold value is not absolute and can be adjusted according to the characteristics of the dataset.

The actual execution results are as follows:

2. **Use Python Program to Run Inference Service**
In addition to using the terminal, you can also use the [**Container Service**](/s/container-service-en) to start Jupyter and connect to the inference service. A Jupyter code is provided in the attachment of this tutorial, and you can use this code to infer directly. Below are the descriptions of the attached code:
1. **Send Request**
Use the requests module here to generate an HTTP POST request and upload the image.
```python=
INFE_URL = "http://flower-inf-i.36e81d89-0c43-4e89-a7d8-a58705042436:9999"
URL_BASE = "{url}".format(url=INFE_URL)
ROUTE = "/predict"
url = "{base}{route}".format(
base=URL_BASE,
route=ROUTE)
image_path = "/input/dataset/train/rose/7865295712_bcc94d120c.jpg"
image_file_descriptor = open(image_path, 'rb')
res = requests.post(url, files={'file': image_file_descriptor})
image_file_descriptor.close()
```
Here `INFE_URL` need to be filled in with the URL of the inference service. The `image_path` is the location of the image to be inferred.
2. **Retrieve Results**
After the object detection is completed, the results are sent back in JSON format, including the prediction results and scores.
```python=
img = mpimg.imread(image_path)
imgplot = plt.imshow(img)
plt.show()
status_code = res.status_code
content = json.loads(res.content)
content = json.dumps(content, indent=4)
print("[code]:\t\t{code}\n[content]:\n{text}".format(code=status_code,text=content))
```
#### **Attached Code**
:::spoiler **Program Code**
```python=1
import requests
import json
import matplotlib.pyplot as plt
import matplotlib.image as mpimg
INFE_URL = "http://flower-inf-i.36e81d89-0c43-4e89-a7d8-a58705042436:9999"
## Case1、Connect test
URL_BASE = "{url}".format(url=INFE_URL)
res = requests.get(URL_BASE)
print("[code]:\t\t{code}\n[content]:\t{text}".format(code=res.status_code,text=res.text))
# Case2、Hello World
ROUTE = "/hello"
url = "{base}{route}".format(
base=URL_BASE,
route=ROUTE)
res = requests.get(url)
print("[code]:\t\t{code}\n[content]:\t{text}".format(code=res.status_code,text=res.text))
# Case3、Predict
ROUTE = "/predict"
url = "{base}{route}".format(
base=URL_BASE,
route=ROUTE)
image_path = "/input/dataset/train/rose/7865295712_bcc94d120c.jpg"
image_file_descriptor = open(image_path, 'rb')
res = requests.post(url, files={'file': image_file_descriptor})
image_file_descriptor.close()
img = mpimg.imread(image_path)
imgplot = plt.imshow(img)
plt.show()
status_code = res.status_code
content = json.loads(res.content)
content = json.dumps(content, indent=4)
print("[code]:\t\t{code}\n[content]:\n{text}".format(code=status_code,text=content))
```
:::