---
description: OneAI Documentation
tags: EN, Case Study, MONAI
---
[OneAI Documentation](/s/user-guide-en)
# AI Maker Case Study - MONAI 1.0 Tutorial: Train 3D Segmentation Model Using Spleen CT Data
[TOC]
## 0. Introduction
MONAI (Medical Open Network for AI) is a community-supported, PyTorch-based deep learning framework for medical imaging. It provides domain-optimized foundational capabilities for developing healthcare imaging training workflows in a native PyTorch paradigm.
The following diagram depicts the overall architecture and modules of MONAI. For developers, it is common to use **Workflow** and suitable **Basic Component** to create customized tasks.
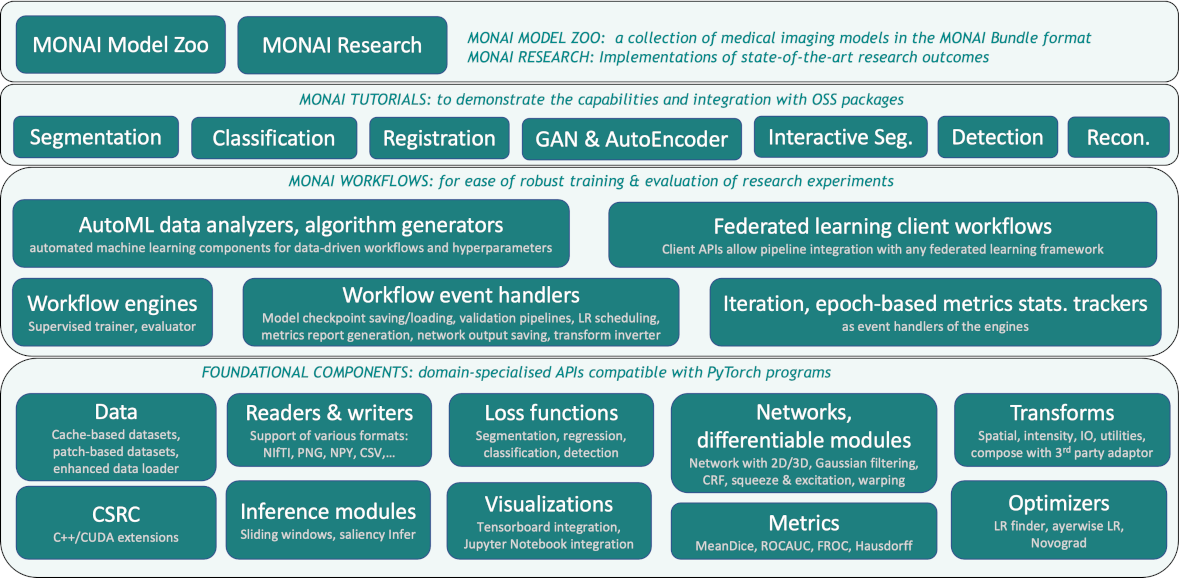
To facilitate the development of medical imaging-related services, AI Maker integrates **MONAI** medical imaging deep learning framework to provide the software and hardware environment required for the development and training process, allowing you to easily train and use medical imaging models.
### Basic Concepts
Before starting, there are three basic concepts that need to be understood first:
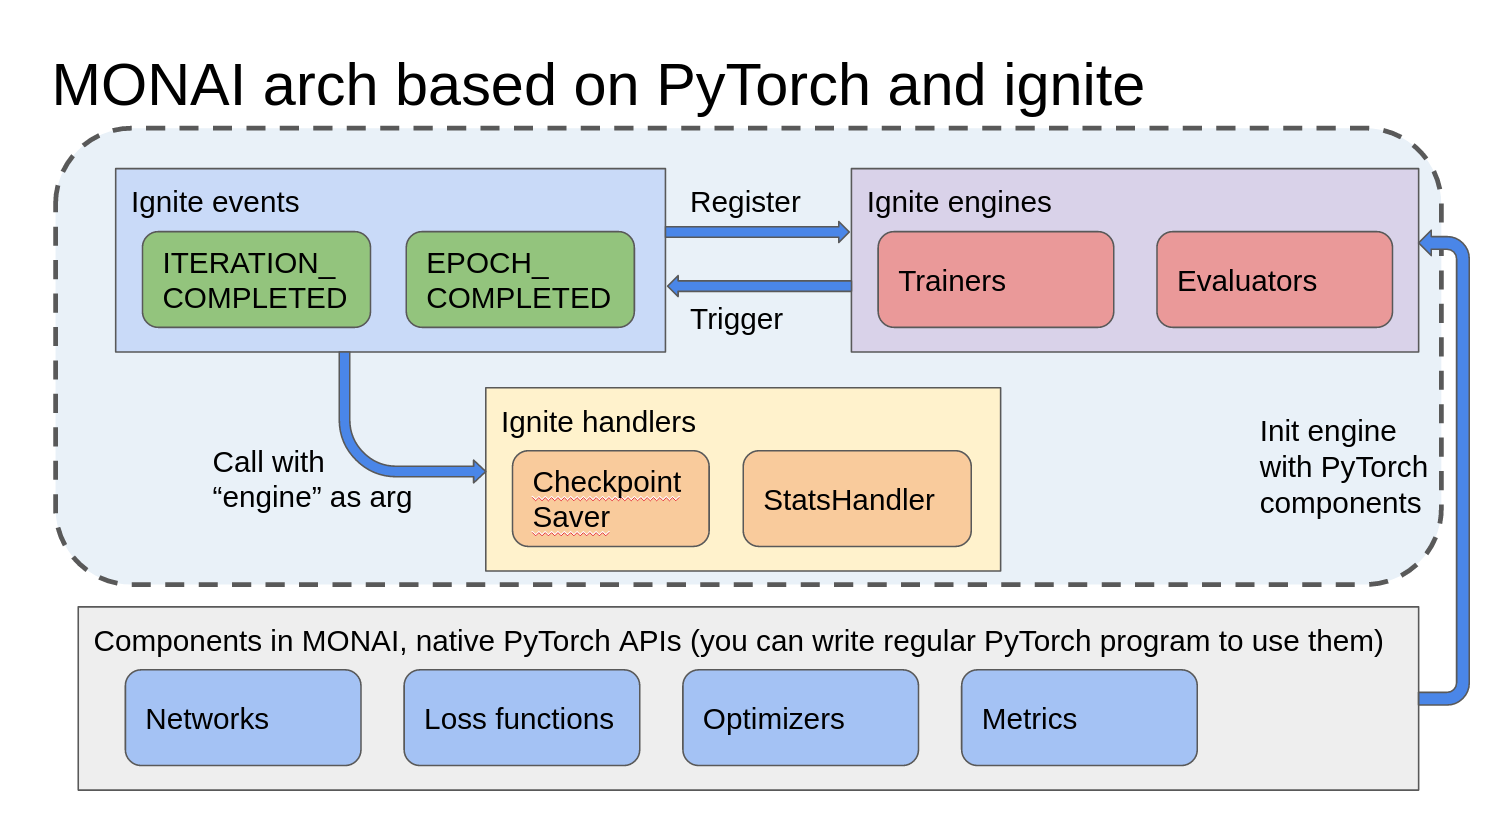
#### 1. MONAI Workflow
MONAI Workflow is built upon PyTorch-Ignite and consists of two key components: Engine and Event Handler. Engines are Trainers, Validators, or Evaluators. When a Trainer is equipped with the necessary components and registered handlers, the training loop can begin. During the process, different events are triggered at different times, and the corresponding handlers are called to perform tasks. For example, the CheckpointSaver handler is responsible for recording model checkpoints and saving the best-performing model.<br>
<center>Image source: Clara Train SDK
([Clara Train SDK 4.0](https://docs.nvidia.com/clara/clara-train-sdk/pt/essential_concepts.html) also uses the MONAI framework for training)
</center>
With traditional PyTorch training tasks, it's like building a house step by step at a construction site, where developers need to control the actions at each step of the training loop. PyTorch-Ignite, on the other hand, allows developers to choose a suitable pre-designed blueprint (Trainer) and combine it with corresponding components to build the final product.
#### 2. MONAI Bundle (MB): Used for Training Tasks and Inference Services
The goal of MB is to define a packaged deep learning network or model and make it easier for users and the program (MONAI Core) to understand how to use the model. The standard structure of a MONAI Bundle is as follows:
- **configs**: Including metadata.json for model-related metadata and JSON files for constructing training, inference, and post-processing workflows.
- **models**: The directory used to store the training model.
- **docs**: As the name suggests, the place to put documents.
```
./Project
├── configs
├── models
└── docs
```
The training tasks in the **configs** directory is listed in **train.json**, which is based on **MONAI Worklflow**. Apart from [**basic syntax**](https://docs.monai.io/en/latest/config_syntax.html), there are no specific reserved keywords in the file. The configuration file content can be simply divided into four parts based on their purpose.
1. Script: The entry point when executing with MB CLI (Command-Line Interface) will initiate the specified Trainer.
2. Engine: This is the Trainer.
3. Components: Components that fulfill the requirements of the Trainer Run.
4. Variables: Parameters that allow flexible adjustment of the previous three components.
<br>
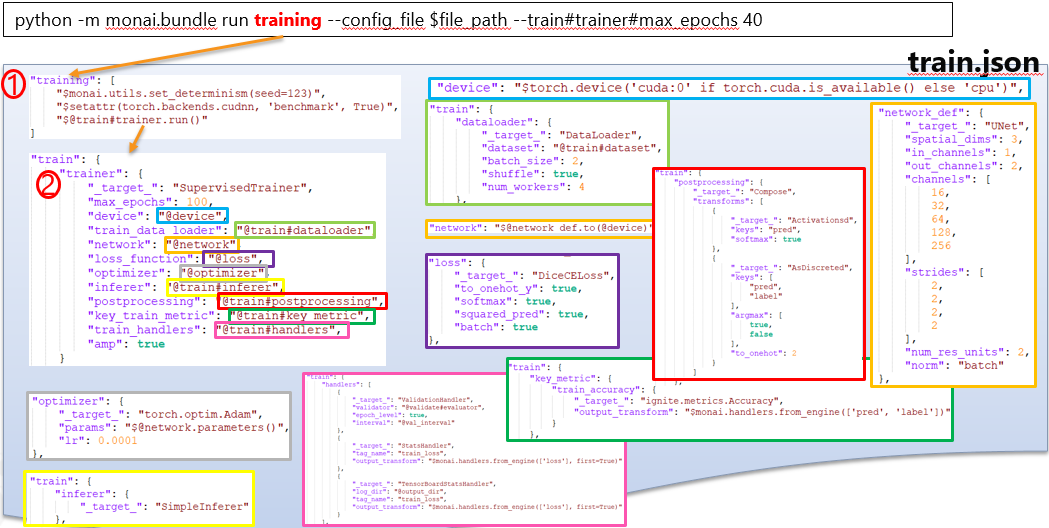
<center>Diagram explanation: The diagram illustrates the relationship between various objects specified in train.json when executing MB via CLI. Colored boxes including _target_ represent Components, and those without it represent Variables.</center>
<br>
In the provided tutorial, the template used for **Training Job** is MB, which is adjusted to some extent using AI Maker. The MB downloaded from the [**MONAI Model Zoo**](https://monai.io/model-zoo.html) does not include the CheckpointLoader handler. This means that during training, the **`model.pt`** file from the models folder will not be loaded as a Pretrained Weight. AI Maker helps by adding the corresponding handler based on the environment variables.
Currently, the medical image models stored in the [**MONAI Model Zoo**](https://monai.io/model-zoo.html) are in the MB format. These models are contributed not only by the MONAI team but also by other organizations within the development community. The Model Zoo also defines comprehensive contribution guidelines. It is expected that MB will become the preferred way to share the latest medical models.
#### 3. MONAI Label: Used for Inference Service
MONAI Label is a Server-Client system that utilizes AI assistance to achieve interactive medical image annotation. It has implemented all the necessary REST APIs for interactivity, so developers only need to focus on training and inference processes of the models. It also provides Sample Apps from different domains to help users get started quickly.
MONAI Label is mainly composed of three components:
* MONAI Label Server: Loads the model and defines the pre-processing and post-processing steps required for training and inference to provide the service.
* Datastore: Stores labeled or unlabeled medical images.
* Client/GUI: The tool used by different domains varies. For example, in radiology, it could be 3D Slicer/OHIF Viewer.
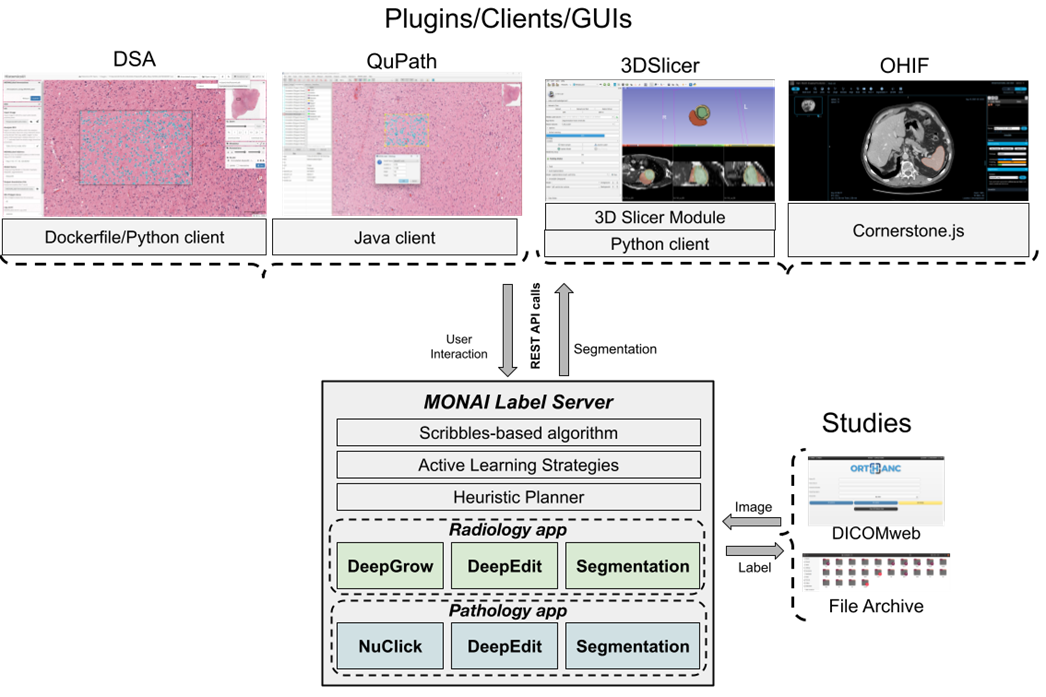
As of MONAI Label v0.5.1, the official release includes four Sample Apps: [**radiology**](https://github.com/Project-MONAI/MONAILabel/tree/0.5.1/sample-apps/radiology), [**pathology**](https://github.com/Project-MONAI/MONAILabel/tree/0.5.1/sample-apps/pathology), [**endoscopy**](https://github.com/Project-MONAI/MONAILabel/tree/0.5.1/sample-apps/endoscopy) and [**monaibundle**](https://github.com/Project-MONAI/MONAILabel/tree/0.5.1/sample-apps/monaibundle). The first three have predefined network models and pre-processing / post-processing configurations for training and inference within the code. The MONAI Label Bundle App retrieves the aforementioned information from the configuration files packaged in the MONAI Bundle (MB).
In this example, the **MONAI Label Bundle App** is chosen for **Inference**. It can seamlessly integrate with the network models trained using the MONAI Bundle (MB) or directly utilize the MB shared through the MONAI Model Zoo.
MONAI Label separates the inference process into different tasks such as network modeling, pre-processing, inference, and post-processing, allowing developers to define them according to their specific needs. Therefore, when parsing the inference.json file in the MONAI Label Bundle App, it doesn't follow the MONAI Workflow approach with an Engine as the main component. Instead, it **uses a Parser to load the required Components**.
Due to the additional conversion processes between the completion of inference and the transmission to the client, the MONAI Label Bundle App may not achieve full compatibility with the MB provided by the MONAI Model Zoo. For the actual **support list**, please refer to the [**official website**](https://github.com/Project-MONAI/MONAILabel/tree/0.5.1/sample-apps/monaibundle) for more information.
### Case Study
In this Case Study, we will describe how to use a publicly available Computed Tomography (CT) dataset of the spleen to train 3D model with segmentation, and how to use the trained model for identification.
The main steps are as follows:
1. [**Prepare MONAI Bundle and Dataset**](#1-Prepare-MONAI-Bundle-and-Dataset)
At this stage, we will describe how to obtain public MONAI Bundle and datasets and upload them to the designated location.
2. [**Train the Segmentation Model**](#2-Train-the-Segmentation-Model)
At this stage, we will configure the Training Job for MONAI training and fitting, and store the trained model.
3. [**Create Inference Service**](#3-Create-Inference-Service)
At this stage, we deploy the stored model to the Inference Service for inferencing.
4. [**MONAI Label Client**](#4-MONAI-Label-Client---3D-Slicer)
At this stage, we will explain how to use [**3D Slicer**](#4-MONAI-Label-Client---3D-Slicer) as the MONAI Label Client and connect to the Inference Service for performing inference tasks.
After completing this example, you will have learned to:
1. Familiarize yourself with AI Maker functions and create jobs for each stage.
2. Use AI Maker's built-in templates to create related jobs.
3. Use the storage service and upload data.
4. How to connect with MONAI Label Server for inference.
## 1. Prepare MONAI Bundle and Dataset
In this step, we describe how to prepare the MONAI Bundle and obtain the relative spleen dataset.
### 1.1 Upload MONAI Bundle
Please follow the steps below to prepare MONAI Bundle and dataset.
First, we will prepare the [**MONAI Bundle (MB)**](https://docs.monai.io/en/latest/mb_specification.html) files required for MONAI training. In this example, we will use the MONAI Bundle config provided by MONAI for 3D segmentation of the spleen from CT images, along with the pre-trained model [**Spleen ct segmentation**](https://github.com/Project-MONAI/model-zoo/releases/download/hosting_storage_v1/spleen_ct_segmentation_v0.3.2.zip). We will also upload the spleen dataset to the Storage Service provided by the platform.
:::info
:bulb: **Tips:** In this example, you need to extract the downloaded MB files and make additional modifications to the **train.json** file. Change the **`dataset_dir`** value from the default **`/workspace/data/Task09_Spleen`** to **`/dataset/Task09_Spleen`** to match the actual file location.
<br>
```json=
{
"imports": [
"$import glob",
"$import os",
"$import ignite"
],
"bundle_root": "/workspace/data/spleen_ct_segmentation",
"ckpt_dir": "$@bundle_root + '/models'",
"output_dir": "$@bundle_root + '/eval'",
"dataset_dir": "/dataset/Task09_Spleen", <--- This needs to be modified
...
```
:::
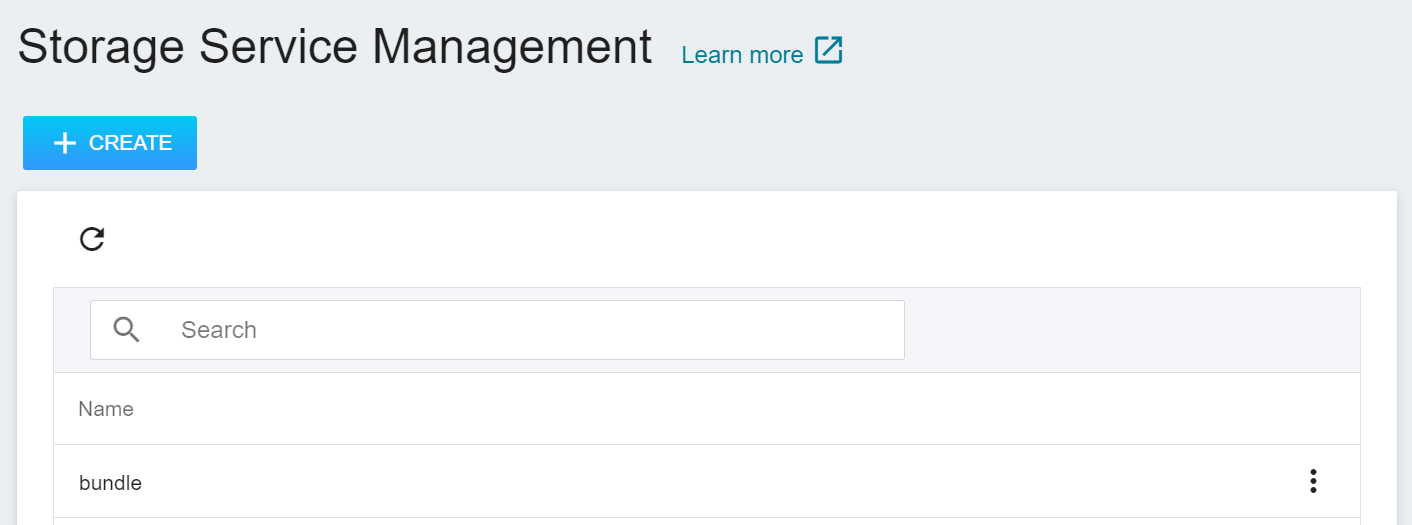
1. **Create a Bucket**
Select **Storage Service** from the OneAI Services, enter the Storage Service Management page, and then click **+ CREATE** to add a bucket named **`bundle`** to store our MONAI Bundle files.
2. **View Bucket**
After the bucket is created, go back to the **Storage Service Management** page, and you will see that the bucket has been created.
3. **Upload MONAI Bundle**
Click the created bucket, and then click **UPLOAD** to start uploading the files. (See [**Storage Service Documentation**](/s/storage-en)).
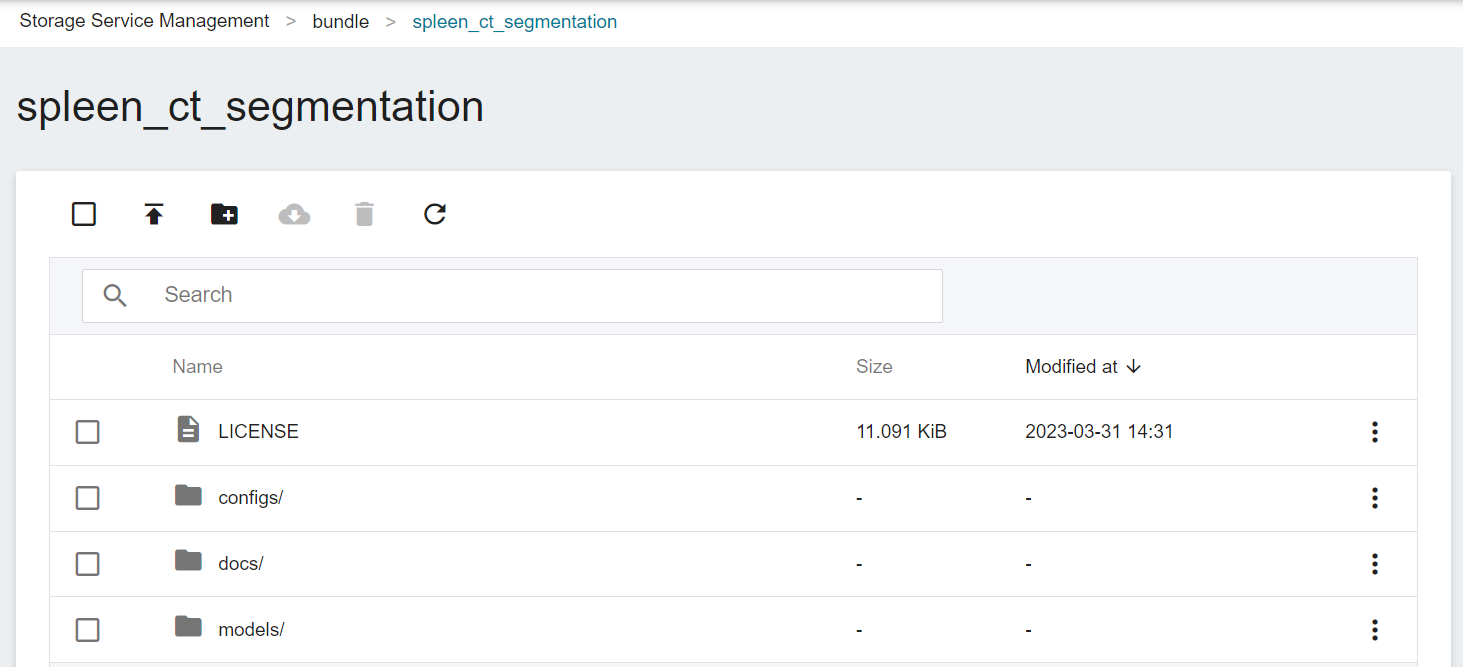
The most important file for the training task in the MONAI Bundle is the train.json file located in the configs directory. This JSON file contains all the parameters needed to define the neural network, the construction of the network model, the activation functions, the optimizer... and more. The settings required for Training and Validation are defined separately, and are described in detail in the official [**MONAI documentation**](https://docs.monai.io/en/latest/config_syntax.html).
### 1.2 Upload Dataset
1. **Download Public Dataset**
After uploading the MONAI Bundle files, the next step is to prepare the corresponding spleen dataset. We use the public dataset — [**Medical Segmentation Decathlon**](http://medicaldecathlon.com/) for training, from which we download **`Task09_Spleen.tar`**. This is a competition dataset for segmentation of medical images, and this Task09 is a dataset for the spleen. Once the dataset is downloaded, extract the files from the compressed archive and prepare to upload them to the storage service.
<center> <img src="/uploads/o33Cg55.png" alt="Introduction to the Spleen Dataset"></center>
<center>Introduction to the Spleen Dataset</center>
<center><a href="http://medicaldecathlon.com/">(Image credit: Medical Segmentation Decathlon)</a></center>
<br><br>
2. **Create a Bucket**
Next, similar to the steps for creating the **`bundle`** bucket, we create a bucket called **`dataset`** in which we will place the spleen dataset.
3. **Upload Dataset**
Next, decompress **Task09_Spleen.tar** and upload the folder to the bucket.
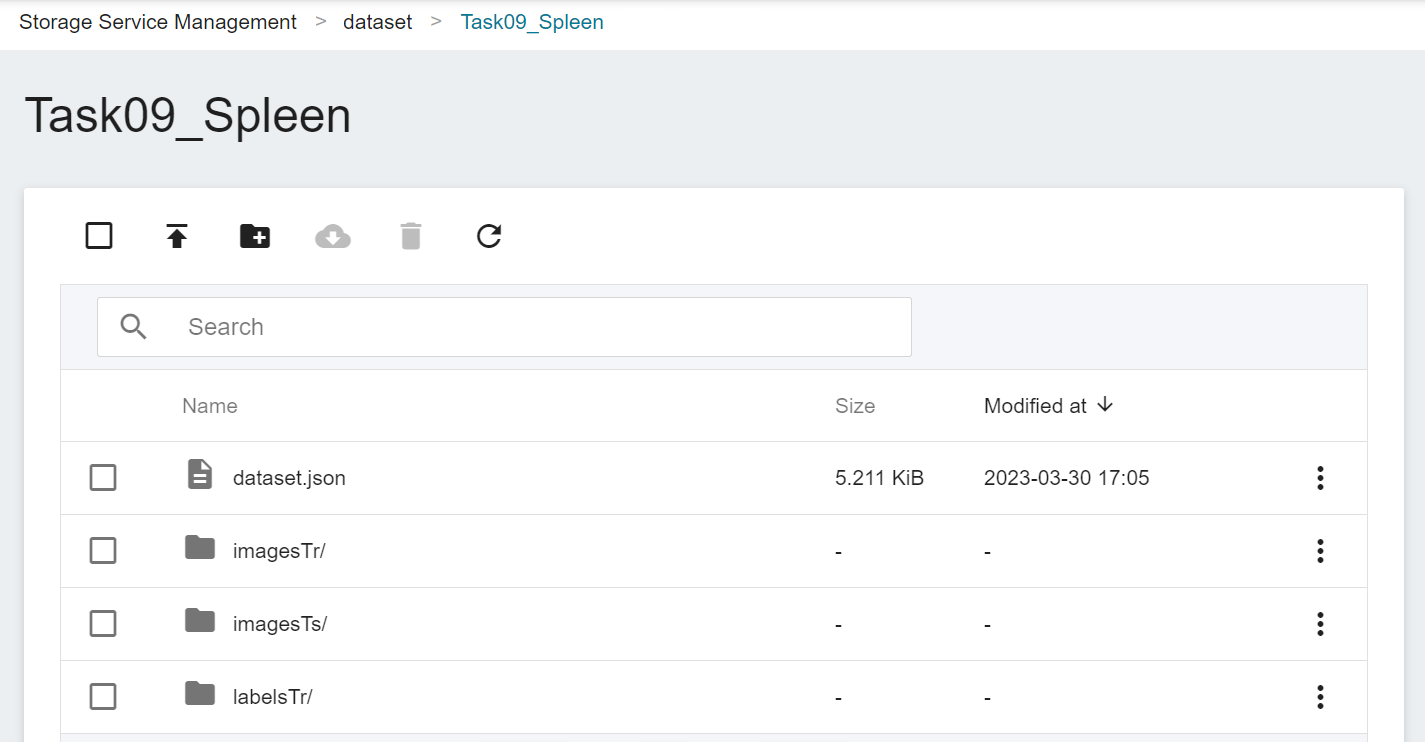
Now, we have finished uploading the dataset.
## 2. Train the Segmentation Model
After completing the upload of [**MONAI Bundle**](#11-Upload-MONAI-Bundle) and [**Dataset**](#12-Upload-Dataset), we can use this dataset for transfer learning training.
### 2.1 Create Training Job
Select **AI Maker** from the OneAI Services, and then click **Training Job**. After entering the Training Job Management page, click **+ CREATE** to add a training job.
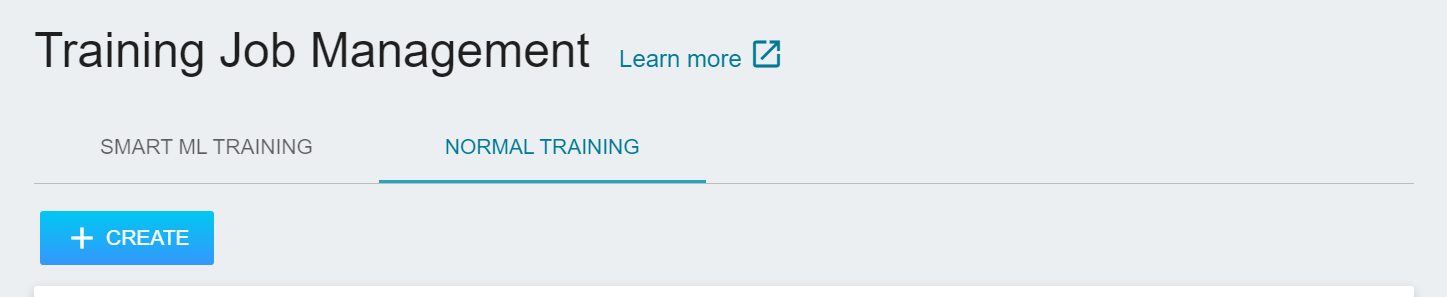
#### 2.1.1 Normal Training Job
There are five steps in creating a training job:
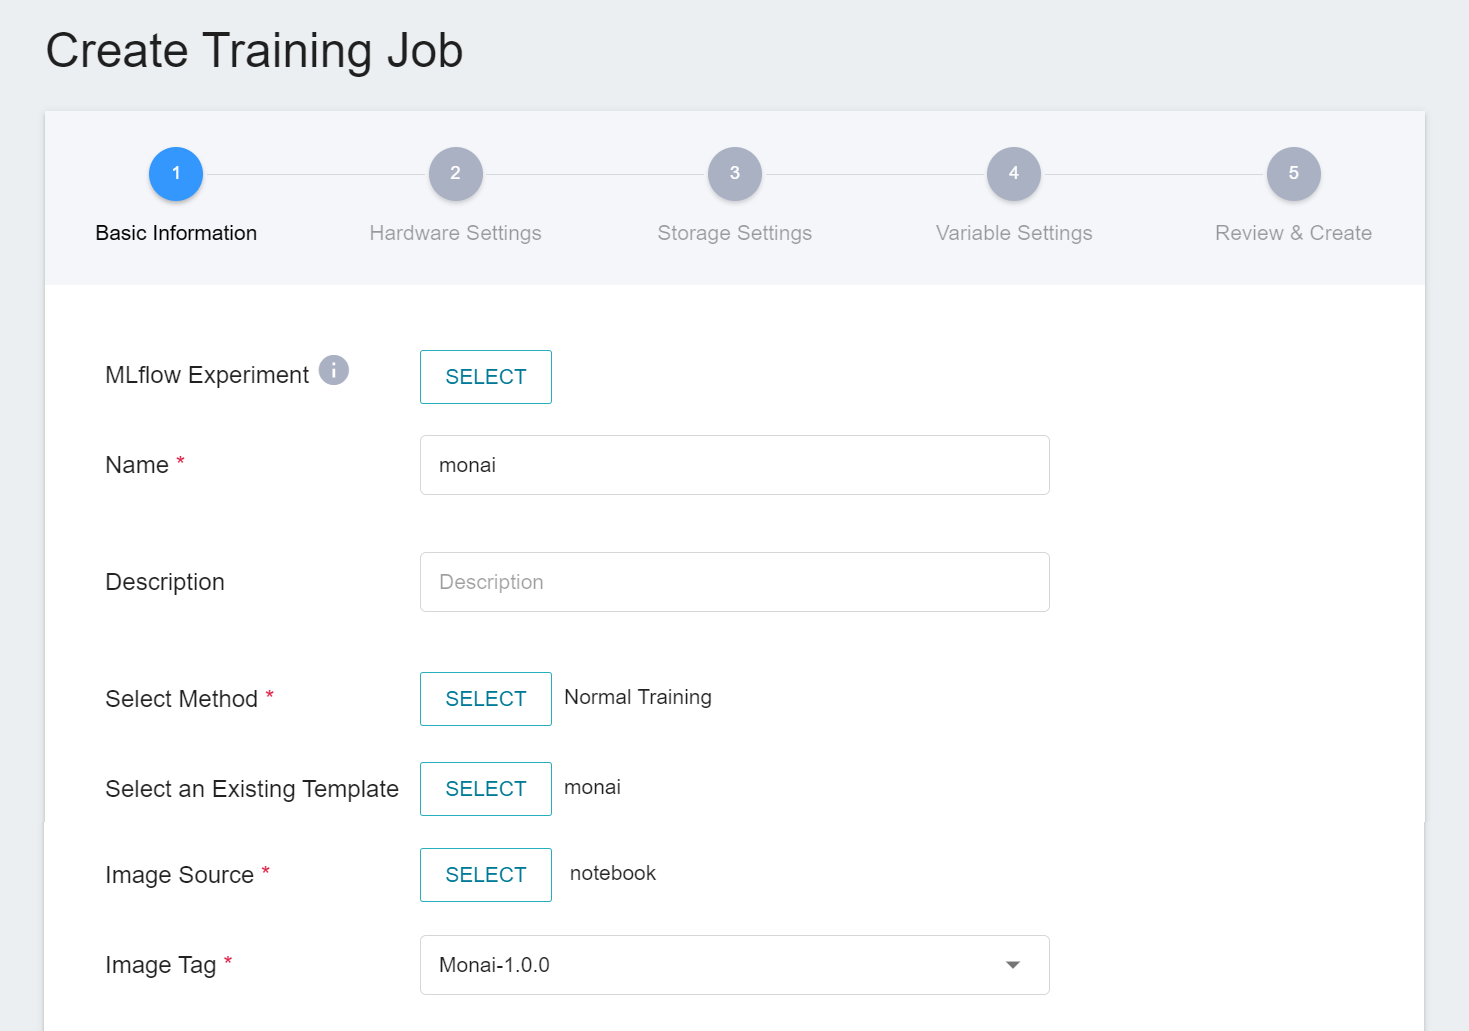
1. **Basic Information**
The first step is to set the basic information. Please enter the **name**, **description**, and **select method** in sequence. In this section, we first select **`Normal Training Job`**. In addition, the rest of the information can be quickly brought into each setting by selecting a template that has already been created through the **Select Template** function.
AI Maker provides a set of **`monai`** templates for the training and use of MONAI, which defines the variables and settings required for each stage, so that developers can quickly develop their own network. At this stage, we use the built-in **`monai`** template to bring in various settings.
2. **Hardware Settings**
Select the appropriate hardware resource from the list with reference to the current available quota and training program requirements.
:::info
:bulb: **Tips:** It is recommended to choose hardware with **shared memory** to avoid training failure due to insufficient resources.
:::
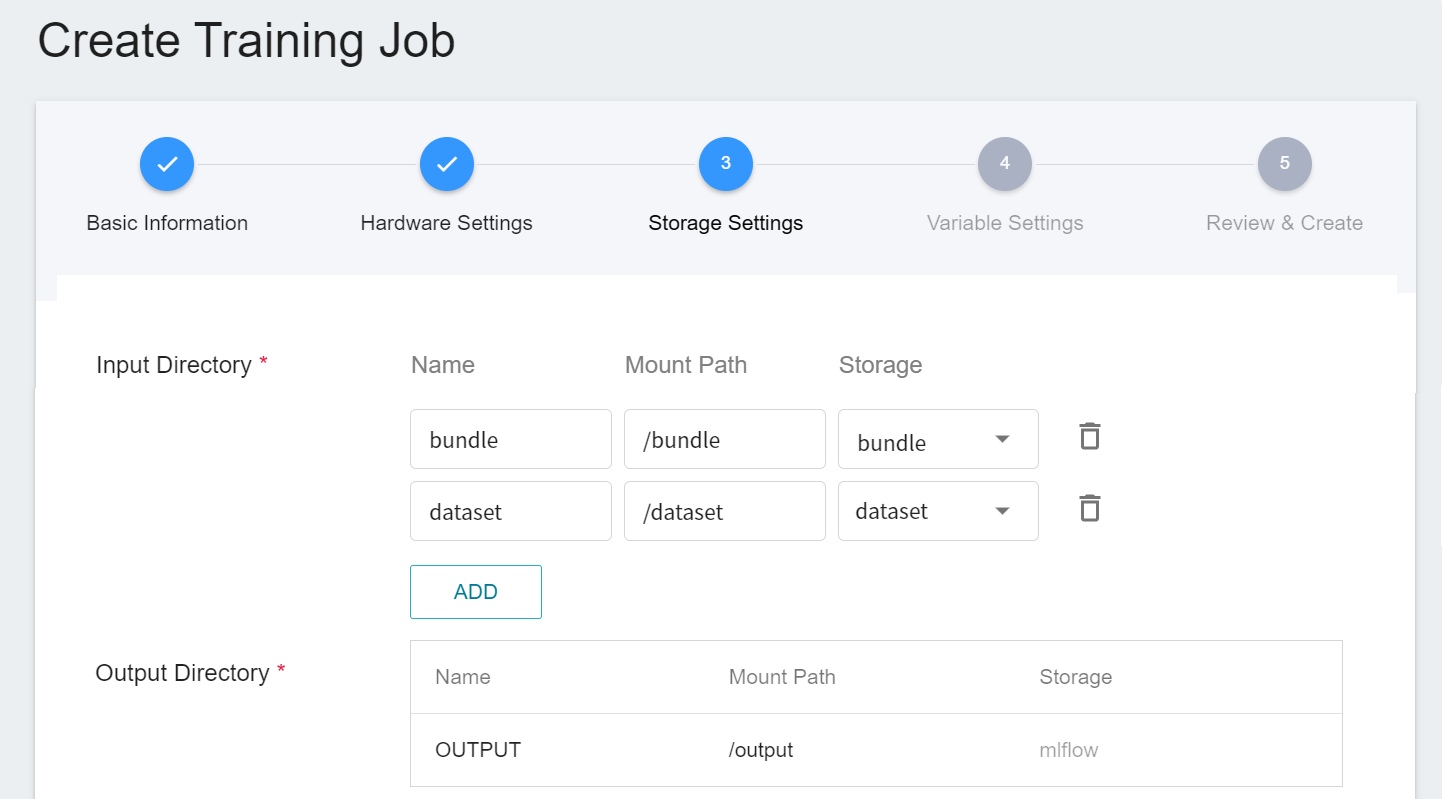
3. **Storage Settings**
There are two buckets to be mounted at this stage:
1. **dataset**: the bucket **`dataset`** where we store data.
2. **bundle**: the bucket **`bundle`** for storing MONAI Bundle-related files.
4. **Variable Settings**
The variable settings step is to set environment variables and commands. However, because we have applied the **`monai`** template when filling in the basic information, these commands and parameters will be automatically imported.
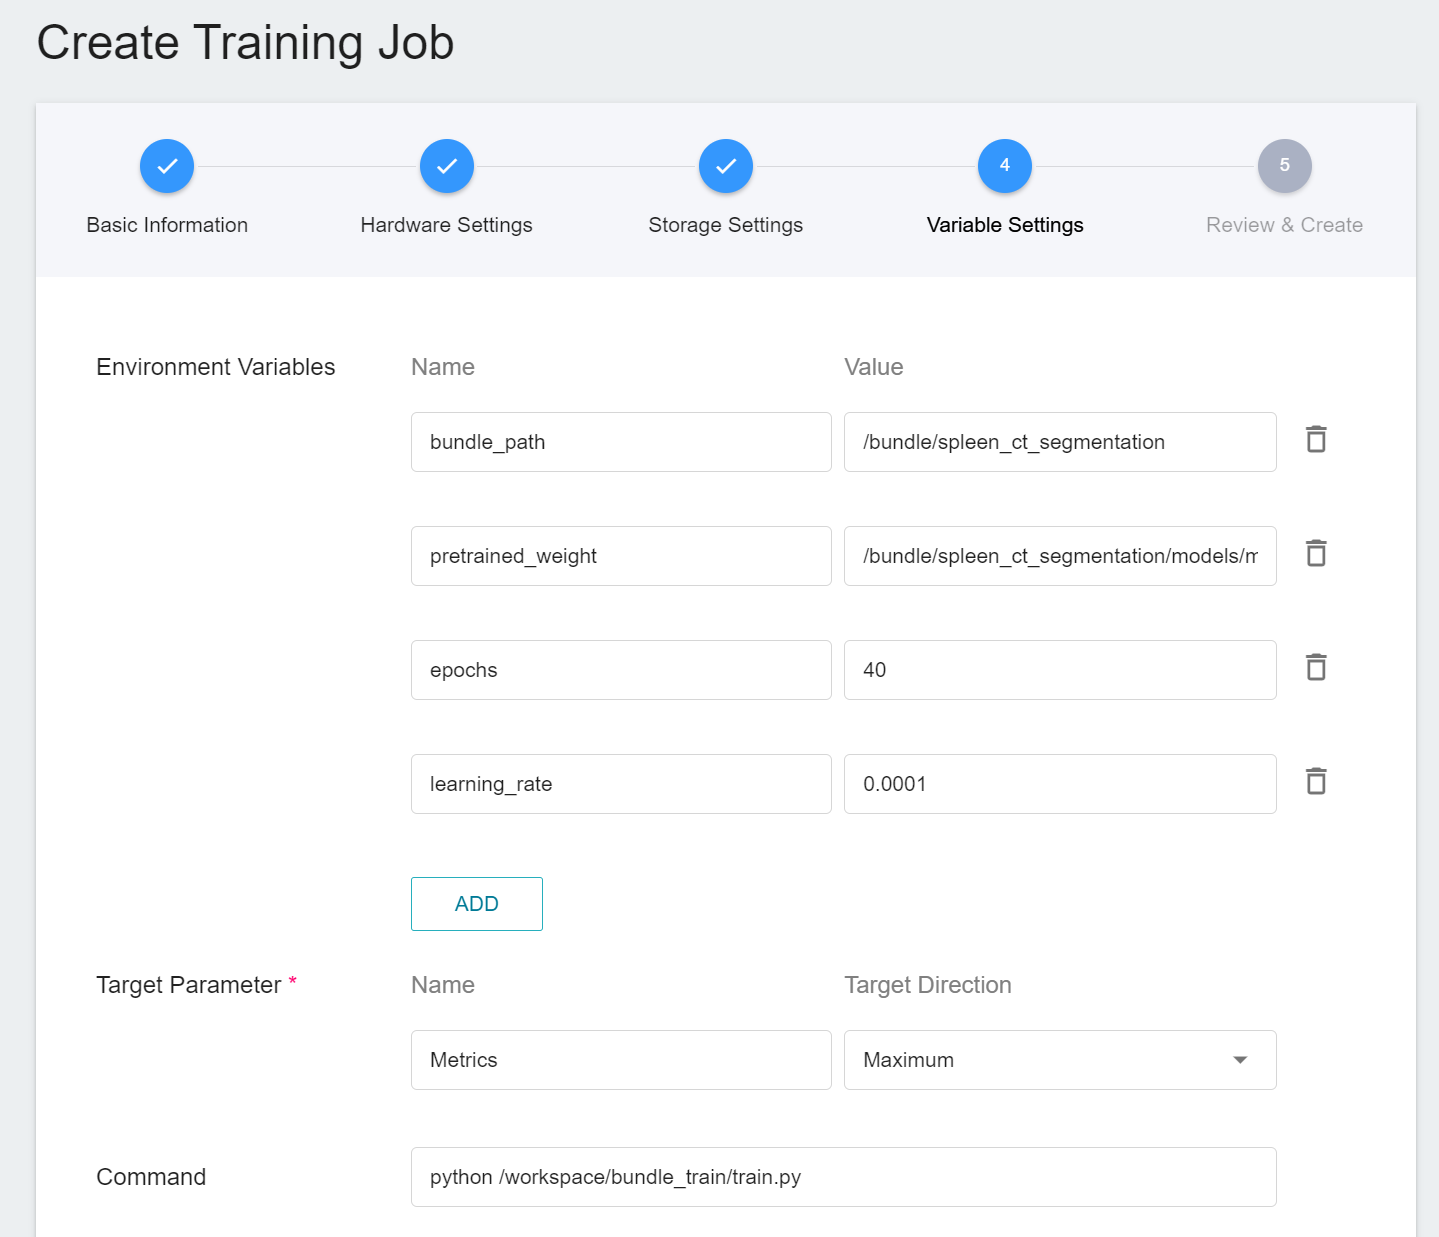
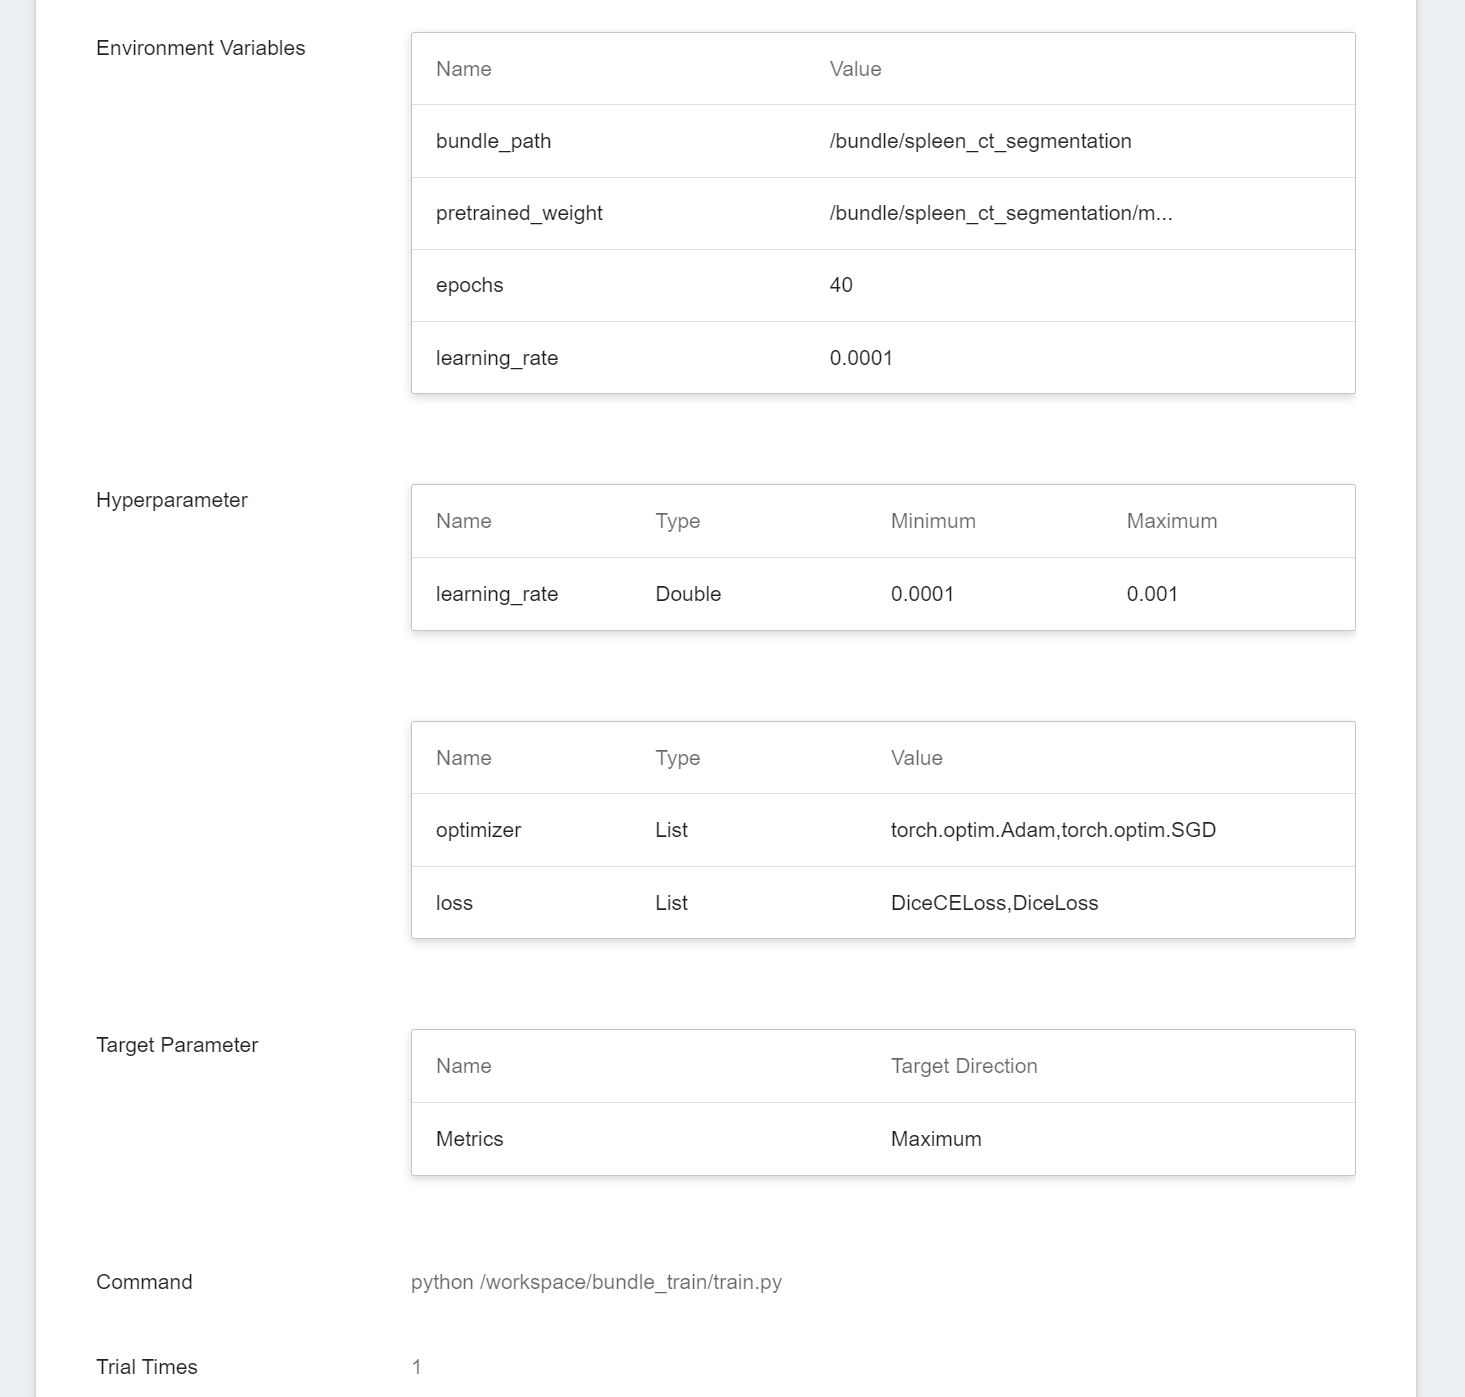
The setting values of environment variables can be adjusted according to your development needs. Described as follows:
| Variable | Default | Description |
| ------------- | ---------- | ---- |
| bundle_path | Defined by train.json | Specify the location of the MONAI Bundle directory|
| pretrained_weight | Defined by train.json | The location of the pre-trained model to be loaded. If there is no such parameter or the file does not exist, the training will start from scratch|
| epochs | Defined by train.json | One epoch = one forward pass and one backward pass for all training samples.|
| learning_rate | Defined by train.json |The **learning rate** parameter can be set larger at the beginning of model learning to speed up the training. In the later stage of learning, it needs to be set smaller to avoid divergence. |
Additionally, if you need to modify the neural network parameters, optimizer settings, or other configurations of the MONAI Bundle that are not controlled by environment variables, you will need to directly modify the **train.json** file.
:::info
:bulb: **Tips:** As mentioned in [**1.1 Upload MONAI Bundle**](#11-Upload-MONAI-Bundle), you may need to modify the **`dataset_dir`** in the **train.json** file. The specific name of this parameter may vary depending on the MB (for example, the train.json file of [**brats_mri_segmentation**](https://github.com/Project-MONAI/model-zoo/releases/download/hosting_storage_v1/brats_mri_segmentation_v0.3.7.zip) uses **`data_file_base_dir`**). Therefore, it is not suitable to define this parameter as an environment variable.
:::
5. **Review & Create**
Finally, confirm the entered information and click **CREATE**.
#### 2.1.2 Smart ML Training Job
In the [**previous section 2.1.1**](#211-Normal-Training-Jobs), we introduced the creation of **Normal Training Job**, and here we introduce the creation of **Smart ML Training Job**. You can choose just one training method or compare the differences between the two. Both processes are roughly the same, but there are additional parameters to be set, and only the additional variables are described here.
1. **Basic Information**
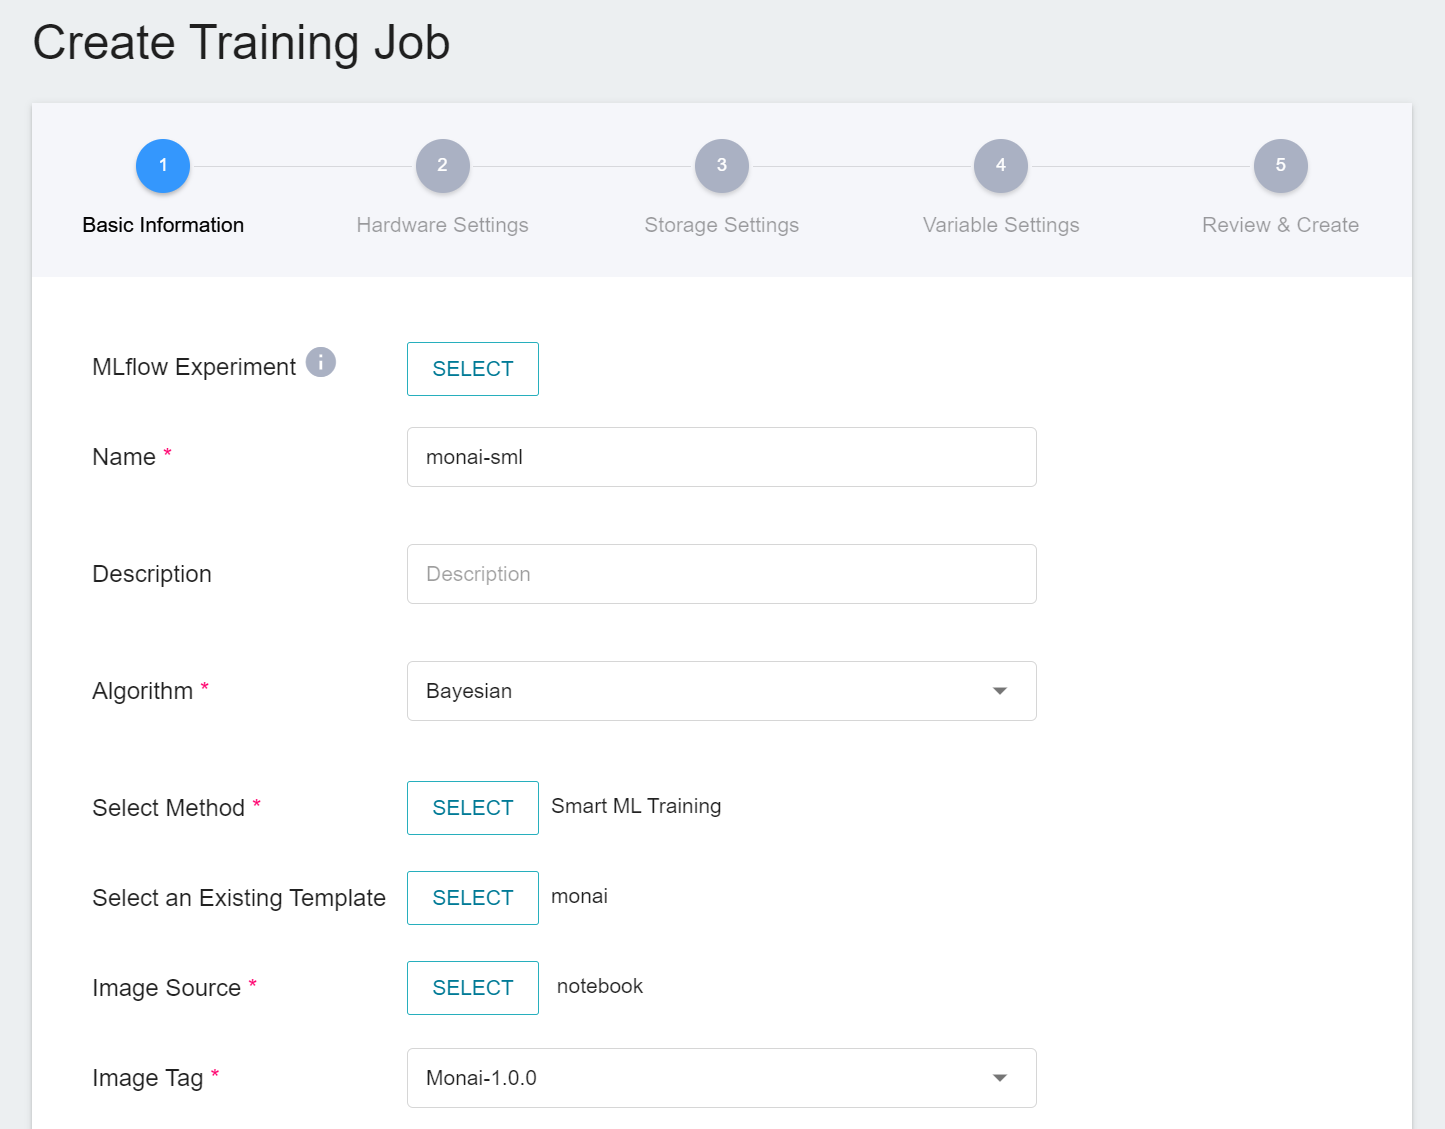
When Smart ML training job is the setting method, you will be further required to select the **algorithm** to be used for the Smart ML training job, and the algorithms that can be selected are as follows.
- **Bayesian**: Efficiently perform multiple training jobs to find better parameter combinations, depending on environmental variables, the range of hyperparameter settings, and the number of training sessions.
- **TPE**: Tree-structured Parzen Estimator, similar to the Bayesian algorithm, can optimize the training jobs of high-dimensional hyperparameters.
- **Grid**: Experienced machine learning users can specify multiple values of hyperparameters, and the system will perform multiple training jobs based on the combination of the hyperparameter lists and obtain the calculated results.
- **Random**: Randomly select hyperparameters for the training job within the specified range.
2. **Variable Settings**
In the variable settings page, there are additional settings described as follows:
* **Hyperparameter**
This tells the job what parameters to try. Each parameter must have a name, type, and value (or range of values) when it is set. After selecting the type (integer, float, and array), enter the corresponding value format when prompted.
The template provides three hyperparameters commonly used in model training:
- loss: adjust the loss function
- optimizer: adjust the choice of the optimizer
- learning_rate: gradient variation within the optimizer
* **Target Parameter (Bayesian or TPE algorithms)**
When using Bayesian or TPE algorithms, they will repeatedly adjust the appropriate parameters based on the results of the target parameters as a benchmark for the next training job. After training, a value will be returned as the final result. Here, the name and target direction are set for the returned value. For example, if the returned value is the accuracy rate, you can name it accuracy and set its target direction to the maximum value; if the returned value is the error rate, you can name it error and set its direction to the minimum value.
* **Trial Times**
Set the number of training sessions, and the training job is executed multiple times to find a better parameter combination.
Of course, some of the training parameters in **Hyperparameter** can be moved to **Environmental Variables** and vice versa. If you want to fix a parameter, you can remove it from the hyperparameter setting and add it to the environment variable with a fixed value; conversely, if you want to add the parameter to the trial, remove it from the environment variable and add it to the hyperparameter settings below.
:::info
:bulb: **Tips:** The optimizer and loss hyperparameters essentially replace the optimizer#\_target_ and loss#\_target_ fields in the train.json file using the contents of the provided list. They do not replace or delete any other parameters within the optimizer or loss components. It is important to avoid replacing components with significantly different parameters to prevent conflicts.
For example, if the DiceCELoss in the config specifies squared_pred = true, replacing it with GeneralizedDiceLoss would result in an error because GeneralizedDiceLoss does not support this parameter. You can choose to remove squared_pred = true or replace it with DiceLoss, which supports the same parameter.
:::
### 2.2 Start a Training Job
After completing the setting of the training job, go back to the training job management page, and you can see the job you just created.
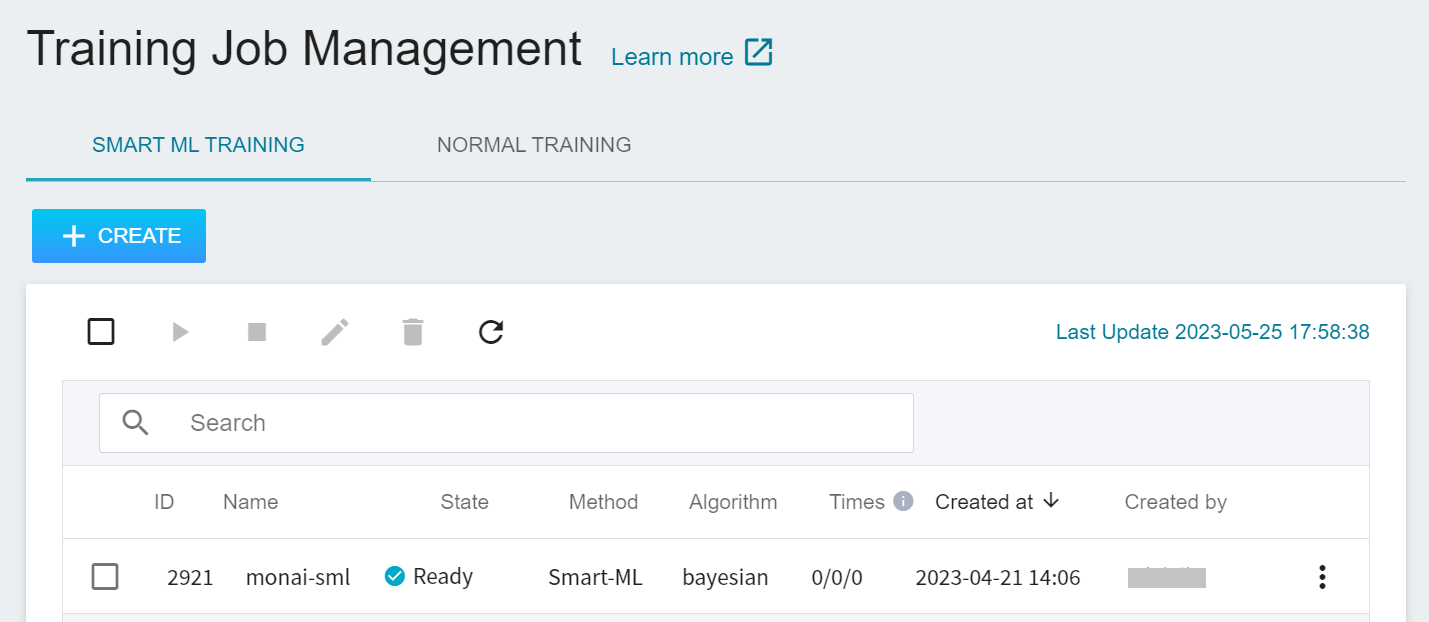
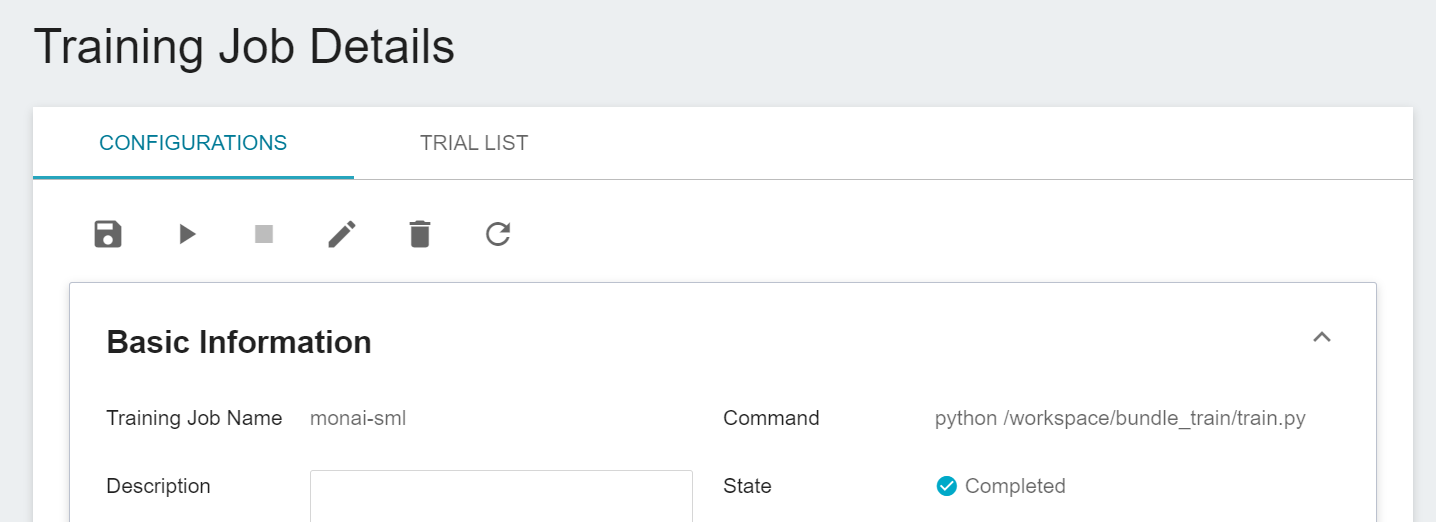
Click the job to view the detailed settings of the training job. In the command bar, there are 6 icons. If the job state is displayed as **`Ready`** at this time, you can click **START** to execute the training job.
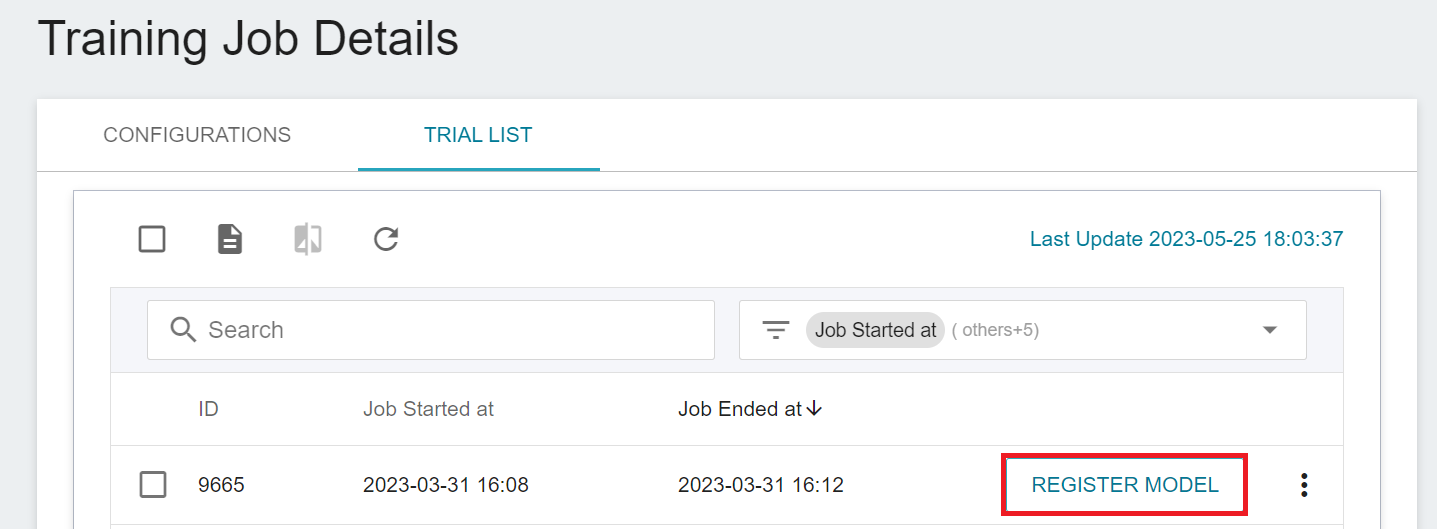
Once started, click the **TRIAL LIST** tab above to view the execution status and schedule of the job in the list. During training, you can click **VIEW LOG** or **VIEW DETAIL STATE** in the menu on the right of the job to know the details of the current job execution.
### 2.3 View Training Results
After training is completed, you can view all the Metrics After training is completed, you can view all the Metrics recorded through MLflow. The metrics recorded in the **Metrics** section include the loss and metrics (in this example, **train_accuracy**) on the training set, as well as the metrics (in this example, **val_mean_dice** and **val_accuracy**) on the validation set. In this example, the result with better performance in the validation set is preferred, that is, the result with higher values of val_mean_dice and val_accuracy.

### 2.4 Model Registration
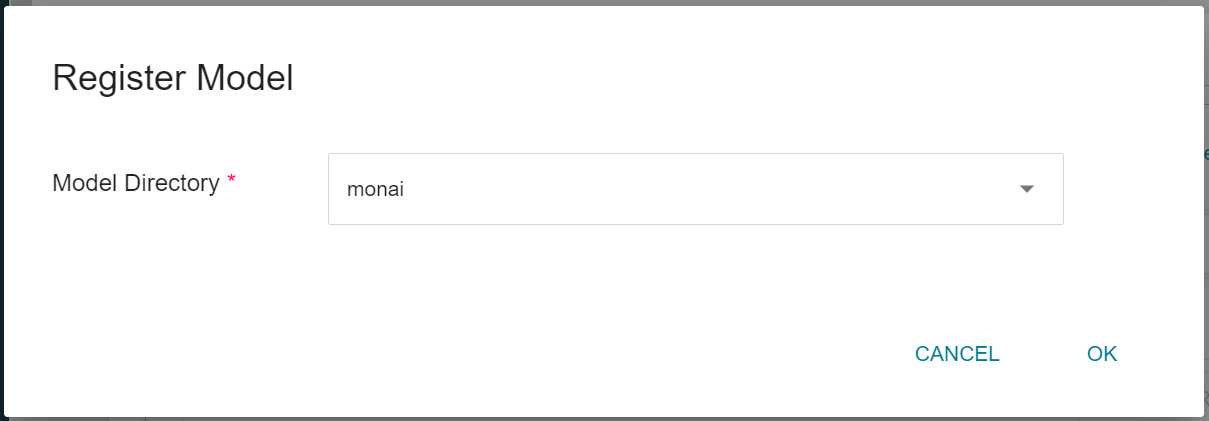
When the training is completed, one or more results will appear. Select the results that meet the expectations, and then click **REGISTER MODEL** on the right to save them to the model repository; if no results meet the expected results, Then readjust the value or value range of environment variables and hyperparameters.
In the **Register Model** window, you can enter the desired model directory name by clicking on the right-hand side menu of **Model Directory**. For example, you can input **`monai`** to create a new model directory, or choose an existing model directory from the list.
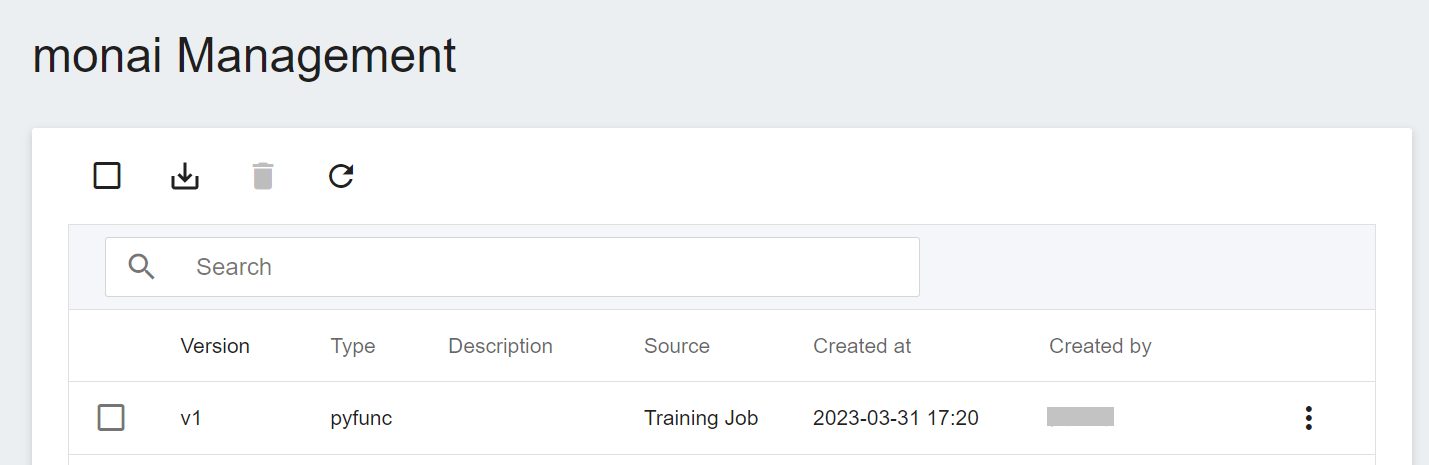
After registering the model, you will enter the Model Version Management page. In the list, you can see all the versions, descriptions, sources and results of the stored models.
## 3. Create Inference Service
Once you have finished training the segmentation model, you can deploy the **inference feature** to set up the MONAI Label Server.
### 3.1 Create Inference
Select **AI Maker** from the OneAI Services, then click **Inference** to enter the Inference Management page, and click **+ CREATE** to create an inference job.
The steps for creating the inference service are described below:
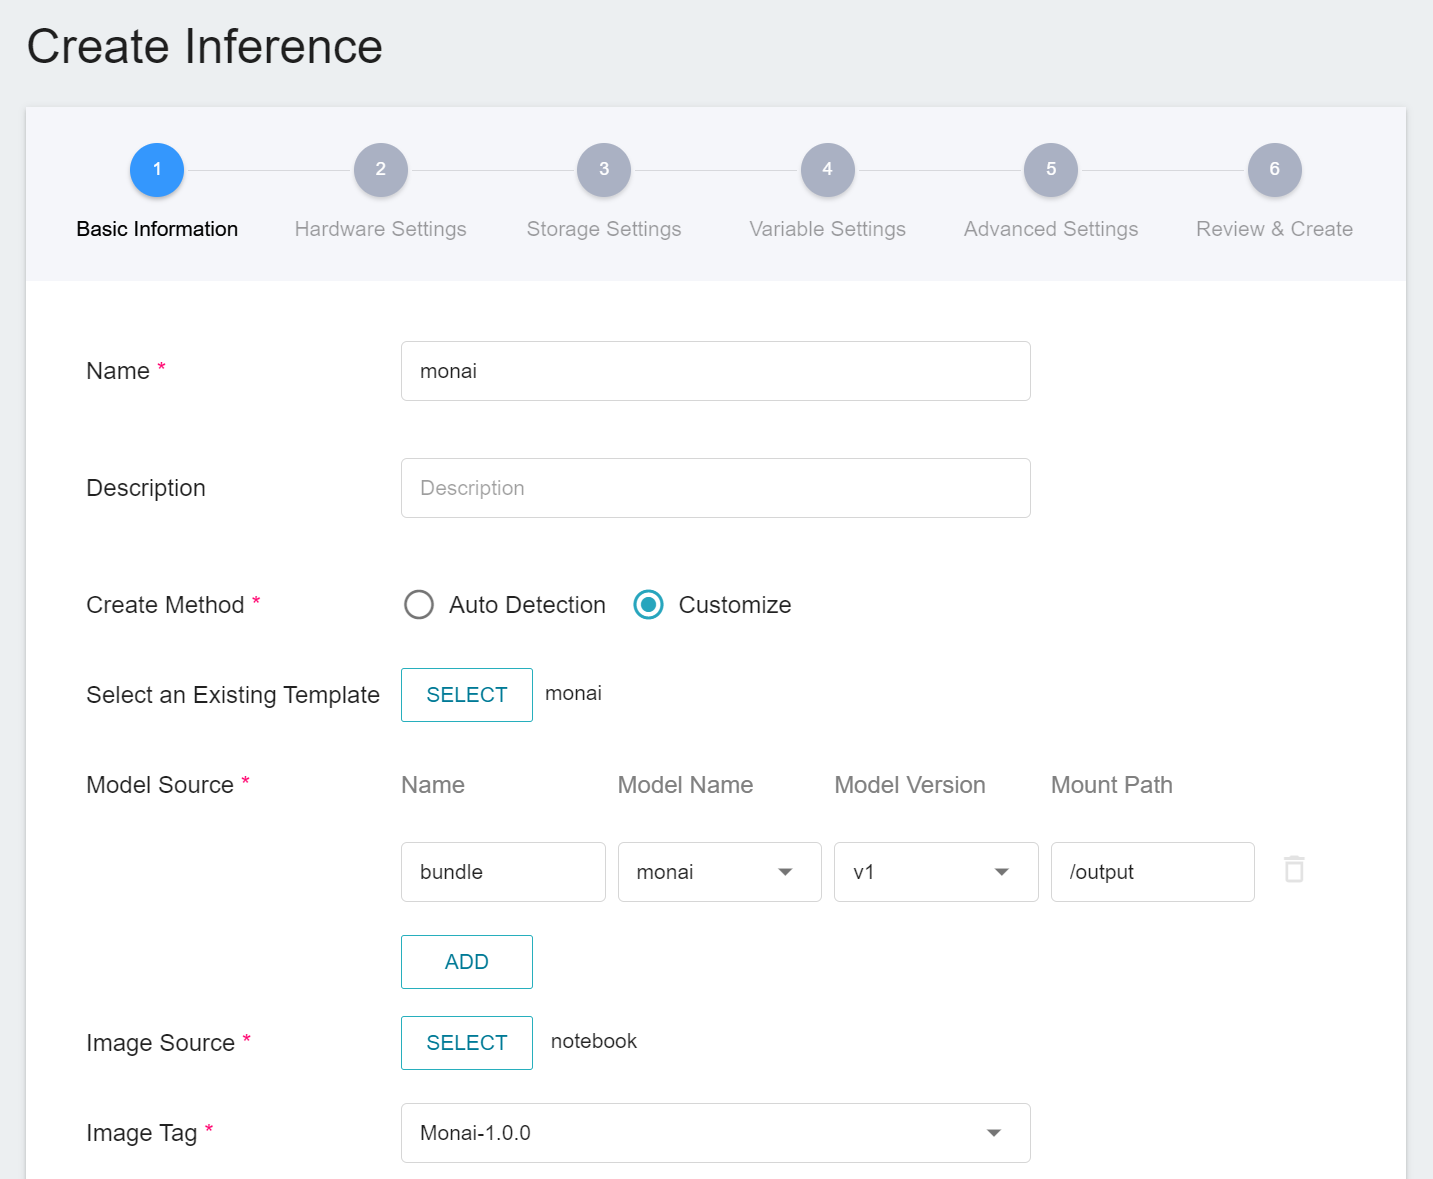
1. **Basic Information**
First, change the **Creation Method** to **Custom** in order to configure the basic information for the inference task. Similar to the training task, we will use the **`monai`** inference template, which makes it easier for developers to set up. However, the model name and version number to be loaded still need to be set manually by the user:
- **Model Name**
The name of the model to be loaded is the model stored in [**2.4 Register Model**](#24-Register-Model).
- **Version**
The version number of the model to be loaded is also the version number generated in [**2.4 Register Model**](#24-Register-Model).
- **Mount Path**
The location of the model after loading is relative to the program's ongoing read, this value will be set by the **`monai`** inference template.
2. **Hardware Settings**
Select the appropriate hardware resource from the list with reference to the current available quota and training program requirements.
3. **Storage Settings**
No configuration is required for this step.
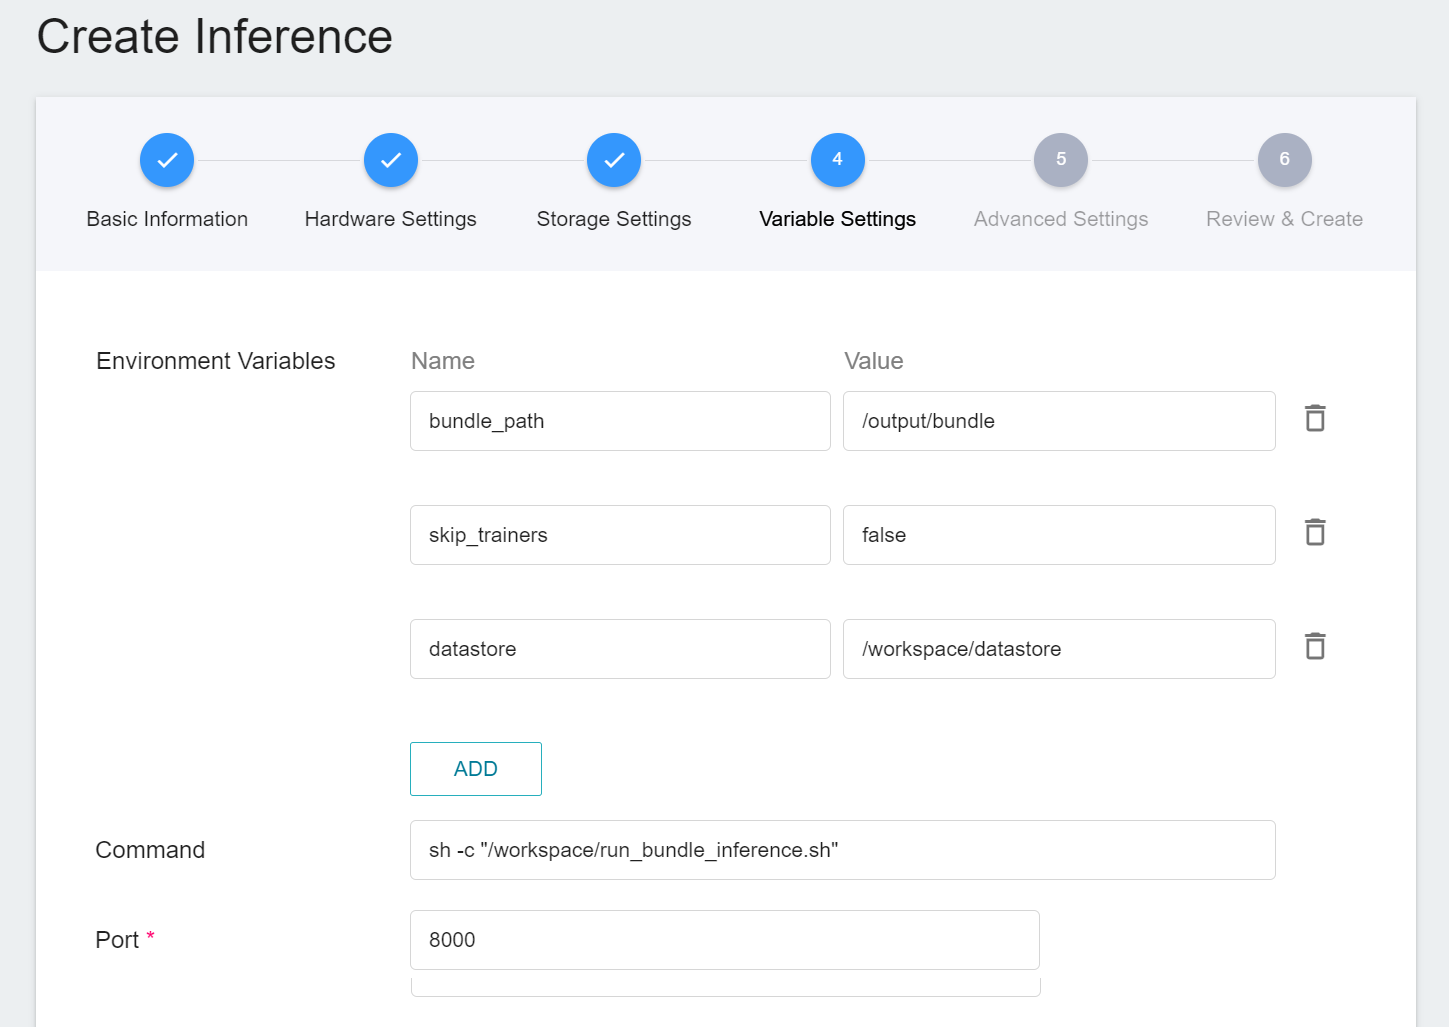
4. **Variable Settings**
In the variable setting step, relevant variables will be automatically imported from the **`monai`** template and can be modified according to requirements.
| Variable | Description |
| ---- | ---- |
| bundle_path | Specify the bundle directory to be read by MONAI Label. By default, it is the location where the model is stored in the training task. You can also specify the bundle directory of external storage space. |
| skip_trainers | If set to true, the training model functionality of MONAI Label will be disabled. |
| datastore | Specifies where to upload annotated data from MONAI Label Client |
**`Port`** Please set it to 8000.
5. **Advanced Settings**
No configuration is required for this step.
6. **Review & Create**
Finally, confirm the entered information and click CREATE.
:::info
:bulb: Tips: The MONAI Label used here is taken from [**MONAI Label Sample Apps**](https://github.com/Project-MONAI/MONAILabel/tree/main/sample-apps/monaibundle) and customized. If you want to know more about parameter settings, you can refer to the official website document.
:::
### 3.2 Querying Inference Information
After creating an inference job, go back to the inference management page and click the job you just created to view the detailed settings of the service. When the service state shows as **`Ready`**, you can start inference with the MONAI Label Client. However, you should be aware of some information in these details, as they will be used later when using the MONAI Label Client:
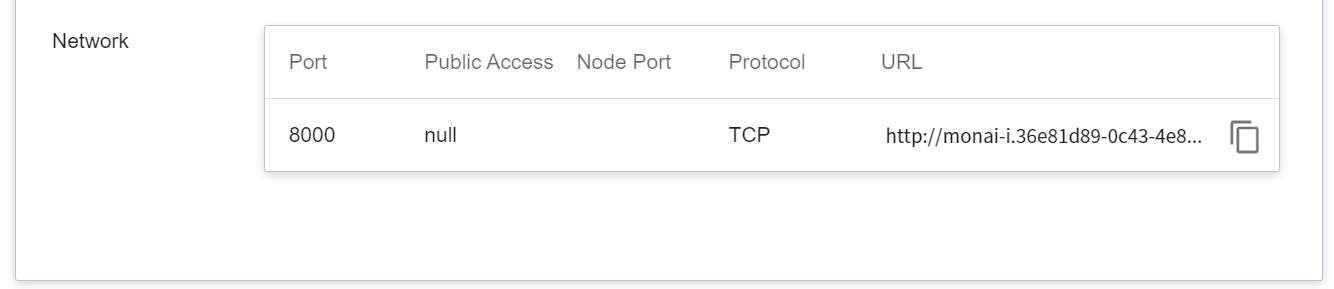
* **Network**
Since the current inference service does not have a public service port for security reasons, we can communicate with the inference service we created through the **Container Service**. The way to communicate is through the **URL** provided by the inference service, which will be explained in the next section.
:::info
:bulb: **Tips:** The URLs in the document are for reference only, and the URLs you got may be different.
:::
<br>
## 4. MONAI Label Client - 3D Slicer
When you have finished starting the inference service, you have also finished starting the MONAI Label Server, so that you can work on the local MONAI Label Client.
Here we use [**3D Slicer**](https://www.slicer.org/) as an example to demonstrate how to connect with the inference service. If you have any questions about the download and installation of 3D Slicer, please refer to the official [**3D Slicer website**](https://download.slicer.org/).
### 4.1 **Create Container Service**
The inference service does not open public service port for security reasons, we need to communicate with the inference service we created through the container service.
Click **Container Service** from the OneAI Services to enter the Container Service Management page, and follow the steps below to create a container service.
1. **Basic Information**
* Name: monai-proxy
* Description: optional, you can enter it yourself
* Image source: generic-nginx
* Image tag: v1
2. **Hardware Settings**
Select the hardware settings. Take into consideration of resource usage when selecting the resources, it is not necessary to configure GPU.
3. **Storage Settings**
No configuration is required for this step.
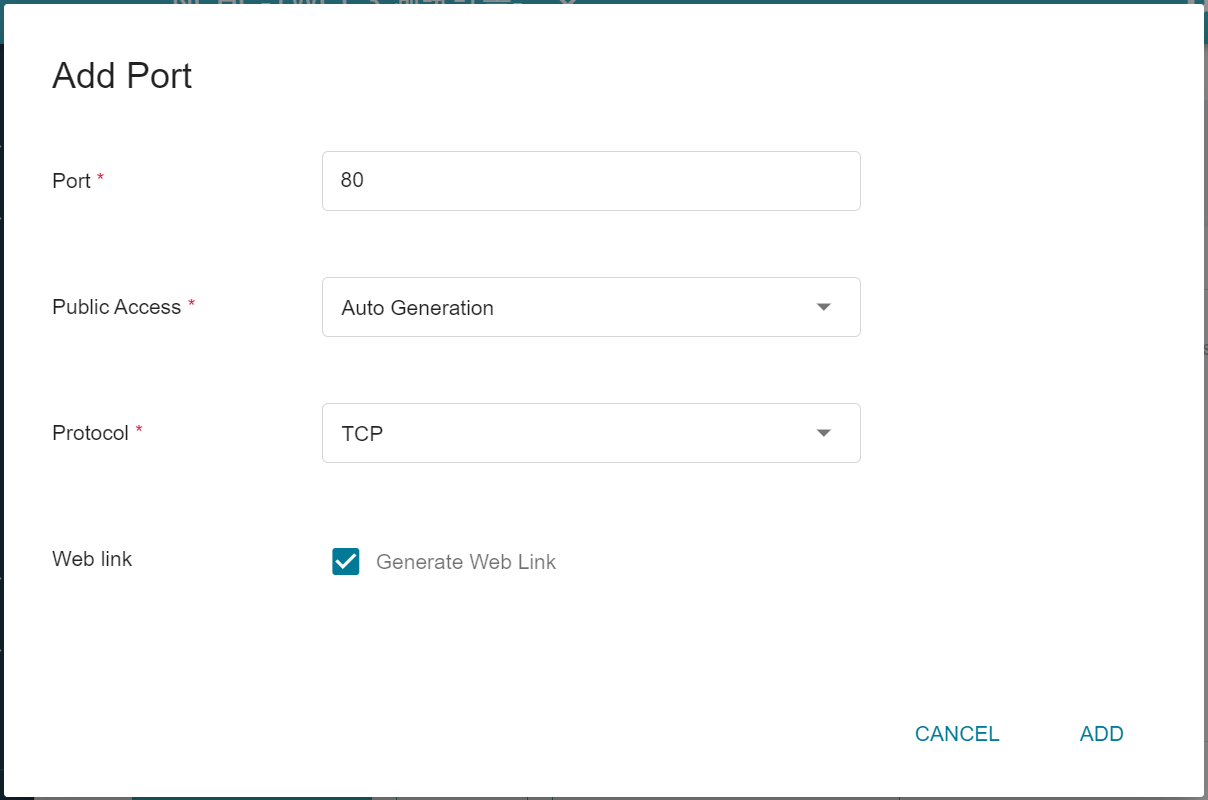
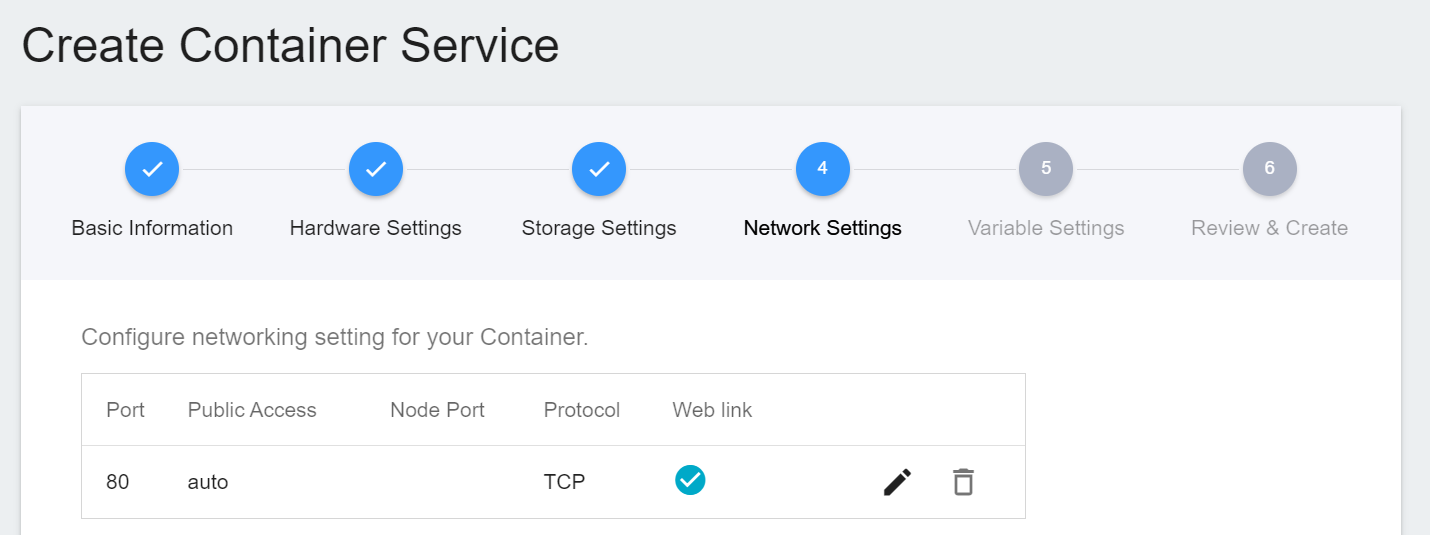
4. **Network Settings**
Please set **Allow port** to **80**, it will automatically generate a public service port, and check **Generate Web Link**.
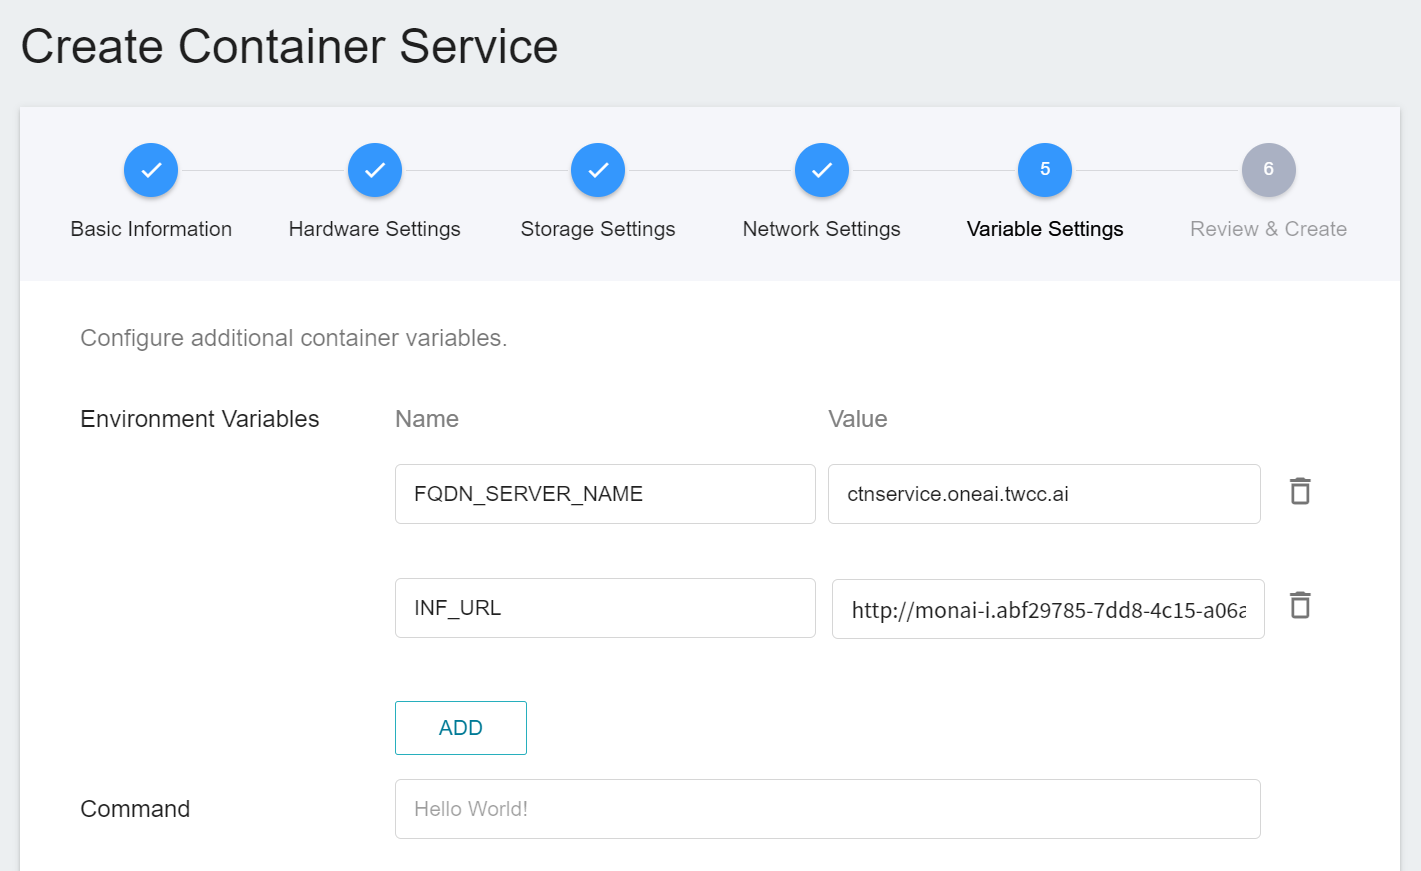
5. **Variable Settings**
* **Environment Variables**: Set two environment variables.
* **FQDN_SERVER_NAME**: **`ctnservice.oneai.twcc.ai`**.
* **INF_URL**: Enter the URL obtained from the inference service.
* **Command**: No setting is required for this example.
6. **Review & Create**
Finally, confirm the entered information and click **CREATE**.
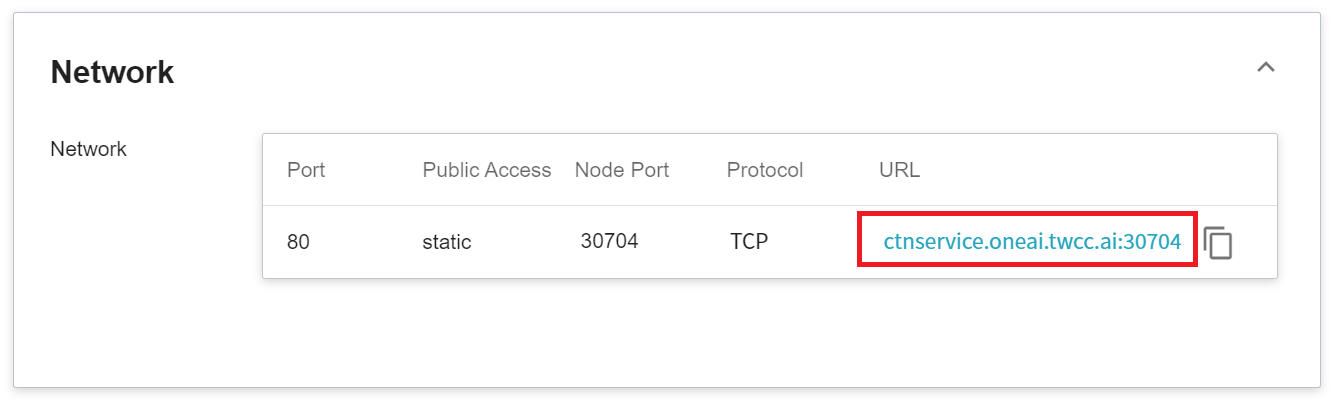
7. **View Public Access**
After creating the container service, go back to the container service management list page and click on the service to get detailed information. Please pay attention to the URL in the red box in the figure below. This is the public service URL of **MONAI Label Server**. Click this URL link to confirm whether the MONAI Label Server service is started normally in the browser tab; click the **Copy** icon on the right to copy this URL link , and next will introduce how to **Use 3D Slicer**.

### 4.2 **Use 3D Slicer**
:::info
:bulb: **Tips:** The following 3D Slicer setup screen is based on version 5.0.3. If you are using other versions, please refer to the official [**3D Slicer website**](https://www.slicer.org/) for instructions.
:::
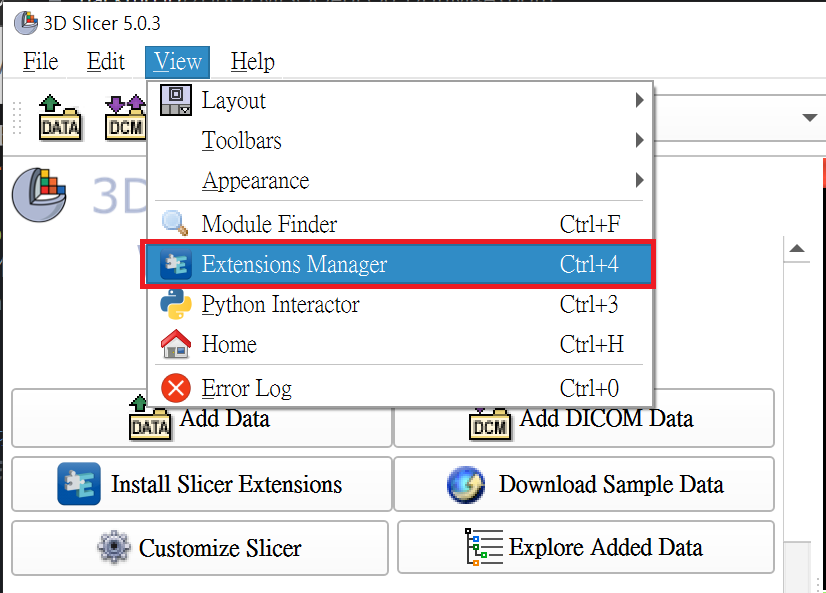
1. **Install MONAI Label Plug-in**
The MONAI Label Plug-in needs to be installed first before proceeding to the other steps. Open 3D Slicer and click **`View` > `Extension Manager`**.
Click **`Install Extensions`** and click the **Active Learning** category on the left, the **MONAI Label** appears, please click **INSTALL**, and restart 3D Slicer.

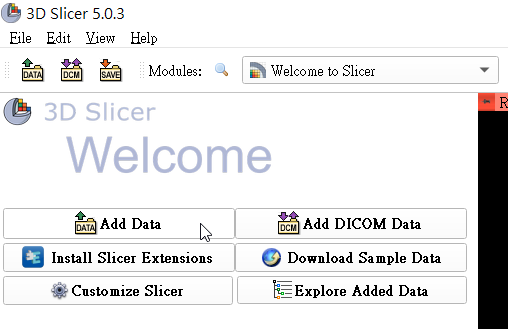
2. **Load Data for Segmentation**
Next, click **`Add Data`** to load the spleen data for segmentation.
And bring up **`Active Learning -> MONAILabel`**.
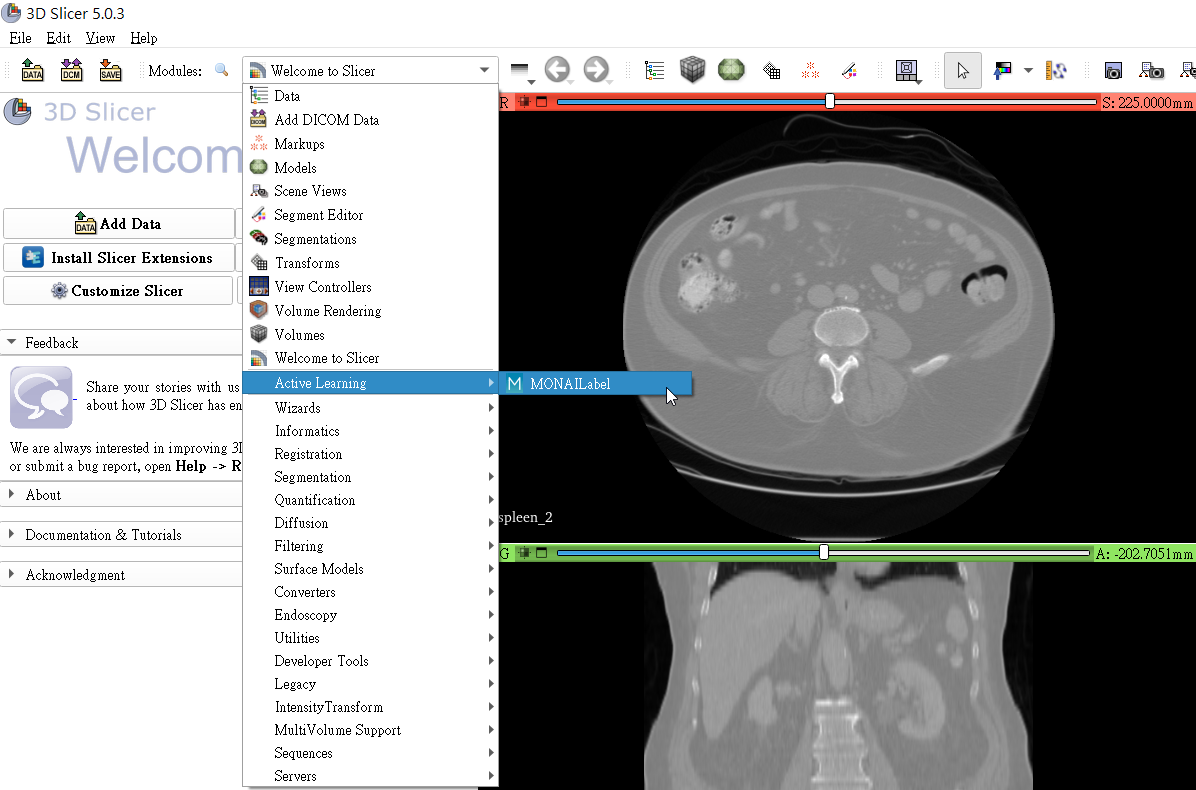
3. **Connect Inference Service**
In the **MONAI Label server** field, fill in the **MONAI Label server** URL copied in the previous section, for example: **`https://ctnservice.oneai.twcc.ai:30704`**. If the MONAI Label server service is set correctly, the **Model** in **Auto Segmentation** will display the default **AIMaker_Inference** name, click the **Run** button on the right to start the inference.
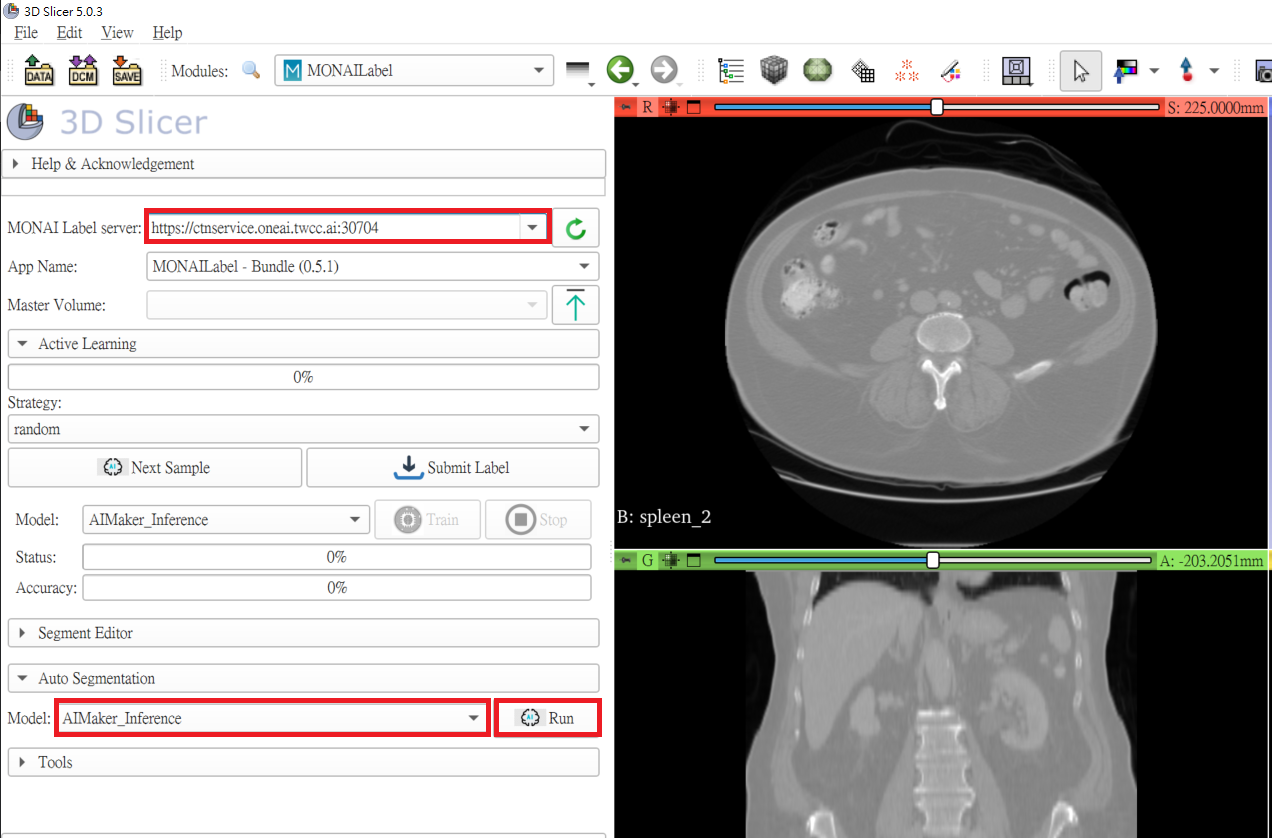
:::info
:bulb: **Tips:** The URLs in the document are for reference only, and the URLs you got may be different.
:::
4. **Annotation Assistance**
At this point, you will see that there are additional areas marked in purple in the CT image, and these purple areas are the results of the spleen location inferred by the model you selected.

# [Supplementary] Inference Application Example - MONAI Label Sample Apps
In addition to the aforementioned process of **Prepare MONAI Bundle and Dataset > Training Task > Storage Model > Inference Service**, you also have the option to directly upload a MONAI Bundle containing the model file to the OneAI storage service and use it in the inference service with the MONAI Label Client for the corresponding domain.
In this example, we will introduce how to use the MONAI Bundle provided by Model Zoo to build models and inference services. If you are not familiar with MONAI Bundle and MONAI Label, you can refer to the [**Basic Concepts**](#Basic-Concepts) at the beginning of this case study.
## Radiology: 3D Slicer + DeepEdit Interactive Annotation
### 1. Create Model
1. **Download Pre-trained Model**
Please download the [**Spleen deepedit annotation**](https://github.com/Project-MONAI/model-zoo/releases/download/hosting_storage_v1/spleen_deepedit_annotation_v0.3.0.zip) provided by MONAI, which is a pre-trained model for 3D segmentation of the spleen organ from CT images. After downloading, unzip it to the folder **spleen_deepedit_annotation_v0.3.0** on the local computer for use.
:::info
:bulb: **Tips:** For more info about **Spleen deepedit annotation**, please refer to the [**MONAI > model zoo > models > Spleen deepedit annotation**](https://github.com/Project-MONAI/model-zoo/tree/dev/models/spleen_deepedit_annotation) website.
:::
:::warning
:warning: **Note:** In the current operating environment, **MONAI 1.0 + MONAI Label 0.5.1** has a [compatibility issue](https://github.com/Project-MONAI/MONAILabel/issues/1064) when reading data with ITK. However, the next version of MONAI, released by the official team, has addressed this issue and provided a fix.
To use this version, you need to manually remove the "reader": "ITKReader" setting in configs/inference.json. The program will automatically use NibabelReader to read the NIfTI files used in this example. This change does not affect the inference performance and results.
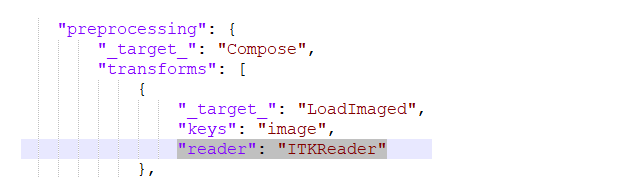
:::
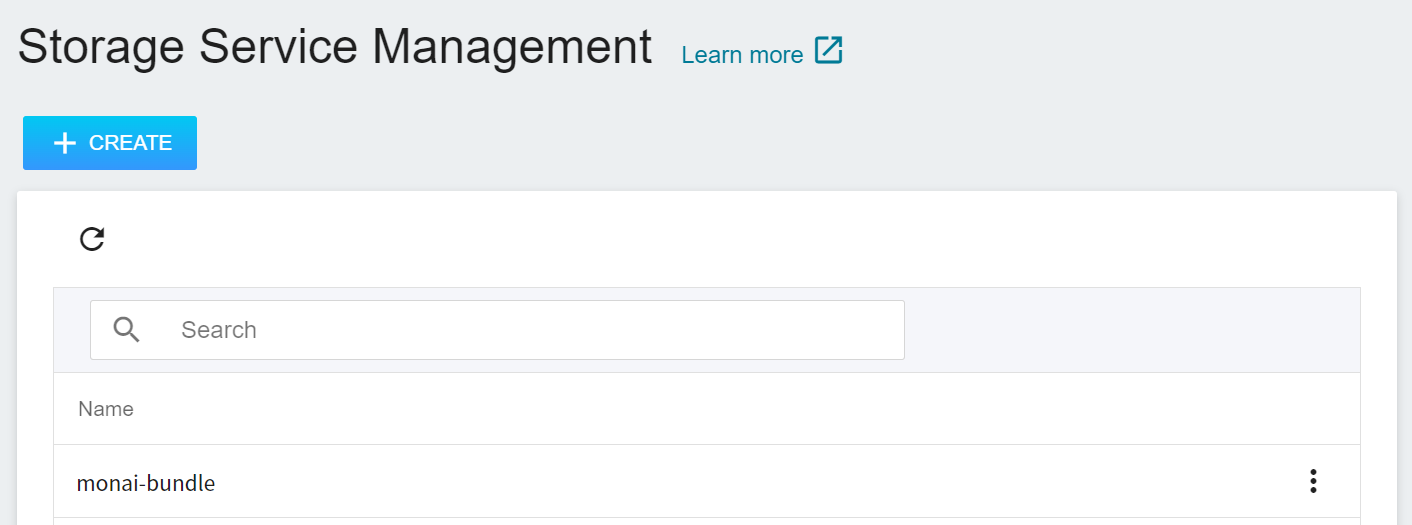
2. **Create a Bucket**
Select **Storage Service** from the OneAI Services, enter the Storage Service Management page, and then click **+ CREATE** to add a bucket named `monai-bundle` to store our MONAI Bundle.
3. **View Bucket**
After the bucket is created, go back to the Storage Service Management page, and you will see the newly added bucket.
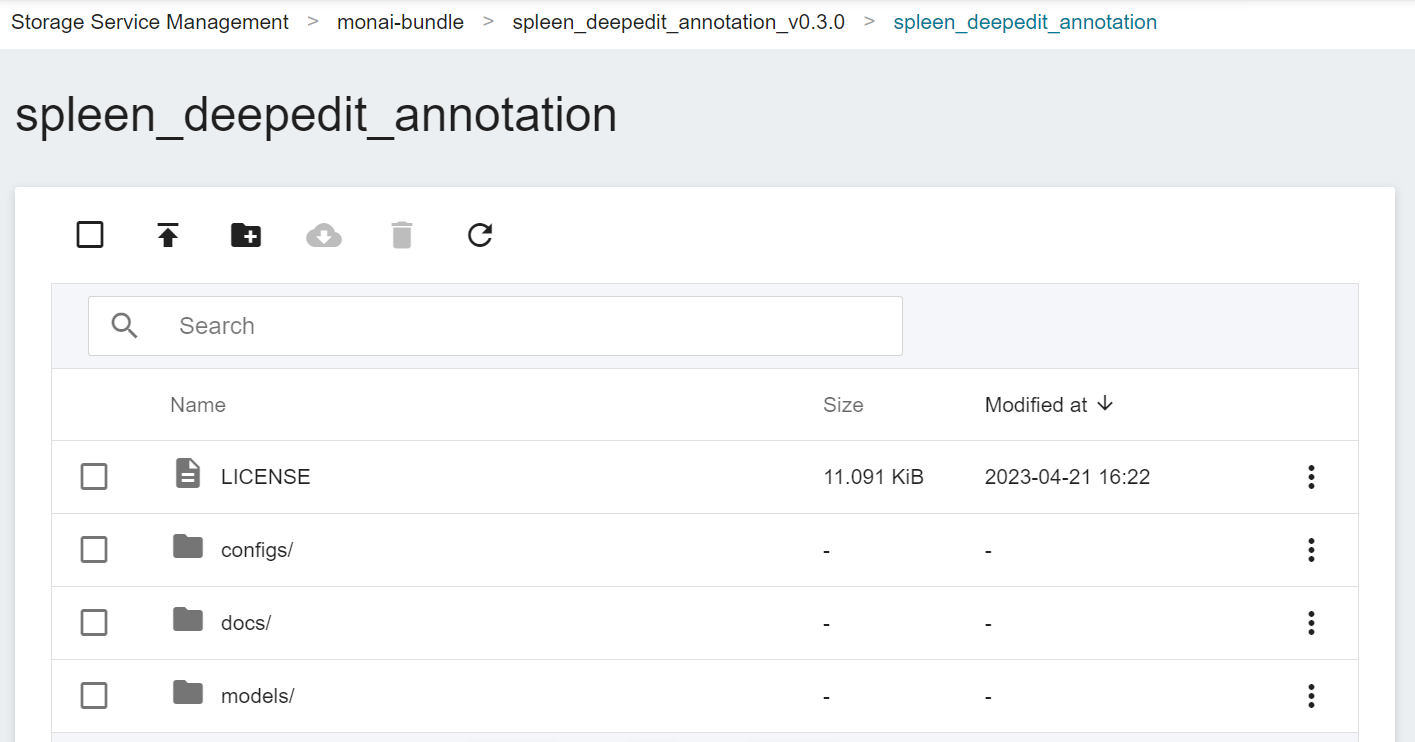
4. **Upload MONAI Bundle**
Click the created bucket, and then click **Upload** to start uploading the file. Upload the previously decompressed folder **spleen_deepedit_annotation_v0.3.0**. The directory structure after completion should be as shown in the attached picture. (See [**Storage Service Documentation**](/s/storage-en)).
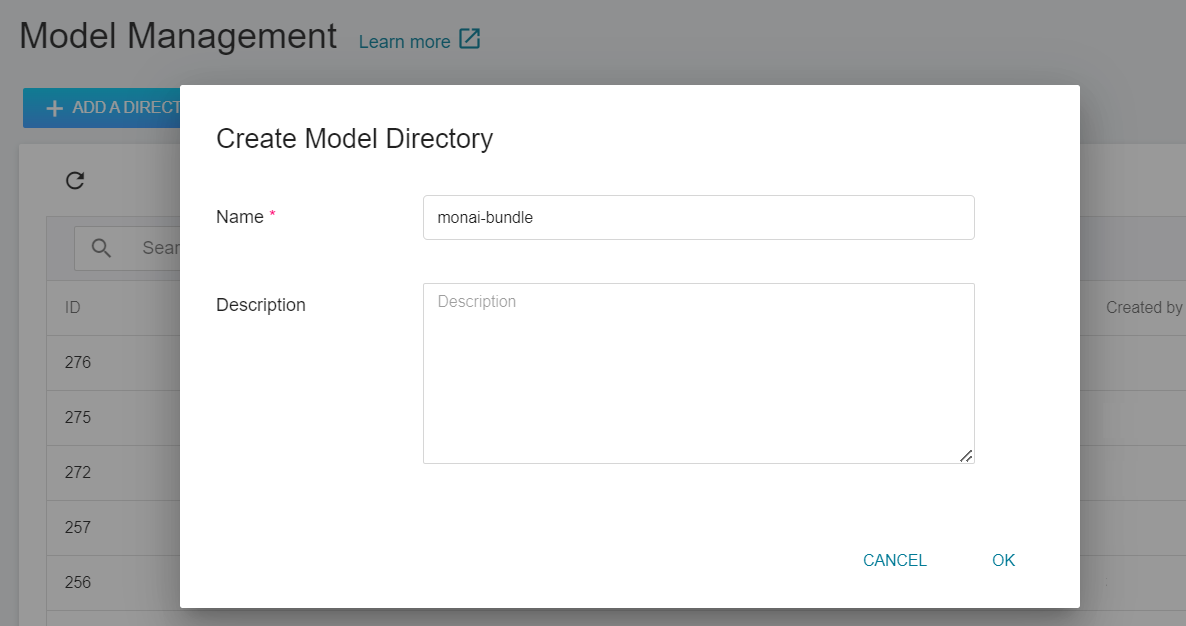
5. **Add Model Directory**
Select **AI Maker** from the OneAI Services, then click **Model**, and click Add Directory on the model management page to create the model directory `monai-bundle`.
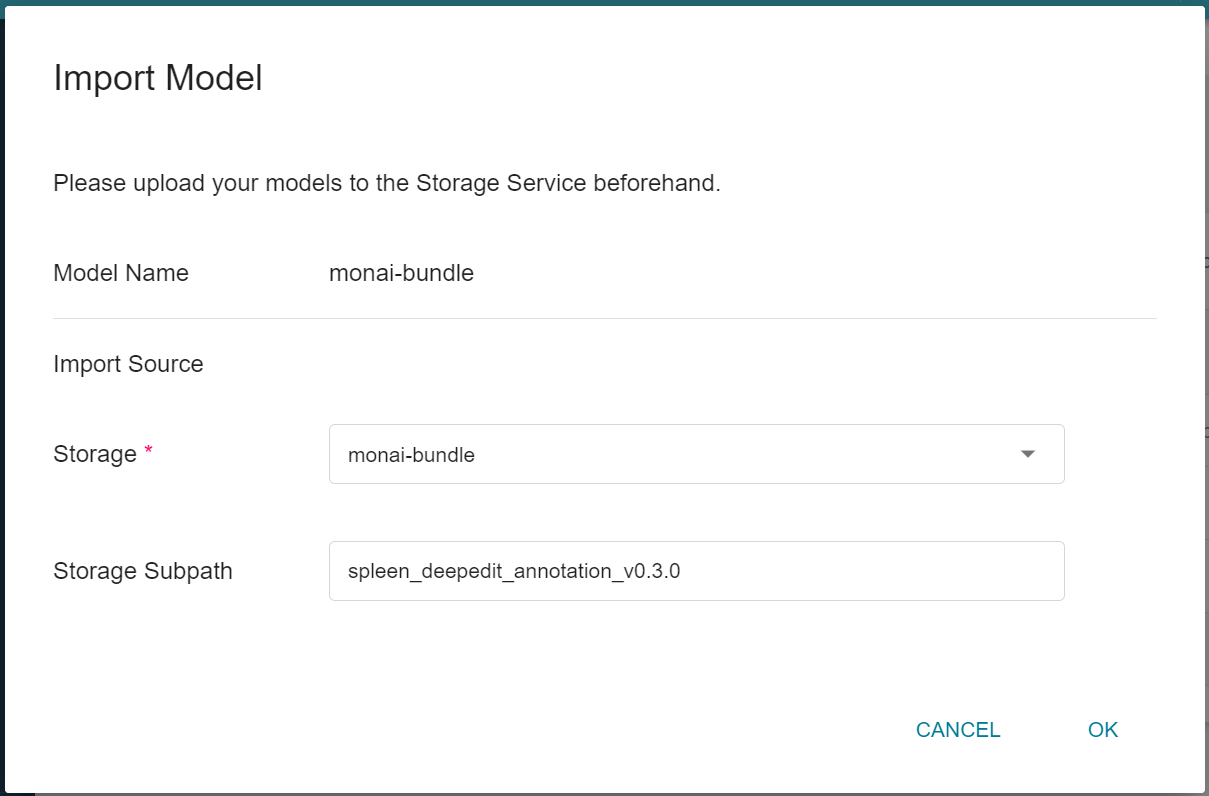
6. **Import Model**
Click to enter the created model directory, and then click the **Import** icon above to import the newly downloaded model.

After completing the **Import Model** settings, click **OK**.
* Model Name: This field will be automatically brought in.
* Storage: Choose the bucket where the model will be saved, for example: monai-bundle.
* Subpath: Select the subpath within the bucket where the model will be saved. This field is optional. In this example, it is "spleen_deepedit_annotation_v0.3.0".
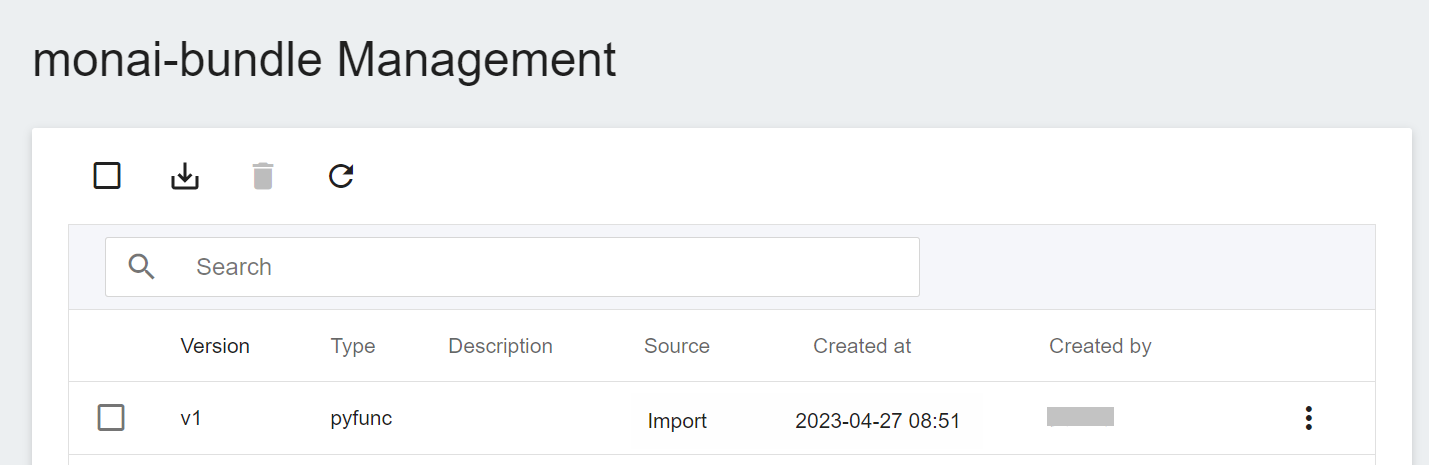
It may take some time to import the model. You can click the **Refresh** icon above. After the import is successful, it will appear in the model version list, and the source will be displayed as **`Import`**.
### 2. Create Inference Service
Select **AI Maker** from the OneAI Services, then click **Inference** to enter the Inference Management page, and click **+ CREATE** to create an inference job.
The steps for creating the inference service are described below:
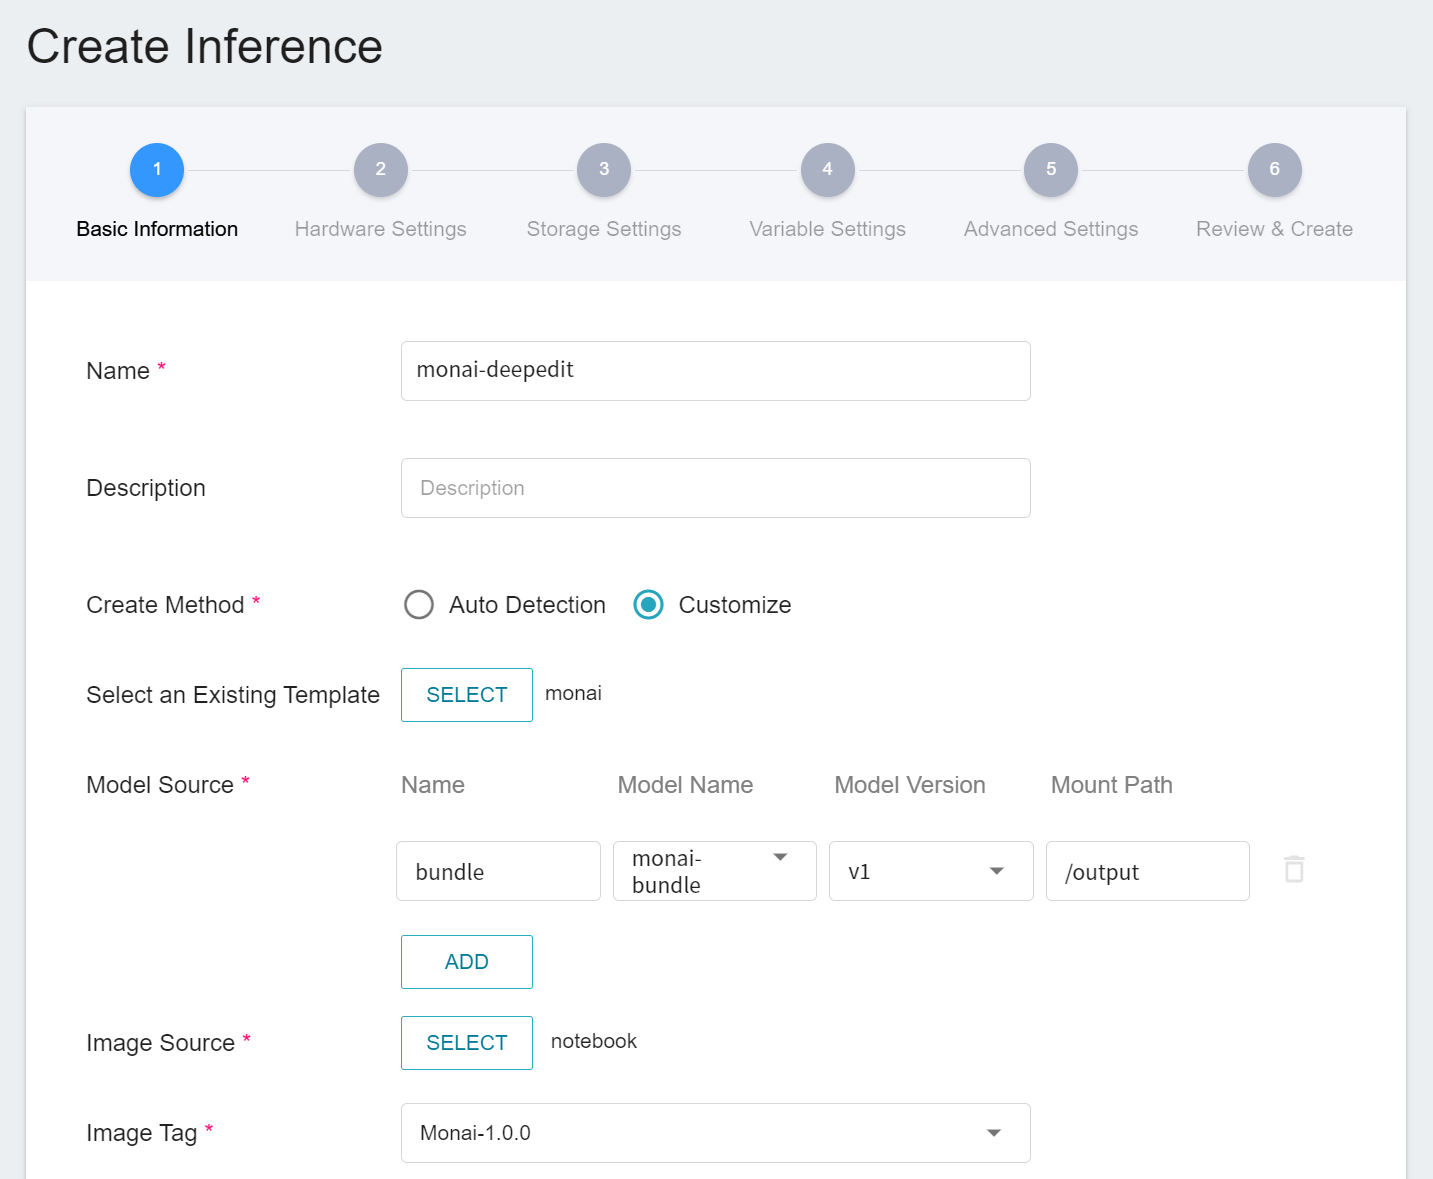
1. **Basic Information**
Similar to the setting of basic information for training jobs, we also use the **`monai`** inference template to facilitate quick setup for developers. However, the model name and version number to be loaded still need to be set manually by the user:
- **Model Name**
The name of the model to be loaded is the model imported in [**1.1 Create Model**](#11-Create-Model).
- **Version**
The version number of the model to be loaded is also the version number set in [**1.1 Create Model**](#11-Create-Model).
- **Mount Path**
The location of the model after loading is relative to the program's ongoing read, this value will be set by the **`monai`** inference template.
2. **Hardware Settings**
Select the appropriate hardware resource from the list with reference to the current available quota and training program requirements.
3. **Storage Settings**
No configuration is required for this step.
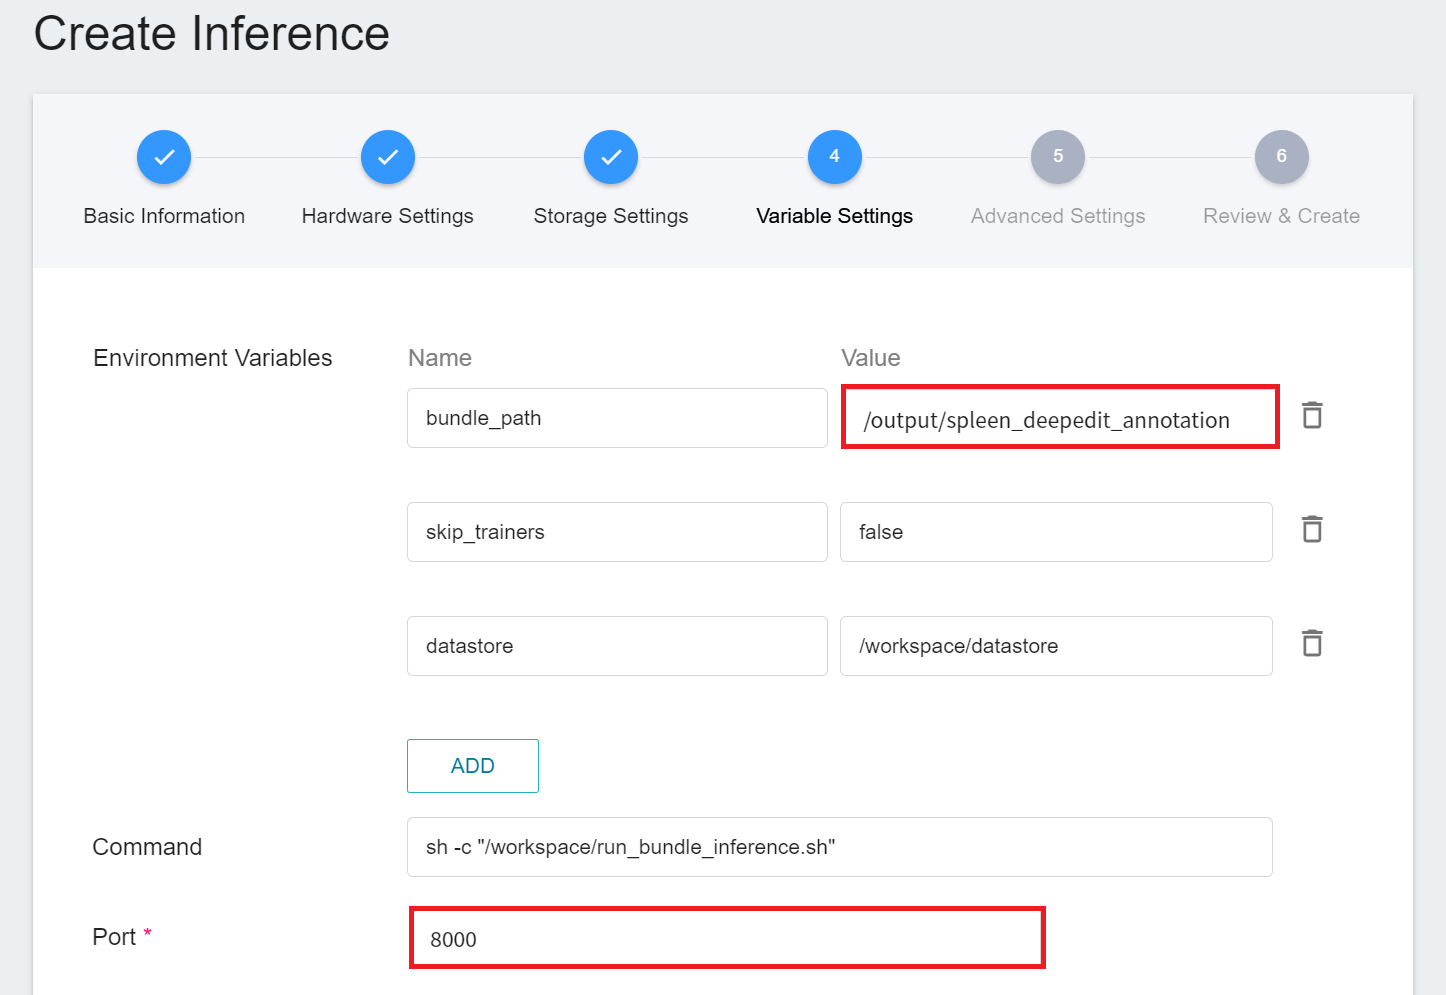
4. **Variable Settings**
In the variable setting step, relevant variables will be automatically brought in by the **`monai`** template and can be modified according to requirements. Since the internal directory name of the MONAI Bundle compressed file used in this example is **spleen_deepedit_annotation**, here you need to manually change the **`bundle_path`** to **`/output/spleen_deepedit_annotation`**.
| Variable | Description |
| ---- | ---- |
| bundle_path| Specify the bundle directory to be read by MONAI Label. By default, it is the location where the model is stored in the training task. You can also specify the bundle directory of external storage space. |
| skip_trainers | If set to true, the training model functionality of MONAI Label will be disabled. |
| datastore | Specifies where to upload annotated data from MONAI Label Client |
**`Port`** Please set it to 8000.
5. **Advanced Settings**
No configuration is required for this step.
6. **Review & Create**
Finally, confirm the entered information and click CREATE.
:::info
:bulb: Tips: The MONAI Label used here is taken from [**MONAI Label Sample Apps**](https://github.com/Project-MONAI/MONAILabel/tree/main/sample-apps/monaibundle) and customized. If you want to know more about parameter settings, you can refer to the official website document.
:::
After creating an inference job, go back to the inference management page and click the job you just created to view the detailed settings of the service. When the service state shows as **`Ready`**, you can start inference with the MONAI Label Client. However, you should be aware of some information in these details, as they will be used later when using the MONAI Label Client:
* **Network**
Since the current inference service does not have a public service port for security reasons, we can communicate with the inference service we created through the **Container Service**. The way to communicate is through the **URL** provided by the inference service, which will be explained in the next section.
:::info
:bulb: **Tips:** The URLs in the document are for reference only, and the URLs you got may be different.
:::

### 3. Create Container Service
Click **Container Service** from the OneAI Services to enter the Container Service Management page, and follow the steps below to create a container service.
1. **Basic Information**
* Name: monai-deepedit
* Description: optional, you can enter it yourself
* Image source: generic-nginx
* Image tag: v1
2. **Hardware Settings**
Select the hardware settings. Take into consideration of resource usage when selecting the resources, it is not necessary to configure GPU.
3. **Storage Settings**
No configuration is required for this step.
4. **Network Settings**
Please set **Allow port** to **80**, it will automatically generate a public service port, and check **Generate Web Link**.


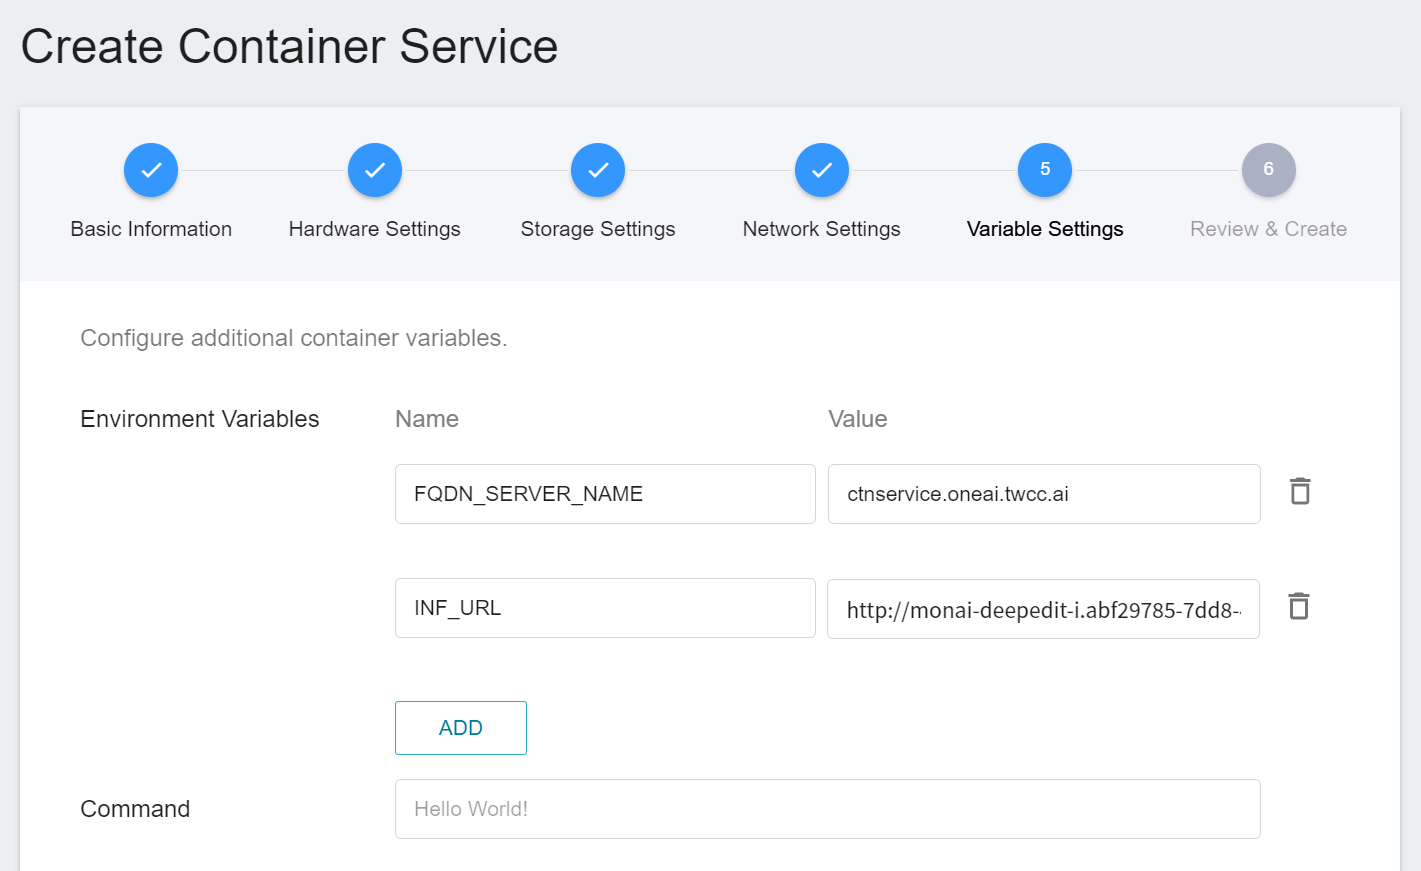
5. **Variable Settings**
* **Environment Variables**: Set two environment variables.
* **FQDN_SERVER_NAME**: **`ctnservice.oneai.twcc.ai`**.
* **INF_URL**: Enter the URL obtained from the inference service.
* **Command**: No setting is required for this example.
6. **Review & Create**
Finally, confirm the entered information and click CREATE.
7. **View Public Access**
After creating the container service, go back to the container service management list page and click on the service to get detailed information. Please pay attention to the URL in the red box in the figure below. This is the public service URL of **MONAI Label Server**. Click this URL link to confirm whether the MONAI Label Server service is started normally in the browser tab; click the **Copy** icon on the right to copy this URL link , and next will introduce how to **Use 3D Slicer**.


### 4. Use 3D Slicer
:::info
:bulb: **Tips:** The following 3D Slicer setup screen is based on version 5.0.3. If you are using other versions, please refer to the official [**3D Slicer website**](https://www.slicer.org/) for instructions.
:::
1. **Install MONAI Label Plug-in**
The MONAI Label Plug-in needs to be installed first before proceeding to the other steps. Open 3D Slicer and click **`View` > `Extension Manager`**.

Click **`Install Extensions`** and click the Active Learning category on the left, the MONAI Label appears, please click INSTALL, and restart 3D Slicer.

2. **Load Data for Segmentation**
Next, click **`Add Data`** to load the spleen data for segmentation.

And bring up **`Active Learning -> MONAILabel`**.

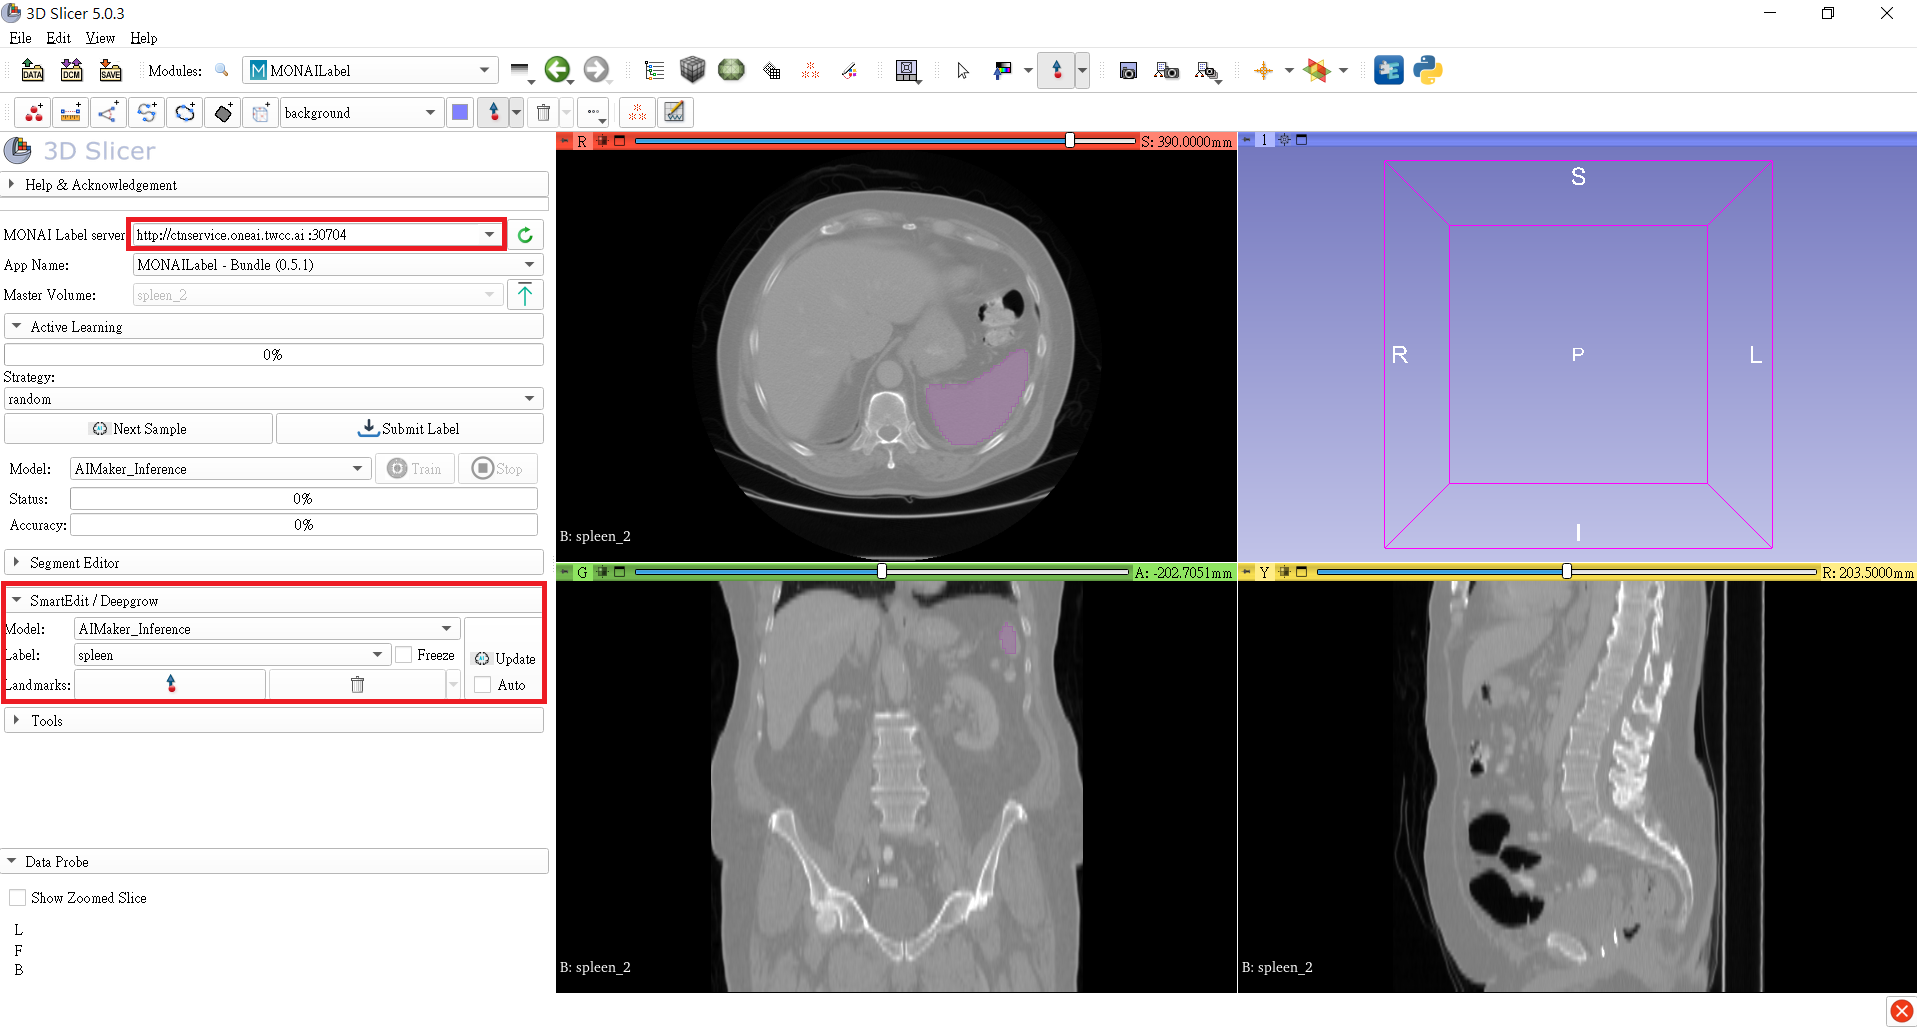
3. **Connect Inference Service**
In the **MONAI Label server** field, fill in the **MONAI Label server** URL copied in the previous section, for example: **`http://ctnservice.oneai.twcc.ai:30704`**. If the MONAI Label server service is set correctly, the **Model** in **SmartEdit / Deepgrow** will display the default **AIMaker_Inference** name, click the **Update** button on the right to start the inference. You can also choose to place auxiliary points and then make inferences.
:::info
:bulb: **Tips:** The URLs in the document are for reference only, and the URLs you got may be different.
:::
4. **Annotation Assistance**
At this point, you will see that there are additional areas marked in purple in the CT image, and these purple areas are the results of the spleen location inferred by the model you selected.
