---
title: Container Service
description: OneAI Documentation
tags: EN, Draft
---
[OneAI Documentation](/s/user-guide-en)
# Container Service
Container Service provides lightweight containers, instant deployment, and elastic expansion of computing resources, which allows you to complete computations or setup inferences easily.
## Create Container Service
Select **Container Service** from the OneAI service list to enter the Container Service Management page, and then click **+ CREATE**.
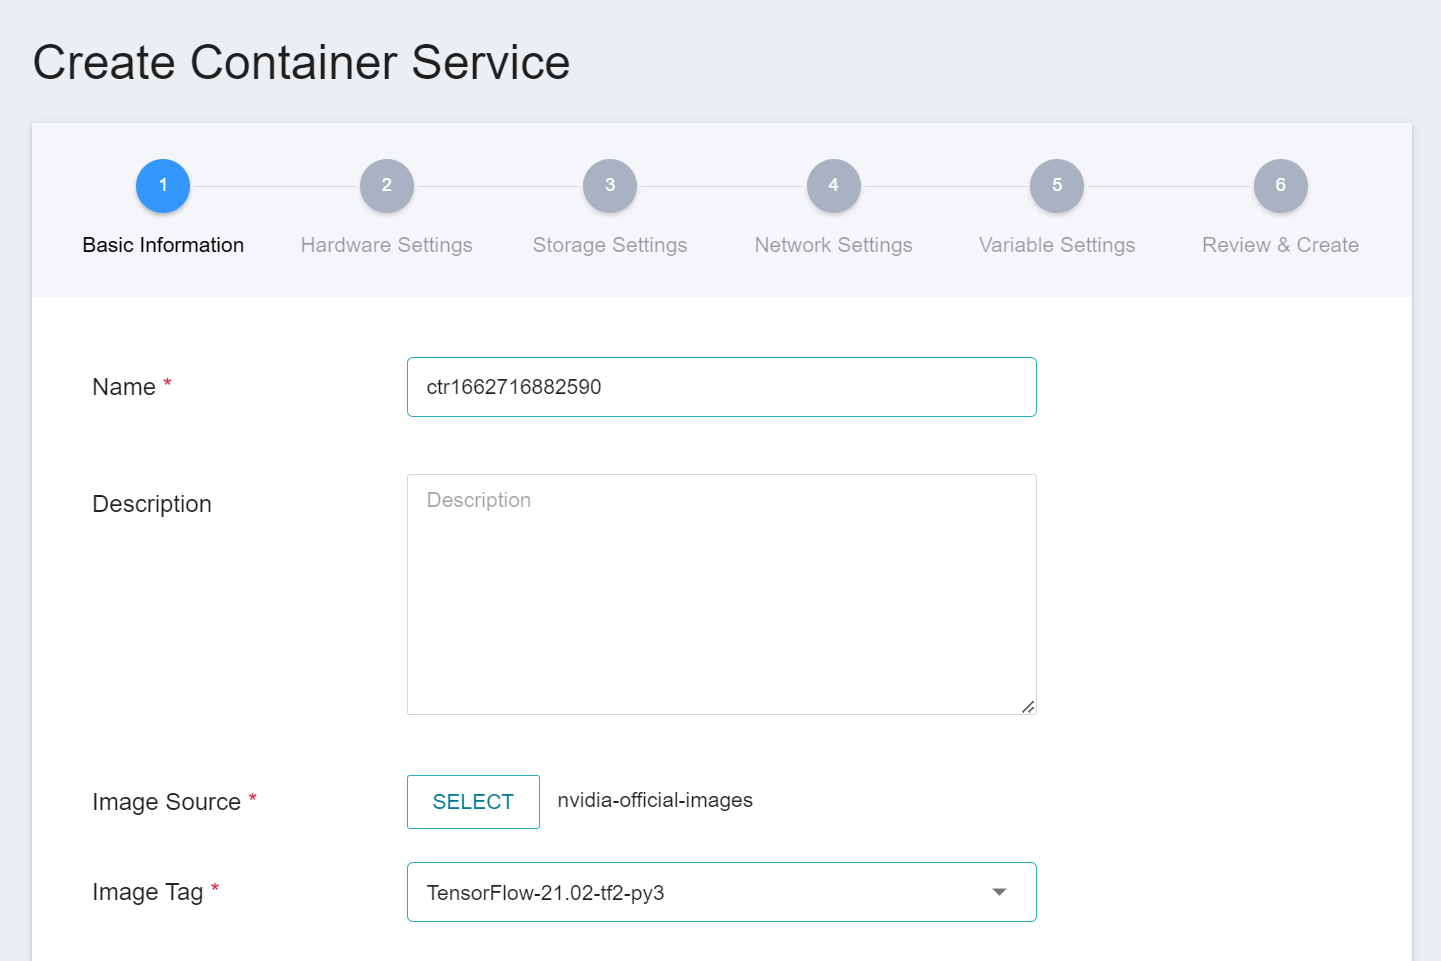
#### 1. Basic Information
* Enter the basic information of the Container Service and select an image, then click **NEXT: HARDWARE SETTINGS >**.
:::info
:bulb: **Tips:** There are two types of image source, **Public** and **Private**:
* **Public Image**: Built in by the system or uploaded by the system administrator and can be used in different projects, see [**Public Image**](/s/public-image-en) descriptions.
* **Private Image**: Uploaded by project members and can only be used in that project, see [**Container Image**](/s/container-image-en) descriptions.
:::
#### 2. Hardware Settings
* Select the suitable hardware configuration according to your computing requirements. You can also click **VIEW AVAILABLE QUOTA** to view the current resource quota and usage of your project, and then click **NEXT: STORAGE SETTINGS >**.
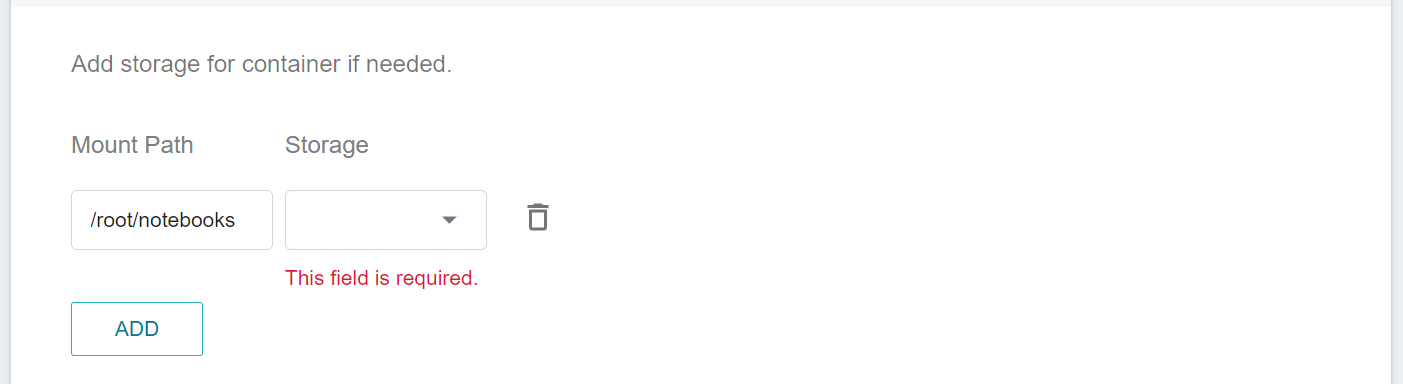
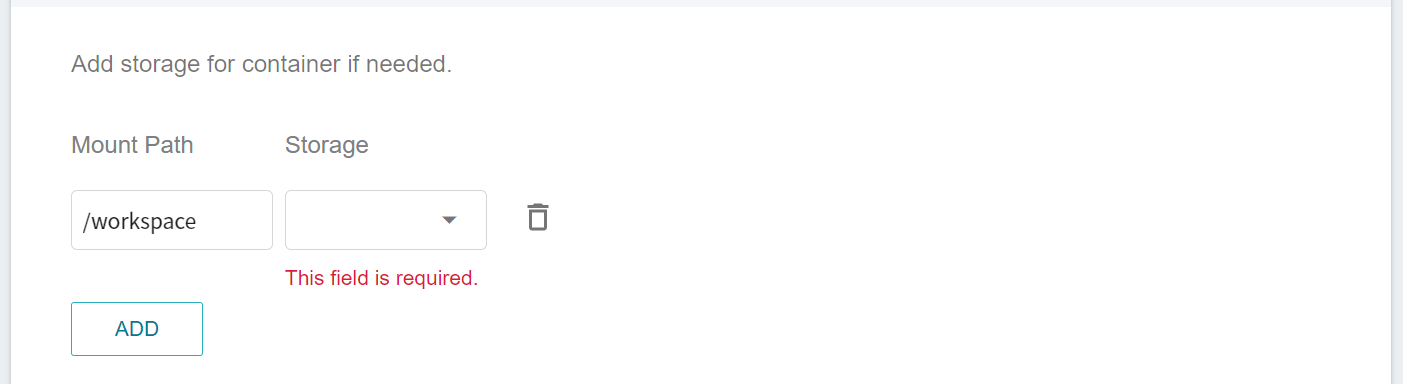
#### 3. Storage Settings
* This step will set the **Bucket** to be mounted. You can upload the program or data to the bucket in [**Storage Service**](/s/storage-en) in advance, and then mount the bucket when using various services of this system. The same bucket can be mounted to different services at the same time, making it easy to share data between services or collaborate with other project members. When the service is stopped or deleted, the data of the bucket will not disappear.
* The default information on the Storage Settings page will vary depending on the selected image. Below is an example using **nvidia-official-images**. If you do not need to use it you can click the **Delete** icon to remove it, or click **ADD** to mount it. Please modify according to your needs. When you are done, click **NEXT: NETWORK SETTINGS >**.
* Below are the default storage settings for different public images.
- **nvidia-official-images**: The default mount path for this image is **/root/notebooks**, which is the default working directory for the Jupyter service. If you do not need to use the Jupyter service, you can remove it by clicking the **Delete** icon, or modify it to another mount path.<br>
- **notebook**: The default mount path for this image is **/workspace**, which is the default working directory for the [**Notebook Service**](/s/notebook-en), and can be used with the **Environment Variable** **`NOTEBOOK_FOLDER`** in the Variable Settings step.<br>
- **AI Maker Case Study Images**: In addition to the above two categories, other public images are provided for AI Maker case studies. The preset value of each image may be different, so you can modify it according to your needs or use it along with [**AI Maker Case Study**](/s/user-guide-en#Case-Study).
#### 4. Network Settings
* Please configure the network settings according to the services to be provided.
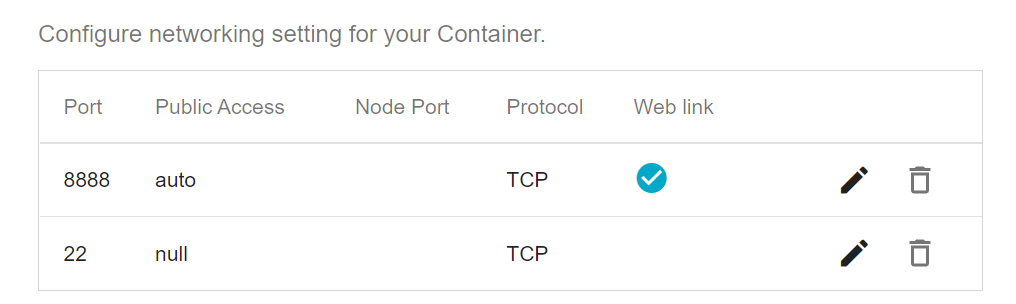
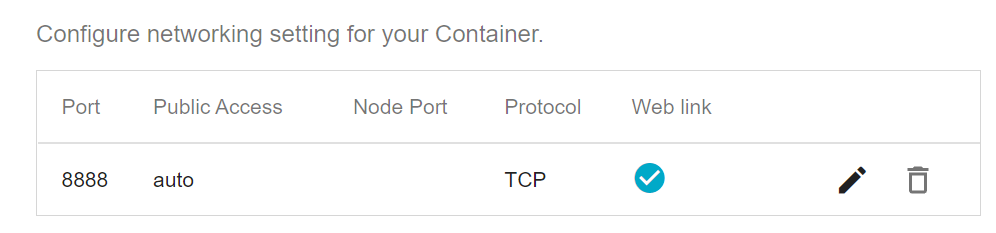
* The default settings on the Network Settings page vary depending on the selected image. If the selected image has default network settings, the system will automatically display them and allow modifications according to your needs, or click the **Delete** icon to remove them if you do not need to use them. Below are the settings for enabling the 8888 and 22 ports for public access, and the [**Connection Method**](#Connection-Method) will be explained later.
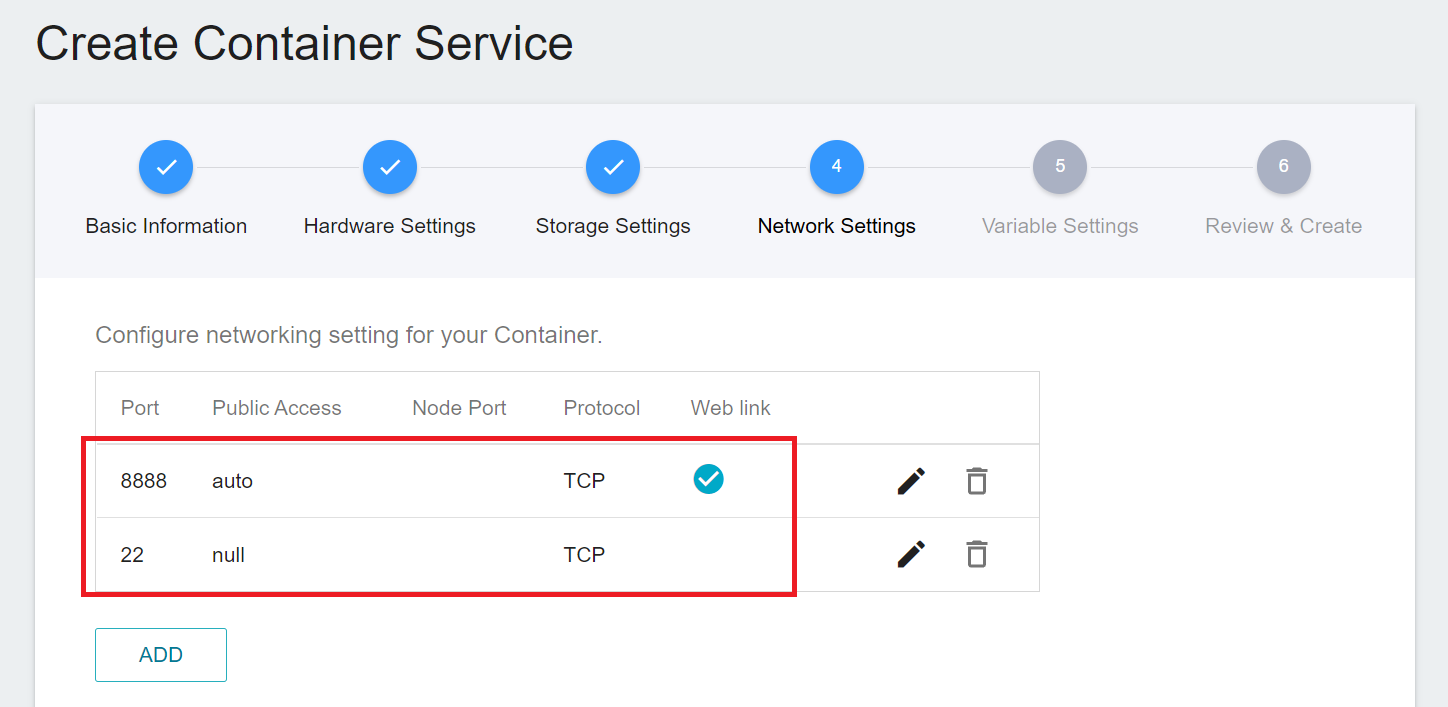
* Click **ADD** to add container port settings. The details are as follows:
- **Port**: Set the port according to the services to be provided, for example: SSH service defaults to 22, Jupyter service defaults to 8888.
- **Public Access**: Select the port for public service.
* **Null**: Does not provide public access, but can be used in connection with other services through this system.
* **Auto Generation**: Automatically assign ports. This setting is recommended for external service.
* **Static Port (30000-32767)**: Manually set any port between 30000-32767 as an external port, but if the port is already in use, the container service will fail to be created.
- **Node Port**: This item will only appear when **Static Port (30000-32767)** is selected for **Public Access**. Please enter any port between 30000-32767 as the external port.
- **Protocol**: Select **UDP** or **TCP** protocol.
- **Web Link**: Check **Generate Web Link**. After the Container Service is created, a hyperlink will appear in the settings. Click the hyperlink to open the service. For example: if the container port is set to 8888, you can Start the Jupyter service (See: [**Connect to Jupyter**](#Connect-to-Jupyter)).
<center><img src="/uploads/upload_8d834405caba460305944f15e7afb8be.png" width="520"></center><br>
* The default settings for different public images are listed below.
- **nvidia-official-images**: These images have Jupyter and SSH services pre-installed and 8888 and 22 ports pre-set. If you want to provide the services externally, click the **Pencil** icon to modify them, or click the **Delete** icon to remove them if you do not need them.
- **notebook**: Jupyter service is preloaded in this type of image and the port 8888 is preset. If you want to provide the services externally, click the **Pencil** icon to modify it, or click the **Delete** icon to remove it you do not need it. The modification method is the same as above.<br>
- **AI Maker Case Study Images**: In addition to the above two categories, other public images are provided for AI Maker case studies for use in conjunction with [**AI Maker Case Study**](/s/user-guide-en#Case-Study), with no default variable settings, you can modify them according to your needs.
* When you are done, click **NEXT: VARIABLE SETTINGS >**.
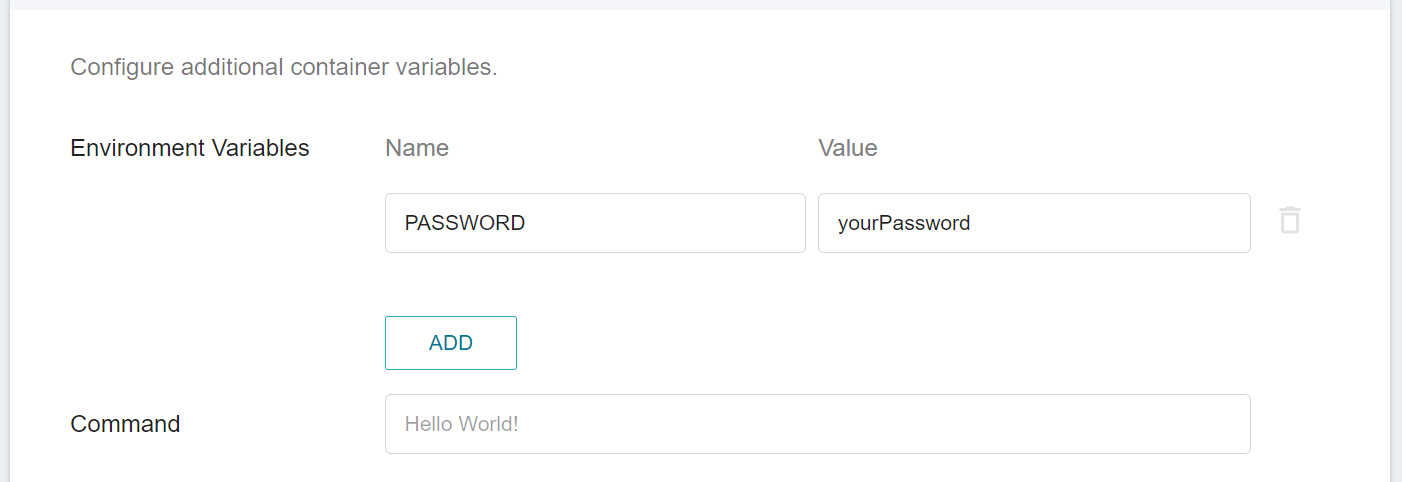
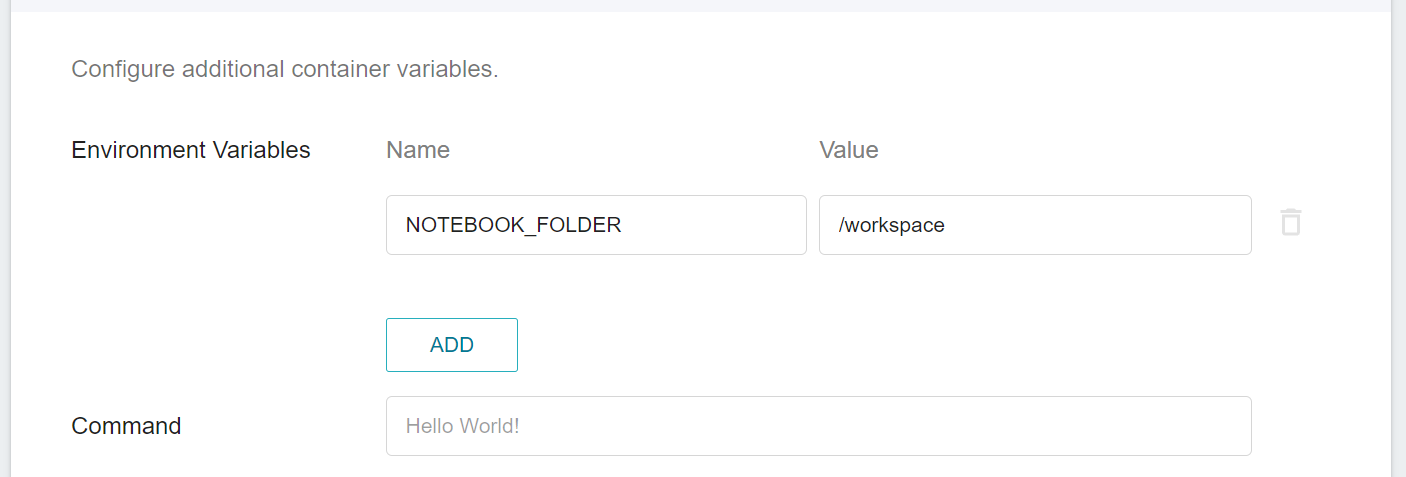
#### 5. Variable Settings
* Set environment variables and commands to dynamically adjust application settings or commands to be executed to meet your development or computing environment needs. The default information on the variable setting page will vary according to the selected image. If the image you selected has default variable settings, the system will automatically bring it out, and you can modify or delete it as needed.
- Environment variable: Set environment variable, for example, you can set the JupyterLab login password provided by the container as environment variable.
- Command: Enter the command or program to be executed, such as `python train.py`. Please note that the path setting of the program is related to the mount path in the previous [**Storage Settings**](#3-Storage-Settings).
* The default settings for different public images are listed below.
- **nvidia-official-images**: This image sets the default login password for **Jupyter** and **SSH** services to the **`PASSWORD`** environment variable, and presets it to `yourPassword`, please remember to modify it, or skip or remove it if not needed.<br>
- **notebook**: This image sets the default mount path of Jupyter service **/workspace** to **`NOTEBOOK_FOLDER`** environment variable. Users can easily modify it when creating services, or can skip or clear it.<br>
- **AI Maker Case Study Images**: In addition to the above two categories, other public images are provided for AI Maker case studies for use in conjunction with [**AI Maker Case Study**](/s/user-guide-en#Case-Study), with no default variable settings, you can modify them according to your needs.
* When you are done, click **NEXT: REVIEW & CREATE >**.
#### 6. Review & Create
* Check the creation information of the Container Service, and then click **CREATE**.
## Container Service Management
* After the Container Service is successfully created, it will appear in the Container Service Management page. Click the container you want to view in the container list to view the details. When the Container Service status shows **`Ready`**, it means the container has successfully started.
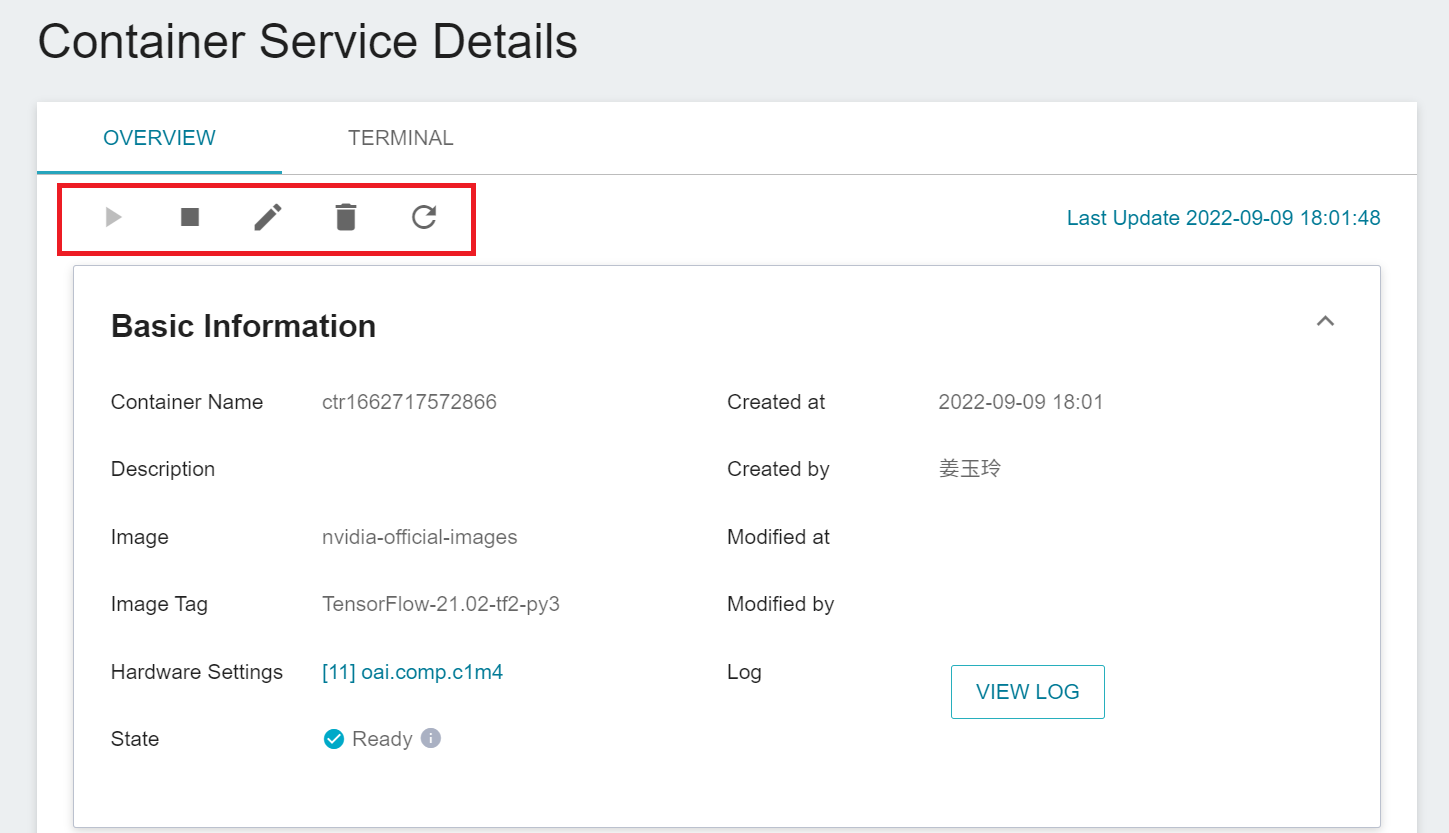
Enter the Container Service Details page to view the settings information of the Container Service. You can perform operations such as Start, Stop, Edit, Delete and Refresh through icons on the command bar above. Below are the descriptions of the operations:
* Enter the Container Service Details page to view the settings information of the Container Service. You can perform operations such as **Start**, **Stop**, **Edit**, **Delete** and **Refresh** , as explained below.
* **Start**: Start the Container Service. If the Container Service is already started or in initializing state, this button will be grayed out.
* **Stop**: If the Container Service will not be used for a while, you can stop it to release system resources. When you need to use it, click **Start** again, but be aware that you may encounter insufficient resources when you start again.
* **Edit**: Modify the settings of the Container Service. The steps are similar to those of creating a Container Service. The Container Service will be restarted automatically after the editing is finished, just be aware that you may encounter insufficient resources during the restart.
* **Delete**: If the Container Service is not needed, click **Delete** to delete the Container Service permanently to save resources. Once deleted, the Container Service will disappear from the list.
* **Refresh**: Instantly update the latest status and information displayed on the screen.
:::info
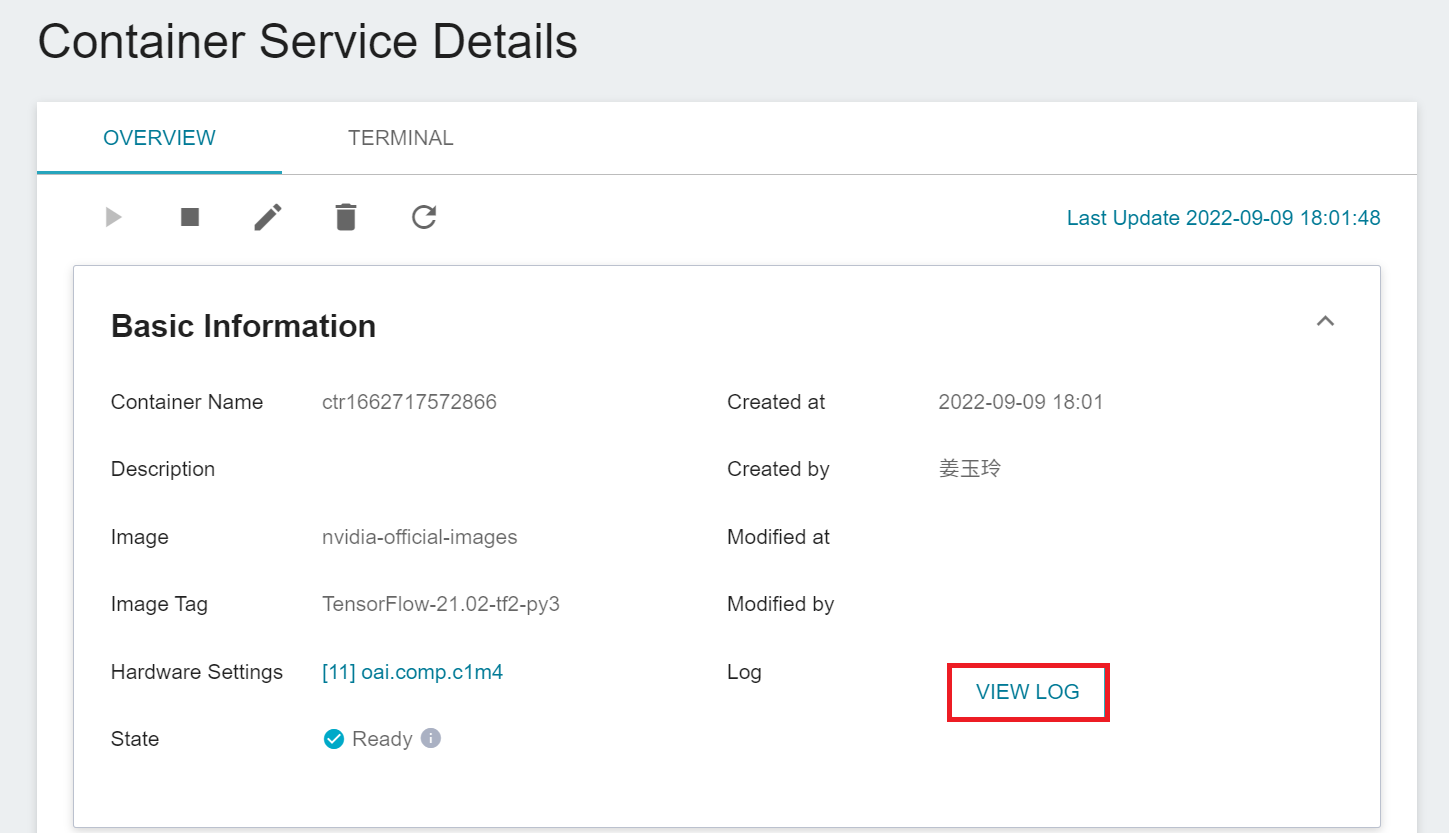
:bulb: **Tips:** Please refer to the [**Service State Description**](/s/service-state-en#Container-Service). If the service is not successfully created, it is recommended to click **VIEW LOG** to determine possible problems based on the log information, such as: hardware resources do not meet requirements, image file or program execution errors.
:::
:::info
:bulb: **Tips:** Once the Container Service is restarted, the initial settings will be restored and any additional packages you installed after the previous Container Service was started may disappear. To avoid having to reinstall packages after the Container Service is restarted, it is recommended that you use the **Command** field in the [**Variable Settings Step**](#5-Variable-Settings) to set the packages or programs to be installed when the Container Service is started.
:::
## View Log
* Click **VIEW LOG** to view the log of the container service.
## Connection Method
* You can start using the Container Service when its state is displayed as **`Ready`**. In addition to quick connection through the **Terminal** provided by the system, other connections can also be used if you select the **nvidia-official-images** public image and have **SSH** or **Jupyter** services enabled when creating the container service.
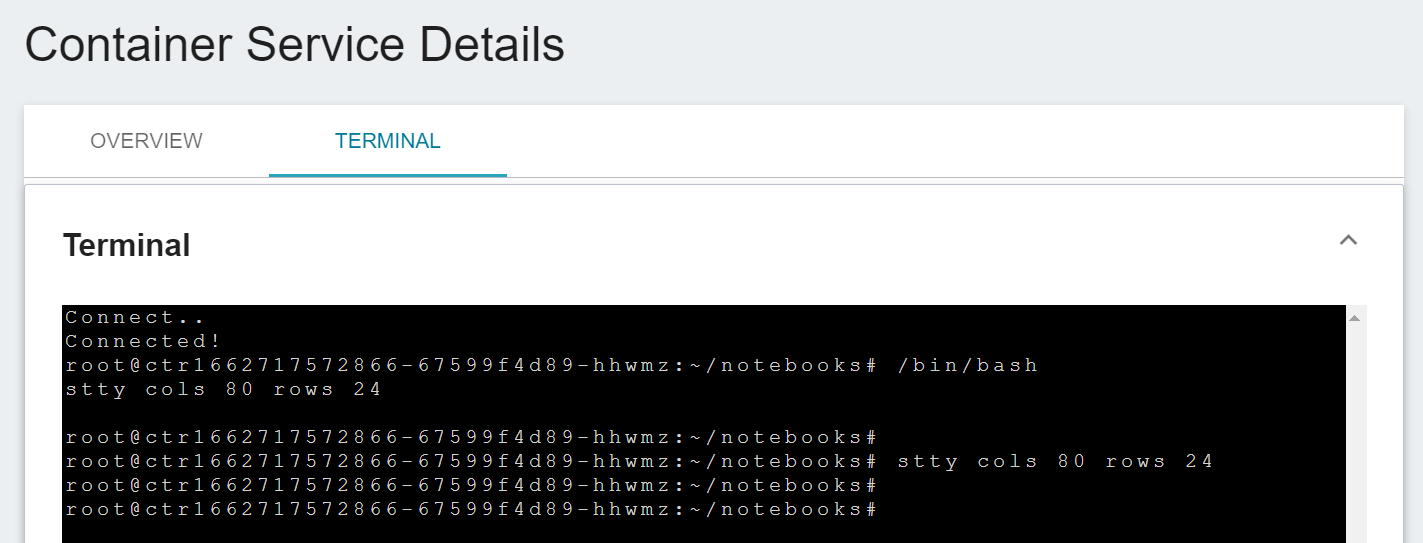
### Connect Using Terminal
* Click the **TERMINAL** tab above to use the terminal to enter the container.
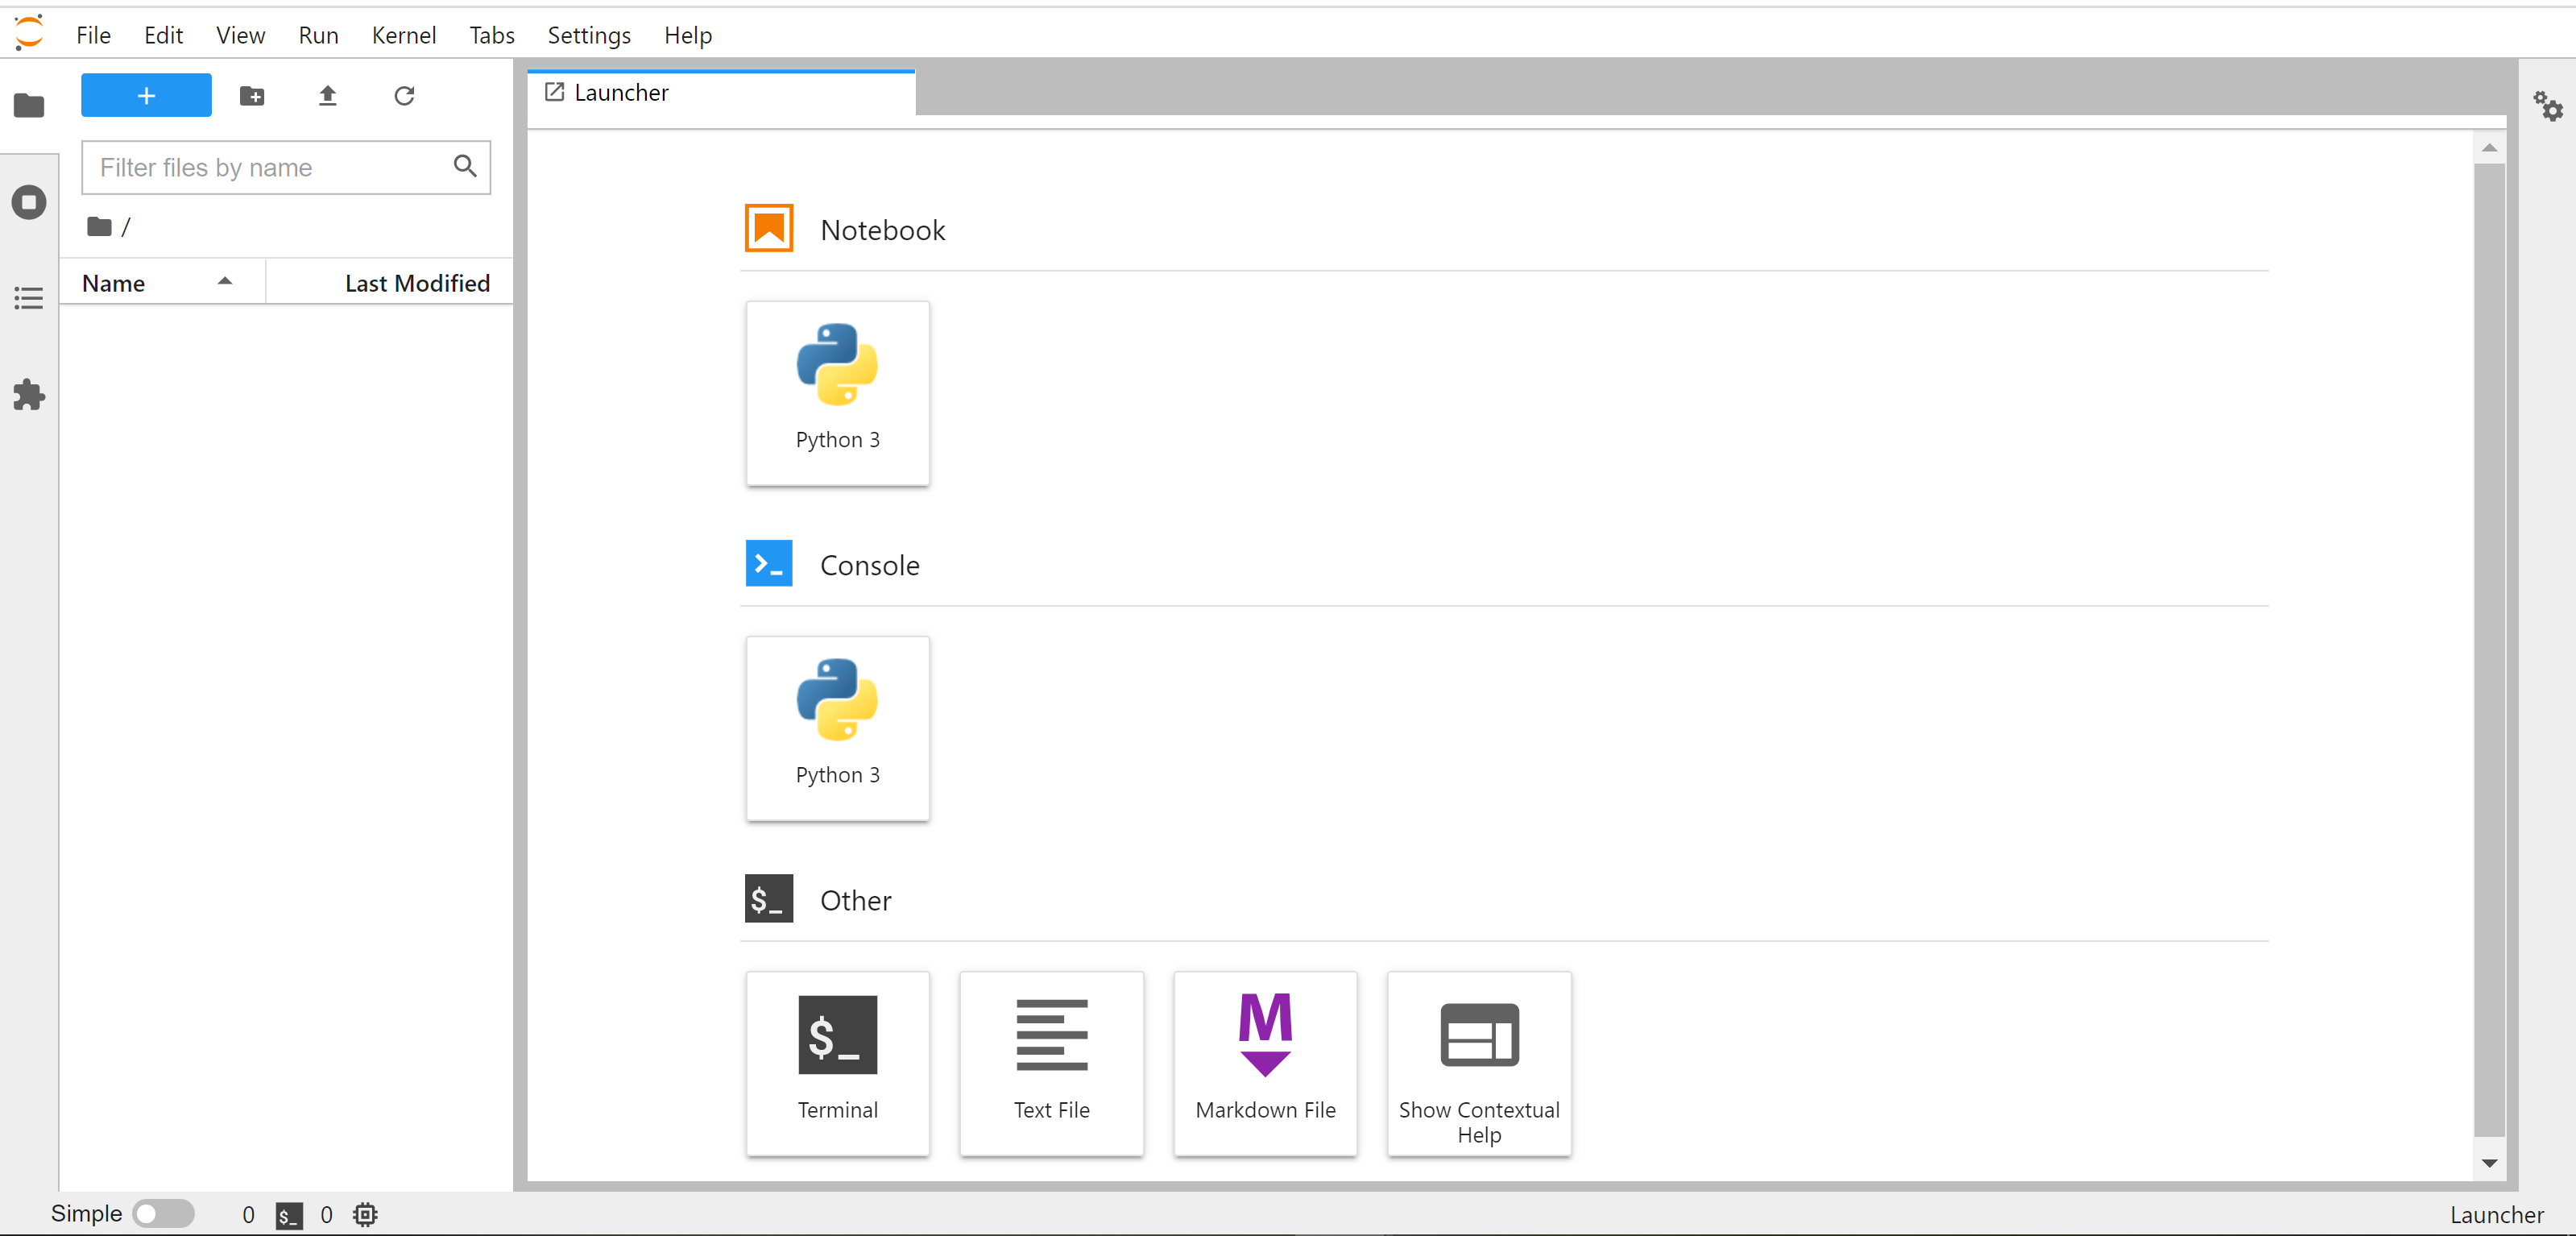
### Connect to Jupyter
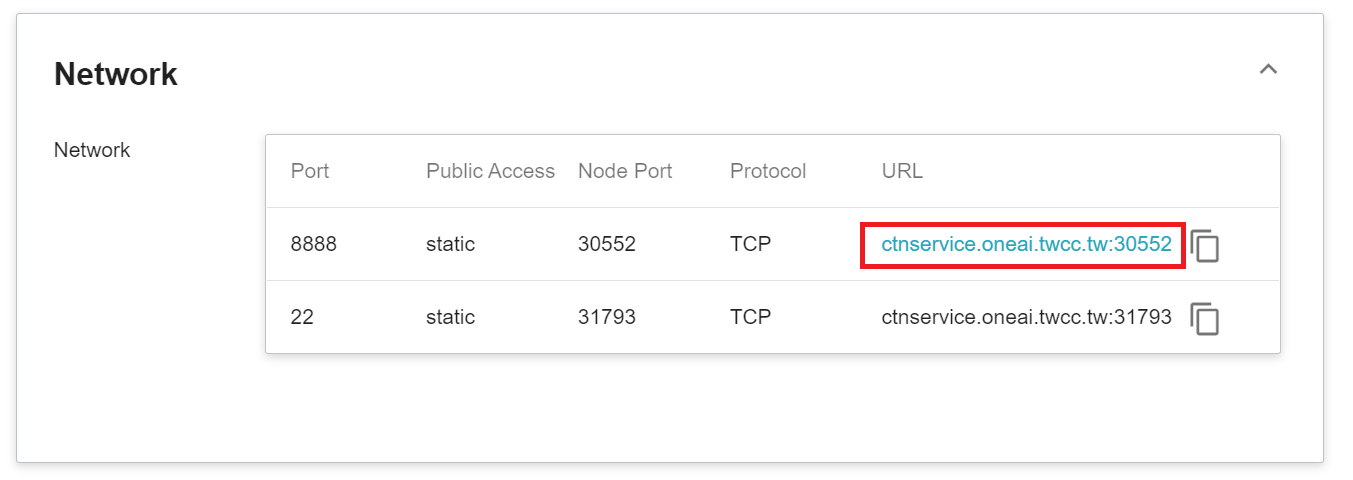
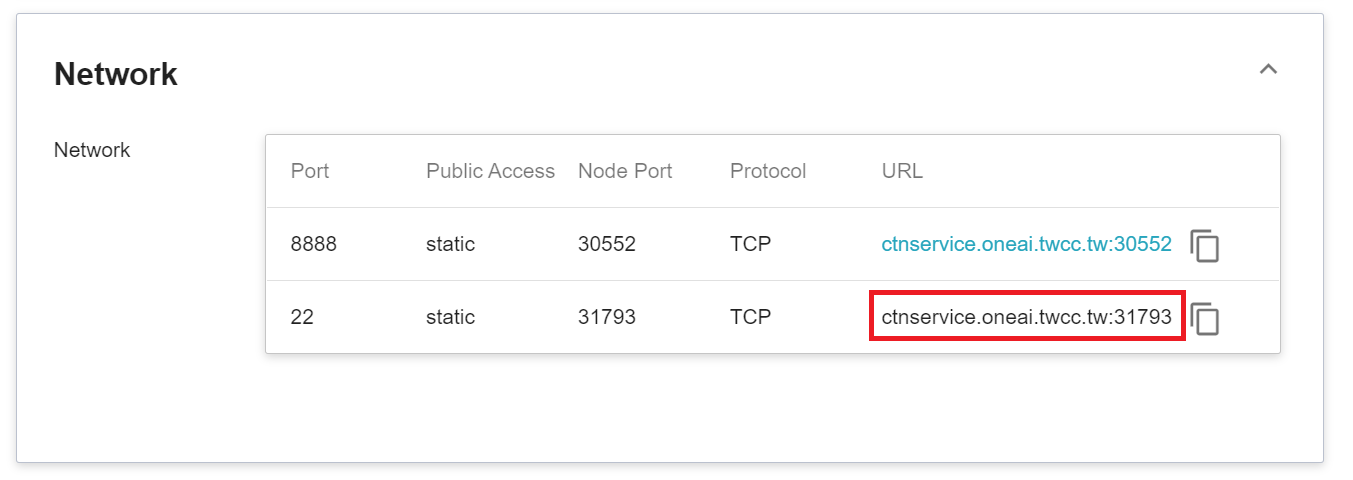
* In the **Network** section, click the Web link to the right of the port 8888 to start the Jupyter service in your browser.
* When the login page of the Jupyter service appears, enter the **`PASSWORD`** variable value set in the [**Variable Settings**](#5-Variable-Settings) step.

* After successful login, you can start using the Jupyter service provided by the **nvidia-official-images** image.
### Use SSH
* On your local computer, open the command terminal and log in to the host address and the node port of the SSH service (container port 22) using SSH command. The command example is as follows:
```
ssh root@{host address} -p {external port}
```
:::info
:bulb: **Tips:** The host address and node port are displayed to the right of Port 22. The SSH service login password is the **`PASSWORD`** value set in the [**Variable Settings**](#5-Variable-Settings) step. Please log in with the password you set.
:::
:::info
:bulb: **Tips:** **SSH Service Usage**
Not all Linux systems have SSH services pre-installed. In the [**Network Settings**](#4-Network-Settings) step, if the default setting for port 22 appears, it means that the public image (e.g., nvidia-official-images) has SSH services enabled. If the selected image does not have the default settings for port 22, you may need to install the SSH service yourself.
:::