---
description: OneAI Documentation
tags: EN, Case Study, Hugging Face
---
[OneAI Documentation](/s/user-guide-en)
# AI Maker Case Study - Hugging Face Object Detection
[TOC]
## 0. Introduction
[**Hugging Face**](https://huggingface.co/) is an open AI community that supports mainstream deep learning frameworks and provides a wide range of pre-trained models, datasets, and development tools, including various AI applications such as natural language processing, speech recognition, and image recognition.
By using the **`huggingface`** container image provided by OneAI and the **job** templates integrated with `PyTorch` and `transformers` framework in AI Maker, you can leverage OneAI's computational resources to accelerate the development of AI applications.
[<img src="/uploads/aDuhtME.png">](https://huggingface.co/models)
<center><a href="https://huggingface.co/models">(Image source: Hugging Face)</a></center>
<br><br>
In this example, we will use the template provided by AI Maker for Hugging Face object detection application to gradually build an object detection application. This template defines the environment variables, images, programs, and other settings required by the training job and inference task. You only need to upload the dataset you want to train or infer, and modify the relevant settings to quickly perform training jobs and inference tasks.
The main steps are as follows:
- **Dataset Preparation**
At this stage, we will download publicly available datasets from [**Hugging Face Datasets**](https://huggingface.co/datasets) and prepare formatted data suitable for this model training.
- **Train the Model**
At this stage, we will configure the training job for model training and fitting, and store the trained model.
- **Create Inference Service**
At this stage, we deploy the stored model to the service to perform inference.
:::info
:bulb: **Tips: Reference Information**
* [Hugging Face official website](https://huggingface.co/)
* [Hugging Face - CPPE-5 Dataset](https://huggingface.co/datasets/cppe-5)
:::
## 1. Prepare the Dataset
In this section, we will use code to download [**CPPE-5 public dataset**](https://huggingface.co/datasets/cppe-5) provided by Hugging Face Datasets. If you want to use your own dataset, you just need to ensure it conforms to the [**training data format**](#11-Data-Format-Description) described in this section and upload it to the bucket in **Storage Service**.
### 1.1 Data Format Description
This example is for detecting relevant personal protective equipment (PPE) in medical settings, which can be categorized as follows:
| category_id | name |
| ----------- | ----------- |
| 0 | coveralls |
| 1 | mask |
| 2 | face shield |
| 3 | gloves |
| 4 | goggles |
The object annotation format used in this example is COOC format. The required attributes are:
- image_id: The image id corresponding to the object, but in this example, one image corresponds to multiple objects, so this attribute is not used.
- area: The area of the rectangular object, that is, length x width.
- bbox: The four-point coordinates of the rectangular object, which are xmin, ymin, xmax, and ymax respectively.
- category_id: The category ID of the object.
The training data supports **JSON** format and is presented as two-column data.
| Columns | Description | Example |
| --- | --- | --- |
| `path` | Relative path of the image file, relative to the JSON file | train/000001.jpg |
| `annotations` | Object annotation content | [{"image_id": 1, "area": 3796, "bbox": [302.0, 109.0, 73.0, 52.0], "category_id": 4}] |
#### Sample JSON Format
```json
{"path": "train/000001.jpg","annotations": [{"image_id": 15, "area": 3796, "bbox": [302.0, 109.0, 73.0, 52.0], "category_id": 4}]}
...
```
### 1.2 Create a Bucket
Select **Storage Service** from the OneAI Services menu, enter the Storage Service Management page, and then click **+ CREATE** to add a bucket named **`hf-cppe5`**. This bucket is used to store our dataset.
### 1.3 Download Dataset
In this section, we will use OneAI's **Notebook Service** to download the train and test datasets from [**Hugging Face Datasets**](https://huggingface.co/docs/datasets/index) for [**CPPE-5 (Medical Personal Protective Equipment Dataset)**](https://huggingface.co/datasets/cppe-5) as training and validation data.
#### 1.3.1 Create Notebook Service
Select **Notebook Service** from the OneAI services to enter the Notebook Service Management page, and then click **+ CREATE**. The information for creating Notebook Service is as follows. For more information, please refer to [**Notebook Service**](/s/notebook-en) documentation.
* Basic Information
- Name: **`hf-demo`**, duplicated names are not allowed, please create your own name
- Framework: **`PyTorch-21.02-py3`**
* Hardware settings: choose the minimum computing resources
* Storage settings: bucket to be mounted for training data
- Mount Path: **`/workspace`**
- Storage: **`/hf-cppe5`**
After the Notebook Service is created, enter the Notebook Service Details page, and in the **Connection** section, click **LAUNCH** on the right side of JupyterLab.

#### 1.3.2 Download and Process Data
After launching JupyterLab, create a Notebook named **`download.ipynb`**.
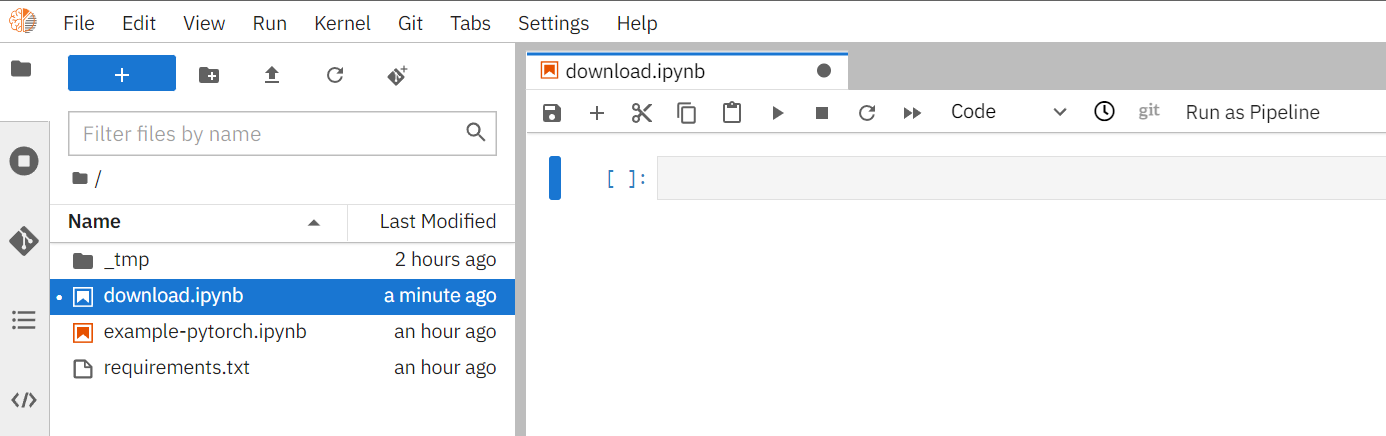
Next, copy and execute the following code to download the dataset.
```python=
# Install Datasets & Image Library
!pip install datasets==2.5.0
!pip install Pillow==9.0.0
# Download Hugging Face Dataset
# Please Ensure That There Are No Folders with the Same Name as the Variable in the Storage Space to Avoid Any Errors.
folder = "cppe-5"
from datasets import load_dataset
cppe5 = load_dataset(folder)
print(cppe5)
print(cppe5["train"].features)
print(cppe5["train"][0])
# Save in Corresponding Format
import json
import os
from PIL import Image
def save2Json(dataset, folder, outputFile):
dirname = os.path.dirname(outputFile)
os.makedirs(dirname, exist_ok=True)
with open(outputFile, 'w+', encoding='utf-8') as f:
num = 1
for record in dataset:
data = {}
data["annotations"] = []
objs = record["objects"]
size = len(objs["id"])
for i in range(size):
obj = {}
obj["image_id"] = record["image_id"]
obj["area"] = objs["area"][i]
obj["bbox"] = objs["bbox"][i]
obj["category_id"] = objs["category"][i]
data["annotations"].append(obj)
data["path"] = "{}/{:06d}.{}".format(folder, num, record["image"].format)
filename = "{}/{}/{:06d}.{}".format(dirname, folder, num, record["image"].format)
os.makedirs(os.path.dirname(filename), exist_ok=True)
record["image"].save(filename)
f.write(json.dumps(data, ensure_ascii=False) + "\n")
num += 1
save2Json(cppe5["train"], 'train', 'cppe5/train.json')
save2Json(cppe5["test"], 'val', 'cppe5/val.json')
```
After execution, the `cppe5` folder will be generated and contain two files, `train.csv` and `val.csv`. The directory structure is as follows:
```
├── cppe5
│ ├── train
│ │ ├── 000001.JPEG
│ │ ├── 000002.JPEG
│ │ ├── 000003.JPEG
...
├── train.json
│ ├── val
│ │ ├── 000001.JPEG
│ │ ├── 000002.JPEG
│ │ ├── 000003.JPEG
...
└── val.json
```
## 2. Train Object Detection Task Model
After completing the [**Prepare Dataset**](#1-prepare-dataset), you can use these data to train and fit our object detection task model.
### 2.1 Create Training Job
Select **AI Maker** from the OneAI services, and then click **Training Job** to enter the Training Job Management page. AI Maker provides two training methods: **Smart ML Training Job** and **Normal Training Job**. Different parameters must be set for different training methods.

- **Normal Training Job**
Perform a one-time training job based on your given training parameters.
- **Smart ML Training Job**
Hyperparameters can be automatically adjusted, and computing resources can be efficiently used for multiple model training to save you time and cost in analyzing and adjusting model training parameters.
In this example, we choose **Normal Training Job** to create a new training job. The steps to create a training job are as follows. For detailed instructions, please refer to the [**AI Maker > Training Job**](/s/ai-maker-en#Training-Job).
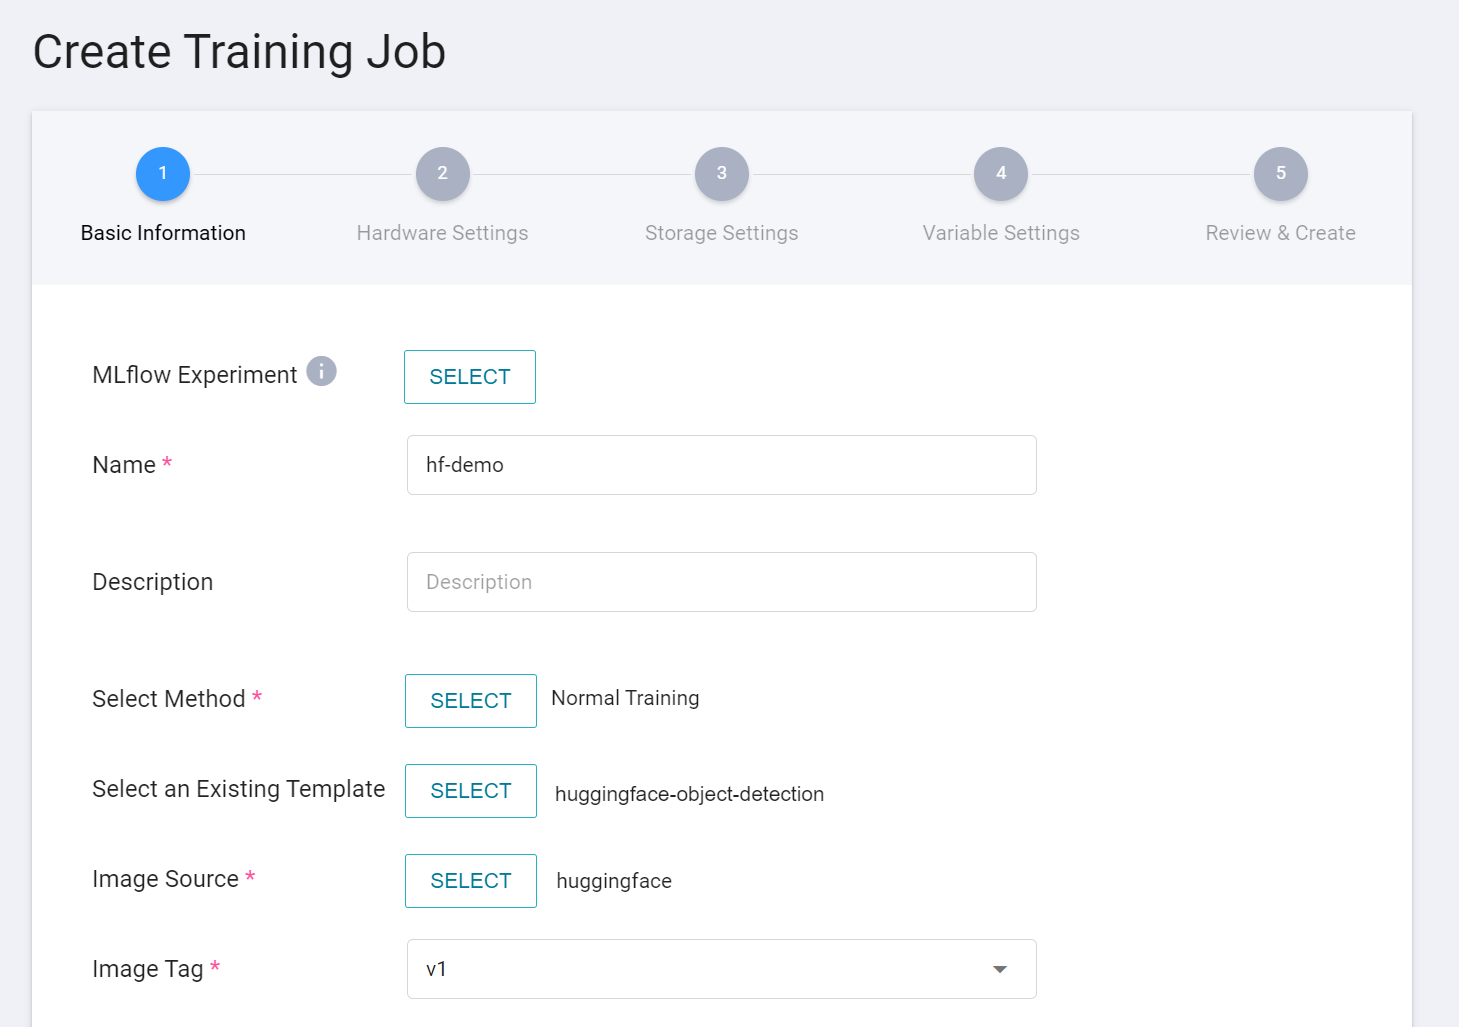
1. **Basic Information**
**AI Maker** provides a **`huggingface-object-detection`** template for object detection training. After entering the name and description, you can select the **`huggingface-object-detection`** template provided by the system to automatically bring up the public image **`huggingface:v1`** and parameter settings for subsequent steps.
:::info
:bulb: **Tips:** Duplicated names are not allowed, please create your own name.
:::
2. **Hardware Settings**
Based on the current available quota and the requirements of the training program, select the appropriate hardware resources from the list, and select the hardware option including **GPU** to accelerate the computation.
3. **Storage Settings**
This stage is to mount the bucket storing the training data into the training environment. The mount path and environment variables are already set in the template. Here, you only need to select the bucket created in the step [**Create a Bucket**](#12-Create-a-Bucket).

4. **Variable Settings**
When entering the basic information, choose to apply the **`huggingface-object-detection`** template, and the basic variables and commands will be automatically brought in. The values of the variable settings can be adjusted or added according to your development needs. The parameters provided by the **`huggingface-object-detection`** template are described below.
| Variable Name | Default | Description |
| --- | --- |--- |
| task_type | object-detection |Hugging Face Job Type |
| training_file | /datasets<br>/cppe5<br>/train.json | Training Dataset description file, absolute path of the mounted bucket. |
| validation_file | /datasets<br>/cppe5<br>/val.json | Validation Dataset description file, if not specified, will be split from the training set based on the `validation_size`. |
| validation_size | 0.2 | The Validation Dataset will only be generated if it is not explicitly specified. It will be randomly generated from the training set based on the defined ratio. In addition to specifying a ratio (decimal), you can also specify the exact number (integer) to be used as the validation set. |
| pretrained_model | [facebook/detr-resnet-50](https://huggingface.co/facebook/detr-resnet-50) | The pre-trained model for an AI job can be specified either by using [Hugging Face Models](https://huggingface.co/models) or by providing the path to the model stored in the bucket. When creating a training job, you can add a new input source and specify the absolute path to the model. |
| pretrained_tokenizer | | Without specific settings, the training process will refer to the settings of the `pretrained_model`. In addition to specifying [Hugging Face Models](https://huggingface.co/models), you can also use the absolute path to the tokenizer folder stored in the bucket. |
| model_config | | Without specific settings, the training process will refer to the settings of the `pretrained_model`. In addition to specifying [Hugging Face Models](https://huggingface.co/models), you can also use the absolute path to the folder containing the model configuration file `config.json` stored in the bucket. |
| from_scratch | False | If set to `True`, the entire model will be retrained without using the parameters of the pre-trained model.
| only_top_layer | False | If set to `True`, the base layer of the model will be frozen or fixed, and only the top layer will be adjusted. |
| score_thresholds | 0.7 | Score Threshold |
| iou_thresholds | 0.5 | IoU (intersection over union) The ratio of the intersection of the predicted object area and the real object area divided by the union|
:::info
:bulb: **Tips: Pre-trained Model**
`pretrained_model` must be a model based on `PyTorch` and `Transformers` framework and conform to the job category (`object-detection`) for it to be used.
:::
For advanced training parameter settings, please refer to the official documentation of [**Hugging Face - TrainingAuguments**](https://huggingface.co/docs/transformers/v4.21.1/en/main_classes/trainer#transformers.TrainingArguments). The following describes several commonly used parameters.
| Variable Name | Default | Description |
| --- | --- | --- |
| num_train_epochs | 30 | The number of training times for all datasets. If the [**max_steps**](https://huggingface.co/docs/transformers/v4.21.3/en/main_classes/trainer#transformers.TrainingArguments.max_steps) parameter is set, it will override the number of epochs when training the entire dataset. |
| learning_rate | 0.00002 | Learning rate |
| per_device_train_batch_size<br>per_device_eval_batch_size | | |
| auto_find_batch_size | True | When enabled, it will automatically find a suitable batch_size to avoid CUDA Out-of-Memory errors |
| load_best_model_at_end | False | Whether to save the best model after training |
| evaluation_strategy<br>save_strategy | epoch<br>epoch | The values of these two parameters must be both epoch or steps |
| save_total_limit | 2 | Must be greater than or equal to 2, store the number of checkpoints, but all will be deleted after the final training |
| ... | ... | Other variables are used with reference to the original [**function library**](https://huggingface.co/docs/transformers/v4.21.3/en/main_classes/trainer#transformers.TrainingArguments) |
:::info
:bulb: **Tips: Items not currently supported**
| Variable Name | Default | Description |
| --- | --- | --- |
| use_iepx | False | Intel® Extension is not currently supported |
| tf32 | False | tf32 related settings are not currently supported |
| bf16<br>bf16_full_eval | False<br>False | bf16 related settings are not currently supported |
| xpu_backend | | Distributed training (mpi/ccl) is currently not supported |
| tpu_num_cores | | TPU is not currently supported |
| sharded_ddp | False | [FairScale](https://github.com/facebookresearch/fairscale) is not currently supported |
| fsdp<br>fsdp_min_num_params | False<br>0| [FSDP](https://pytorch.org/docs/stable/fsdp.html) is not currently supported |
| deepspeed | | [DeepSpeed](https://github.com/microsoft/deepspeed) is not currently supported |
:::
5. **Environment Variables and Hyperparameters**
Depending the training method selected at [**Create Training Job**](#21-Create-training-job), that is, whether **Smart ML Training Job** or **Normal Training Job**, the variable settings will be slightly different.
| Field name | Description |
| --- | --- |
| Environment variable | Enter the name and value of the environment variables. The environment variables here include not only the settings related to the training execution, but also the parameters required for the training network. |
| Hyperparameter<sup style="color:red"><b>\*</b></sup> | **(Smart ML Training Job)** This tells the job what parameters to try. Each parameter must have a name, type, and value (or range of values) when it is set. After selecting the type (integer, float, and array), enter the corresponding value format when prompted. |
| Target parameters<sup style="color:red"><b>\*</b></sup> | **(Smart ML Training Job)** When using **`Bayesian`** or **`TPE`** algorithms, they will repeatedly adjust the appropriate parameters based on the results of the **target parameters** as a benchmark for the next training job. After training, a value will be returned as the final result. Here, the name and target direction need to be set for this value. For example, if the returned value is the accuracy rate, you can name it accuracy and set its target direction to the maximum value; if the returned value is the error rate, you can name it error and set its direction to the minimum value.<br><br> The metrics provided according to the task type is `mAP`, and its direction is the `maximum value` |
| Command | Enter the command or program name to be executed. The command provided in this image is: `python3.8 /usr/src/app/training.py`. |
| Trial Times<sup style="color:red"><b>\*</b></sup> | **(Smart ML Training Job)** That is, the number of training sessions, the training job is executed multiple times to find a better parameter combination. |
Here, **environment variables** and **hyperparameters** can switch from one to another. If you want a parameter to be a fixed value, you can remove it from the hyperparameter setting and add it to the environment variable with a fixed value; conversely, if you want to add the parameter to the trial, remove it from the environment variable and add it to the hyperparameter settings below.

6. **Review & Create**
Finally, confirm the entered information and click **CREATE**.
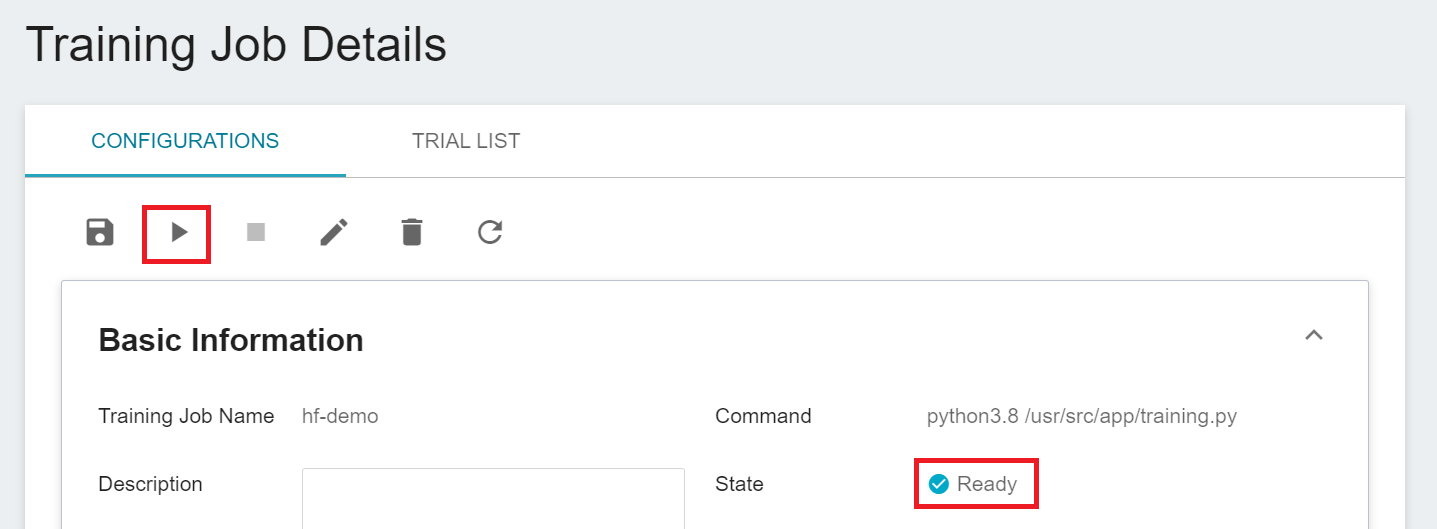
### 2.2 Start a Training Job
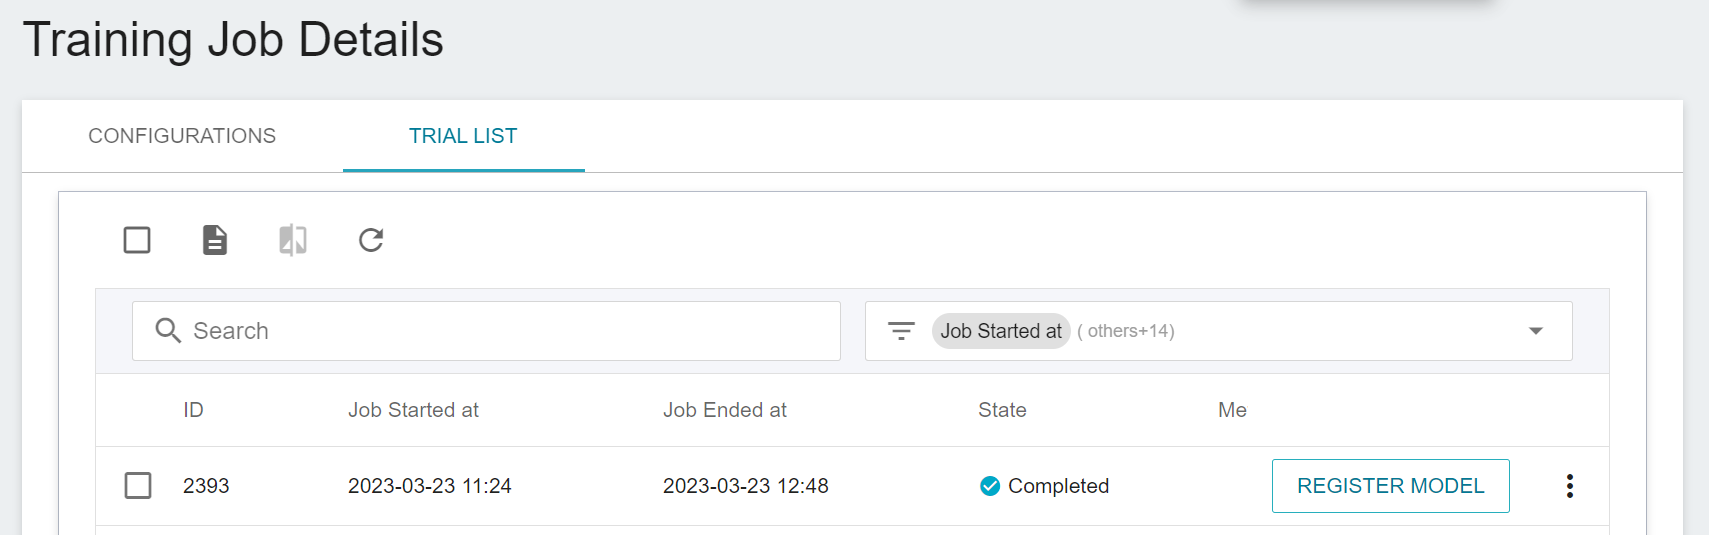
After completing the setting of the Training Job, go back to the **Training Job Management** page, and you can see the job you just created. Click the job to view the detailed settings of the training job. If the job state is displayed as **`Ready`**, you can click **START** to execute the training job.
Once started, click the **TRIAL LIST** tab above to view the execution status and schedule of the job in the list. During training, you can click **VIEW LOG** or **VIEW DETAIL STATE** in the list on the right of the job to know the details of the current job execution.
### 2.3 View Training Results
Please refer to the [**AI Maker > View Training Results**](/s/ai-maker-en#View-Training-Results) documentation for step by step instructions. You can refer to the items starting with `eval_` for the Metrics of the training job. In this example, it is `eval_mAP`. The larger the value, the better.

### 2.4 Model Registration
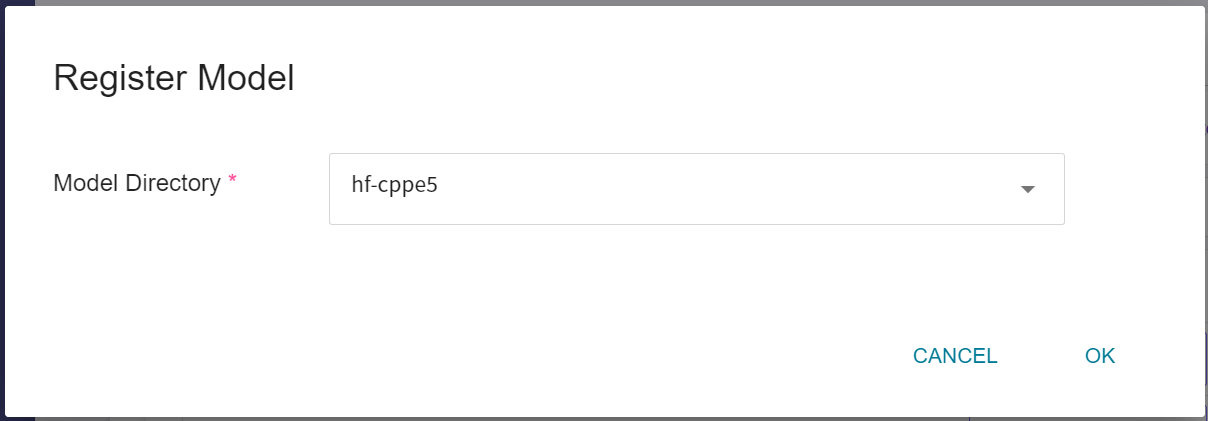
Select the result that meets expectation from one or more trial results, and then click **REGISTER MODEL** on the right to save them to Model Management; if no results meet expectation, then re-adjust the value or value range of environment variables and hyperparameters.
In the **Register Model** window, you can enter the desired model directory name. For example, you can input `hf-cppe5` to create a new model directory, or choose an existing model directory.
After saving, you can find the model in the model management list, click to enter the version list of the model, and you can see the version, type, description and source of the saved model.
## 3. Create Inference Service
Once you have trained the network for Object Detection tasks and stored the trained model, you can deploy it to an application or service to perform inference using the **Inference** function.
### 3.1 Create Inference Service
First, click **Inference** in the Services menu on the left, enter the Inference Management page, and click **+ CREATE** to create an inference service. The steps for creating the inference tasks are described below:
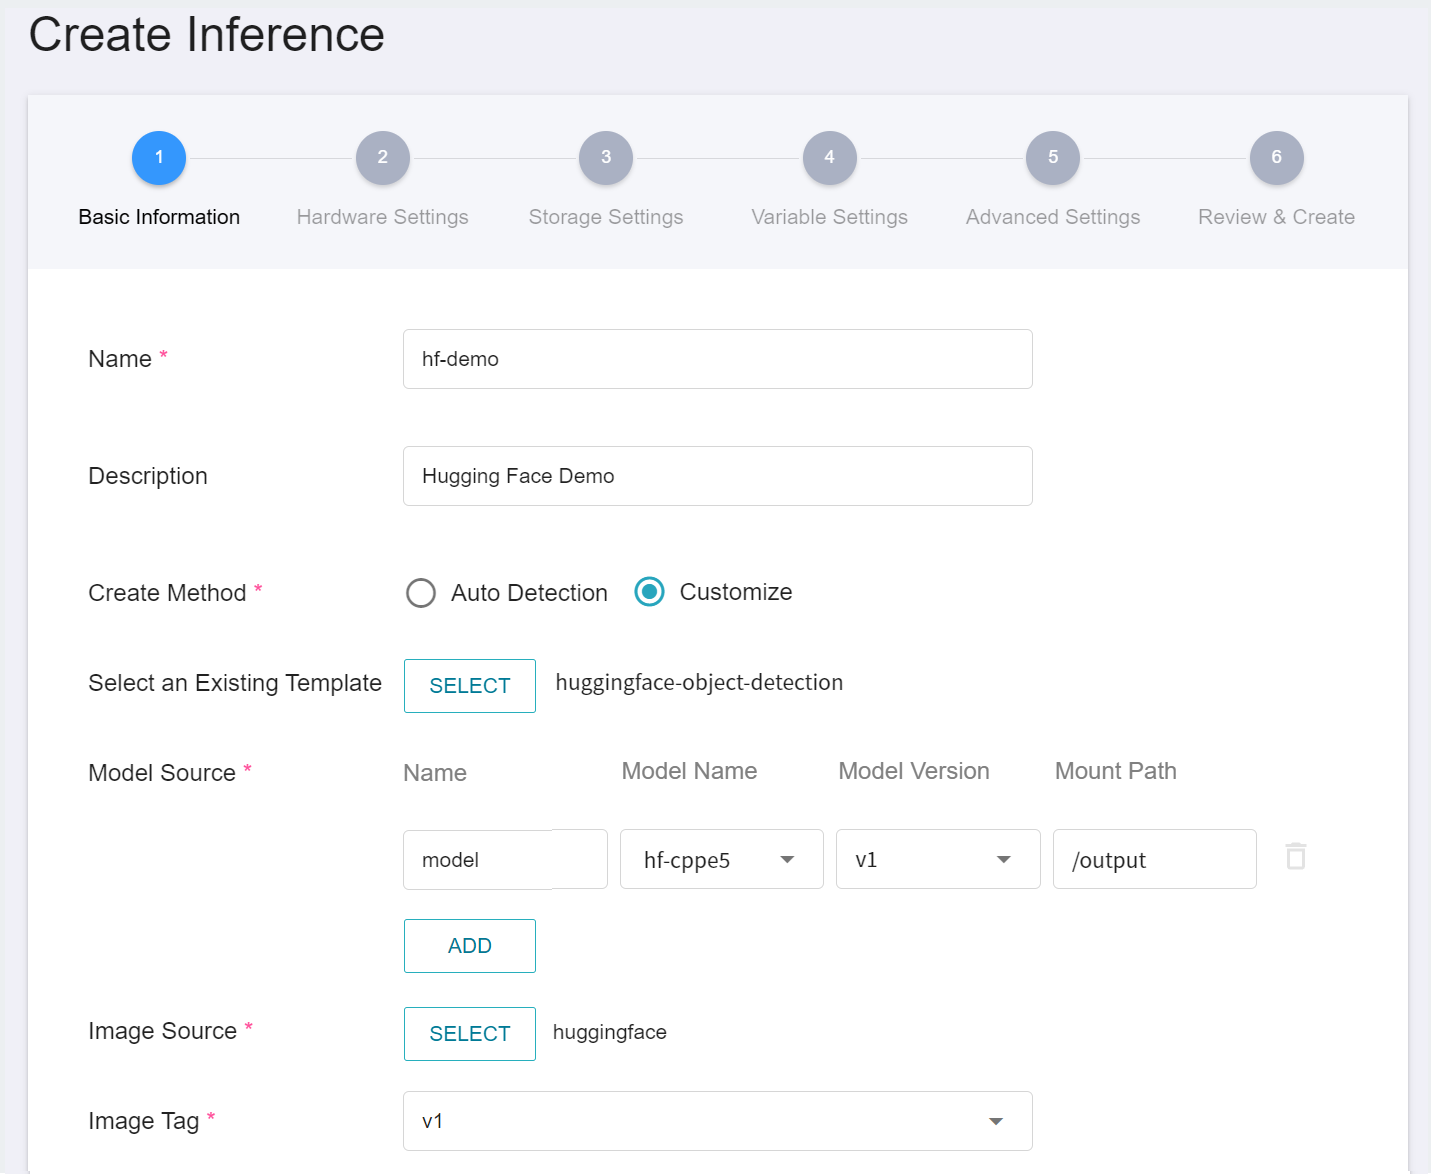
1. **Basic Information**
First, change the **Create Method** to **Customization**. Similar to the previous settings, we also use the **`huggingface-object-detection`** template for the task. However, the model name and version number to be loaded still need to be set manually.
- **Name**
The file name of the loaded model, which can be input by the user. In this example, it is `model`.
- **Model Name**
The name of the model to be loaded is the model stored in [**2.4 Register Model**](#24-Model-Registration).
- **Version**
The version number of the model to be loaded is also the version number generated in [**2.4 Register Model**](#24-Model-Registration).
- **Mount Path**
The location of the loaded model is related to the model loading function in the Inference program. This value is set by the `huggingface-object-detection` Inference Template.
<br>
:::info
:bulb: **Tips:** Duplicated names are not allowed, please create your own name.
:::
2. **Hardware Settings**
Select the appropriate hardware resource from the list with reference to the current available quota and requirements. If you want the response of the inference service to be more immediate, choose a specification that includes a **GPU**.
3. **Storage Settings**
No configuration is required for this step.
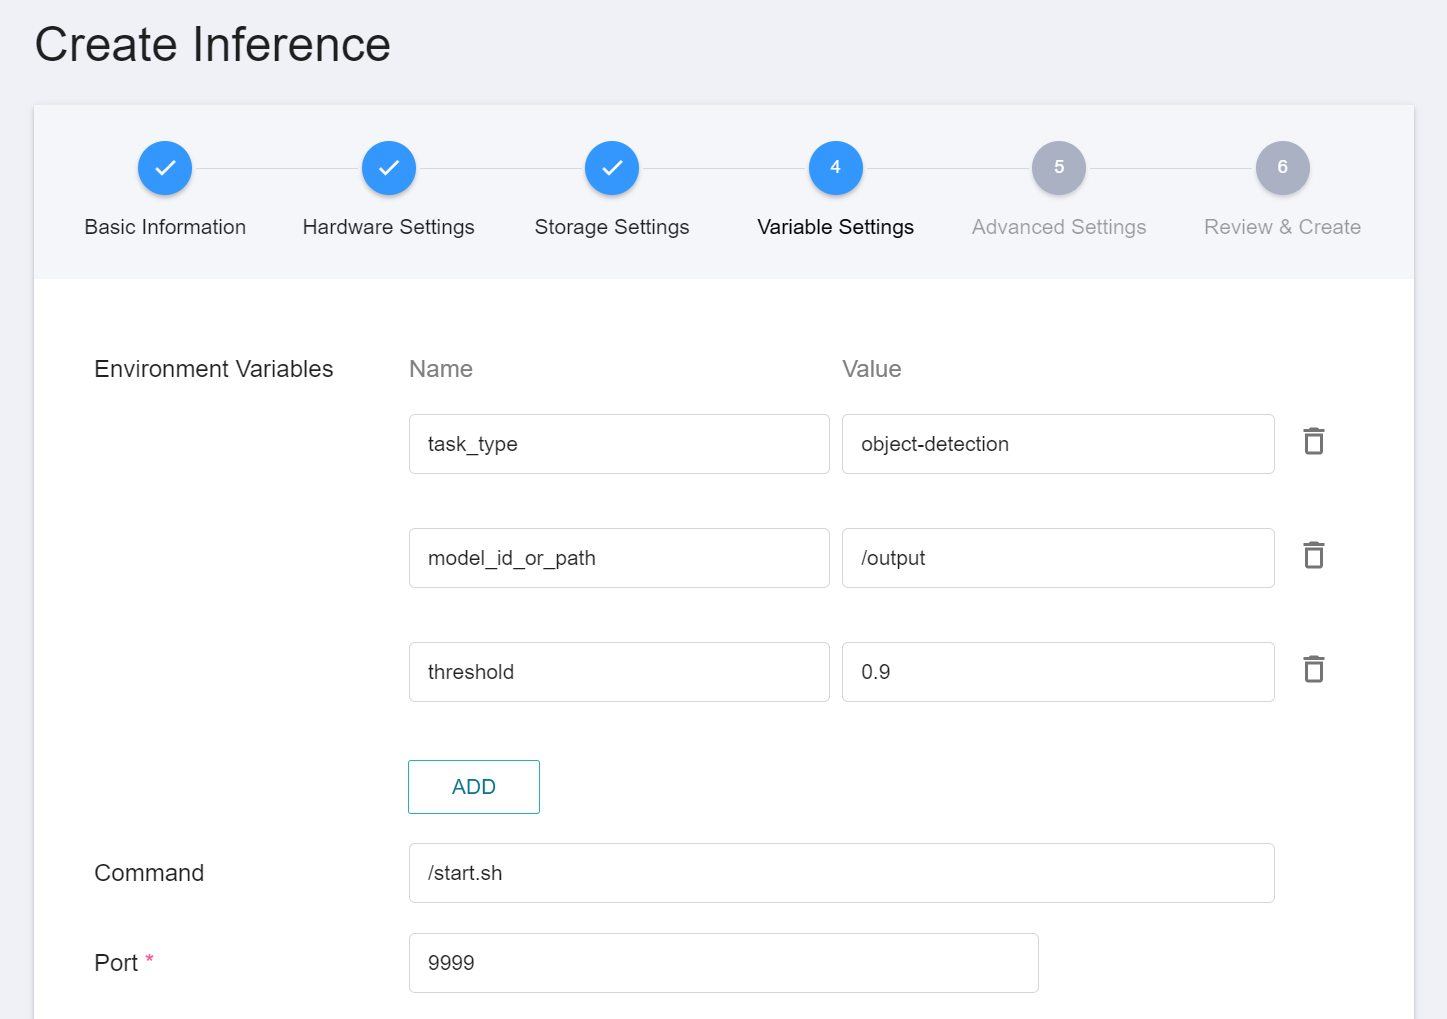
4. **Variable Settings**
In the Variable Settings step, the usual commands and parameters are automatically brought in when the template is applied.
5. **Review & Create**
Finally, confirm the entered information and click **CREATE**.
:::info
:bulb: **Tips:**
In addition to using the Template method, the system also provides an additional auto-detection method. Press the **DETECT** button, the Model Type will be displayed as **huggingface**, and the Inference Server will be **HuggingFace Server**.

:::
### 3.2 Make Inference
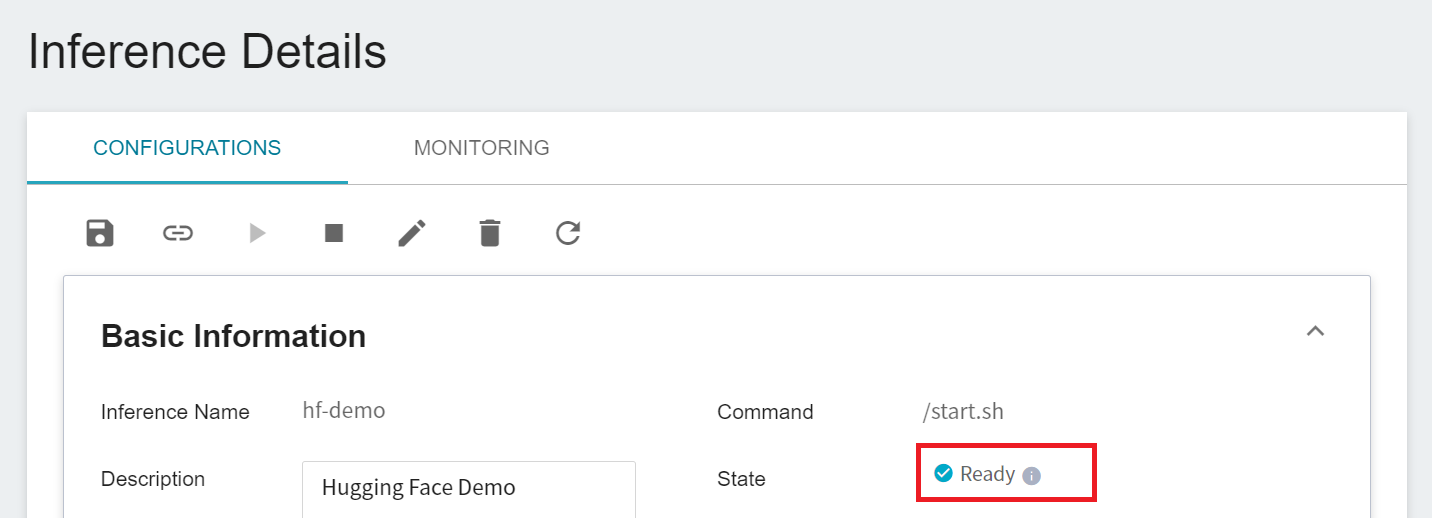
After completing the setting, please go to the Inference Service's detailed settings to confirm whether it is successfully started. When the service state shows as **`Ready`**, you can start connecting to the Inference Service.
Inference service currently does not support public Node Port for security reasons, we can communicate with the created Inference service through the **Notebook Service**. The way to communicate is through the **Network** information displayed at the bottom of the **Inference Details** page.

:::info
:bulb: **Tips: Inference Service URL**
- For security reasons, the **URL** provided by the inference service can only be used in the system's internal network, and cannot be accessed through the external Internet.
- To provide this Inference Service externally, please refer to [**AI Maker > Provide External Service**](/s/ai-maker-en#Making-Inference) for instructions.
:::
You can click on the **MONITORING** tab to see the relevant monitoring information on the monitoring page, and the following figure shows the inference results after a period of time.

Click the Period menu to filter the statistics of the Inference API Call for a specific period, for example: 1 hour, 3 hours, 6 hours, 12 hours, 1 day, 7 days, 14 days, 1 month, 3 months, 6 months, 1 year, or custom.

:::info
:bulb: **About the start and end time of the observation period**
For example, if the current time is 15:10, then.
- **1 Hour** refers to 15:00 ~ 16:00 (not the past hour 14:10 ~ 15:10)
- **3 Hours** refers to 13:00 ~ 16:00
- **6 Hours** refers to 10:00 ~ 16:00
- And so on.
:::
#### 3.2.1 Test the Inference Service with the curl Command
If you want to test the Inference service, you can use the [**Notebook Service**](/s/notebook-en), and apply the PyTorch development framework, such as `PyTorch-21.02-py3`, and use curl to call the API for inference:
```python
!curl -X POST hf-demo-i.36e81d89-0c43-4e89-a7d8-a58705042436:9999 -T "cppe5/val/000001.JPEG"
```
When the server receives the image, it will detect the object, and finally return the recognized object type, score and four-point coordinate position
> [{"score":0.9337628483772278,"label":"2","box":{"xmin":1142,"ymin":148,"xmax":1354,"ymax":345}},{"score":0.9408917427062988,"label":"2","box":{"xmin":649,"ymin":158,"xmax":849,"ymax":385}},{"score":0.9733251929283142,"label":"0","box":{"xmin":314,"ymin":78,"xmax":1710,"ymax":1077}},{"score":0.9843624830245972,"label":"4","box":{"xmin":893,"ymin":320,"xmax":1112,"ymax":545}}]
#### 3.2.2 Use Python Program to Run Inference Service
In addition to using curl, you can also use [**Notebook Service**](/s/notebook-en) with the PyTorch development framework, such as `PyTorch-21.02-py3` to launch JupyterLab and establish a connection with the inference service. Below is an example code snippet:
1. **Send Request**
Use the requests module here to generate an HTTP POST request. The **`endpoint`** variable needs to be filled with the URL link of the inference service.
```python=
import json
import requests
import matplotlib.pyplot as plt
from PIL import Image
# colors for visualization
COLORS = [[0.000, 0.447, 0.741], [0.850, 0.325, 0.098], [0.929, 0.694, 0.125],
[0.494, 0.184, 0.556], [0.466, 0.674, 0.188], [0.301, 0.745, 0.933]]
id2label = ['coveralls', 'mask', 'face shield', 'gloves', 'goggles']
def predict(filename):
endpoint = "http://hf-demo-i.36e81d89-0c43-4e89-a7d8-a58705042436:9999"
data = open(filename,'rb').read()
return requests.post(endpoint, data=data)
def plot(image, result):
plt.figure(figsize=(16,10))
plt.imshow(image)
ax = plt.gca()
colors = COLORS * 100
i = 0
for data in result:
xmin = data['box']['xmin']
ymin = data['box']['ymin']
xmax = data['box']['xmax']
ymax = data['box']['ymax']
label = id2label[int(data['label'])]
score = data['score']
ax.add_patch(plt.Rectangle((xmin, ymin), xmax - xmin, ymax - ymin, fill=False, color=colors[i], linewidth=3))
text = f'{label}: {score:0.2f}'
ax.text(xmin, ymin, text, fontsize=15, bbox=dict(facecolor='yellow', alpha=0.5))
i = (i + 1) % len(COLORS)
plt.axis('off')
plt.show()
path = "cppe5/val/000001.JPEG"
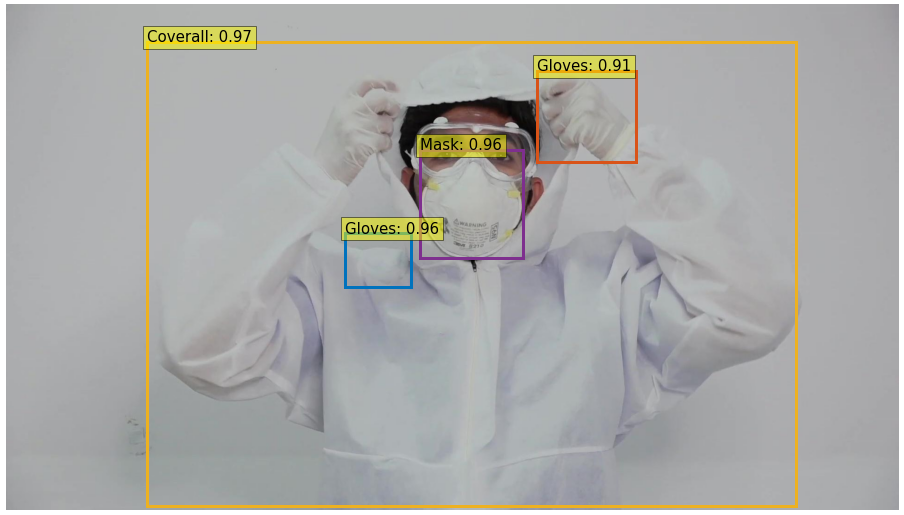
response = predict(path)
plot(Image.open(path), response.json())
```
2. **Retrieve Results**
After completing the object detection and recognition, the results will be returned in JSON format. The program will then use the information to annotate the corresponding objects' names, scores, and positions in the video. This inference program will only return objects with a score greater than `0.9`.