---
title: Notebook Service
description: OneAI Documentation
tags: EN
---
[OneAI Documentation](/s/user-guide-en)
# Notebook Service
Notebook Service integrates popular development environments including JupyterLab IDE and deep learning frameworks (TensorFlow, PyTorch, MXNet) and packages, and supports data science languages (Julia, R) and data analysis engines (Spark). It offers you a secure development environment for deep learning or data science to develop, test, execute, and debug programs, or share and collaborate with team members.
## Create a Notebook Service
Select **Notebook Service** from the OneAI Services Menu to enter the **Notebook Service Management** page, then click **+ CREATE**.
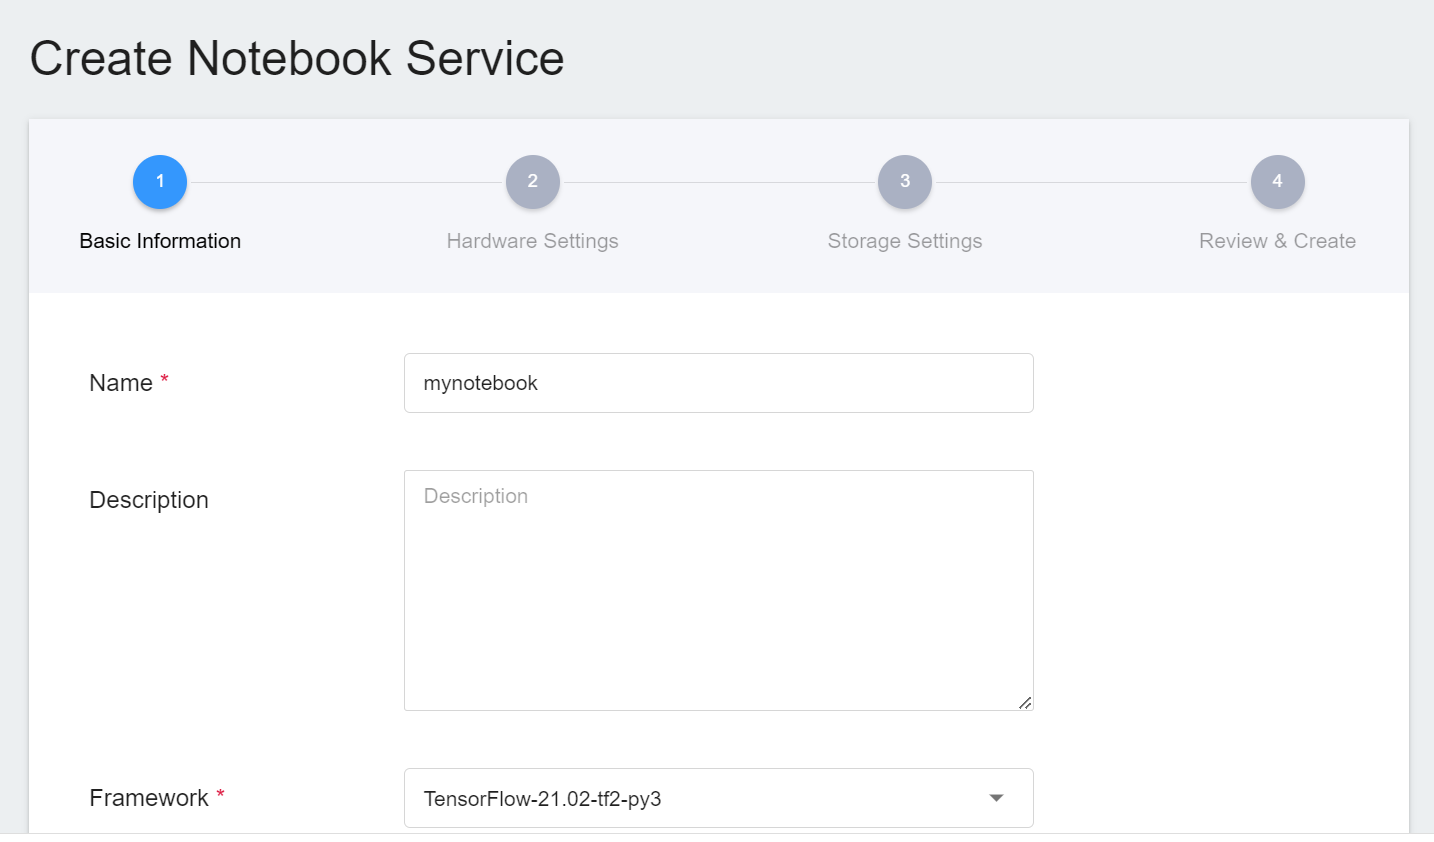
#### 1. Basic Information
* Enter the name, description and select a development framework, then click **NEXT: HARDWARE SETTINGS >**.
:::info
:bulb: **Tips: Development Frameworks**
* The Notebook Service provides a variety of AI development frameworks that can work without a GPU. Excerpt for **`Pytorch`** and **`MXNet`** contained in the development framework which can only be executed in an environment with a GPU, it is recommended that you choose appropriate hardware specifications for development according to your needs. For more information, refer to [**Notebook Image**](/s/public-image-en#Notebook-Images).
:::
:::warning
:warning: **Note:** If you want to use the Elyra package, it is recommended to run it through the CLI command. For details, please refer to [**Elyra Running Pipelines Documentation**](https://elyra.readthedocs.io/en/latest/user_guide/pipelines.html#running-pipelines).
:::
#### 2. Hardware Settings
* Select the suitable Hardware Settings configuration according to your computing requirements. You can also click **View Available Quota** to view the current resource quota and usage of the system and your project, and then click **NEXT: STORAGE SETTINGS >**.
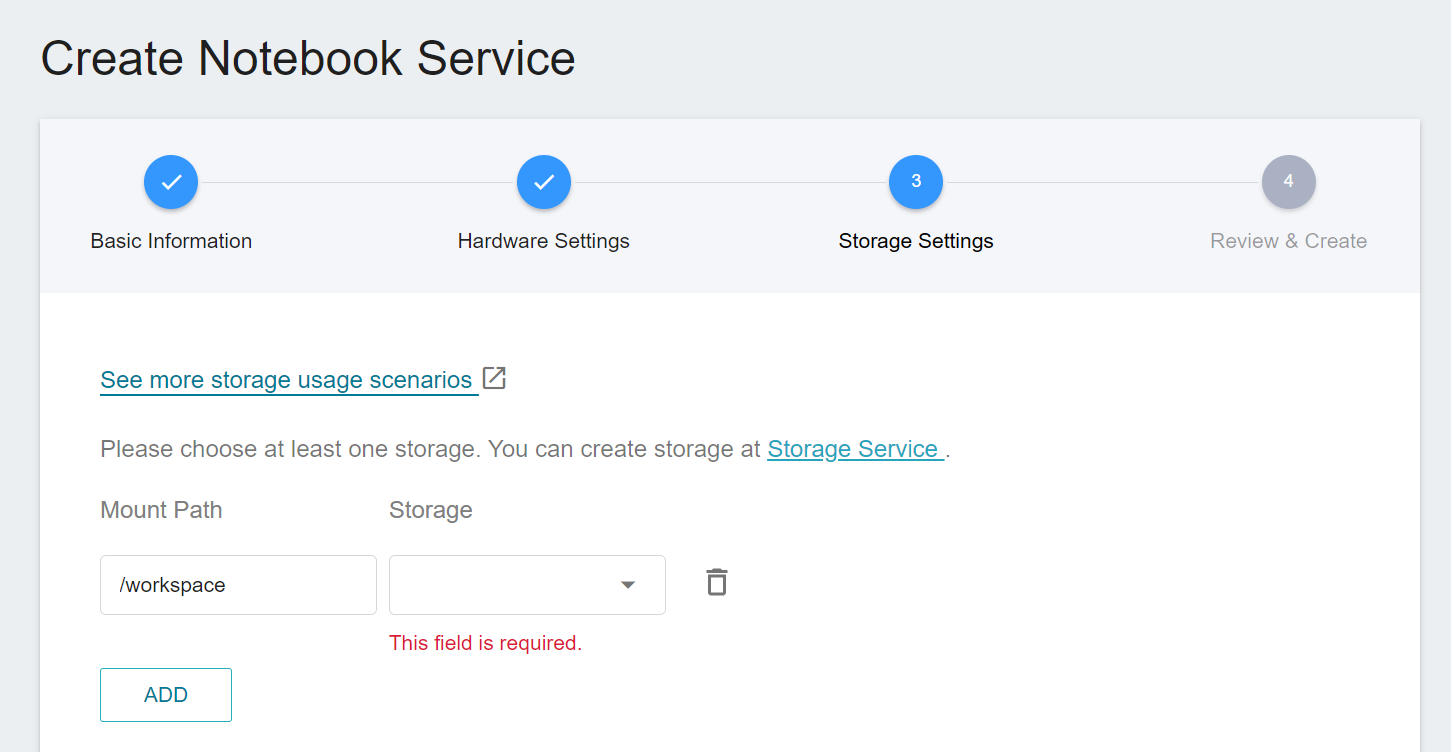
#### 3. Storage Settings
* This step will set the bucket to be mounted. You can upload the program or data to the bucket in OneAI's [**Storage Service**](/s/storage-en) in advance, and then mount the bucket when using various services of this system. The same bucket can be mounted to different services at the same time, making it easy to share data between services or collaborate with other project members. When the service is deactivated or deleted, the data of the bucket will not disappear.
* The system sets the default path of the notebook service as **`/workspace`**, so you must select at least one bucket to mount to **`/workspace`** as the working environment of the notebook service, and then click **NEXT: VARIABLE SETTINGS >**. Click **ADD** to add other buckets if needed.
#### 4. Review & Create
* Check the creation information of the Notebook Service, and then click **CREATE**.
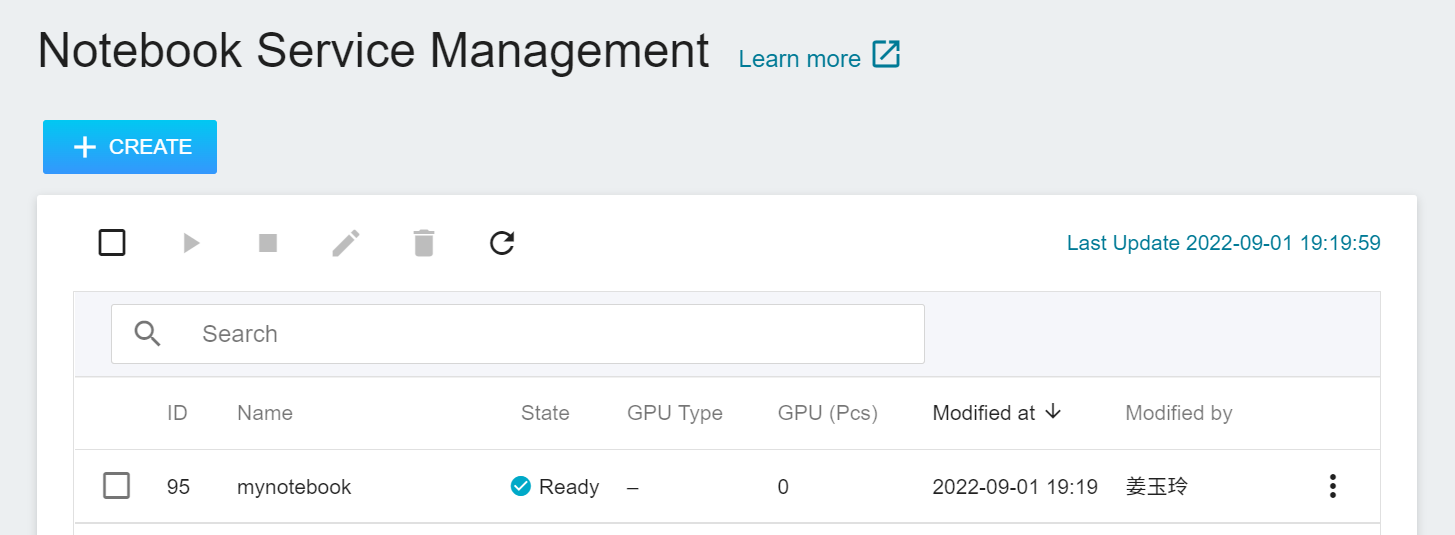
## Notebook Service Management
* After the Notebook Service is successfully created, it will appear on the list of the Notebook Service Management page. Click the notebook you want to view in the notebook list to view the details.
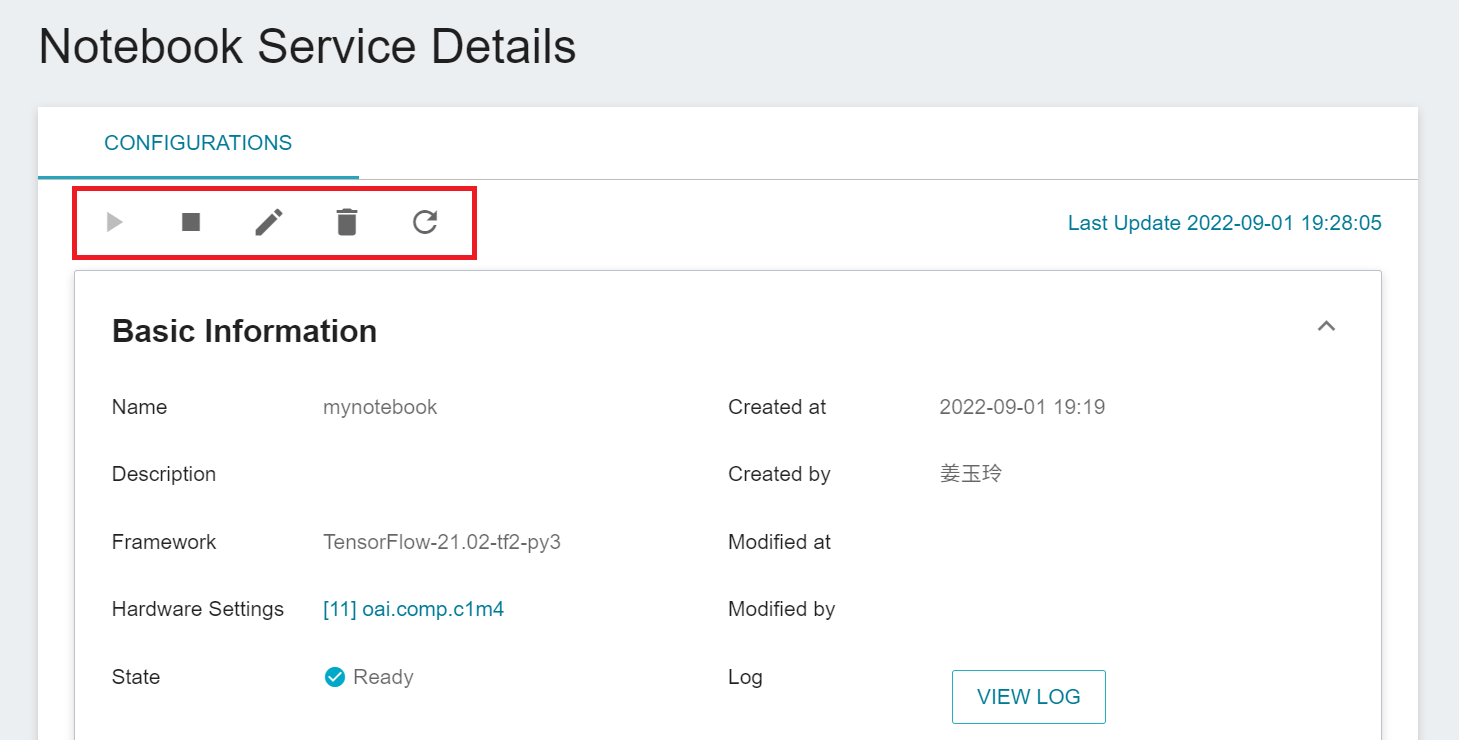
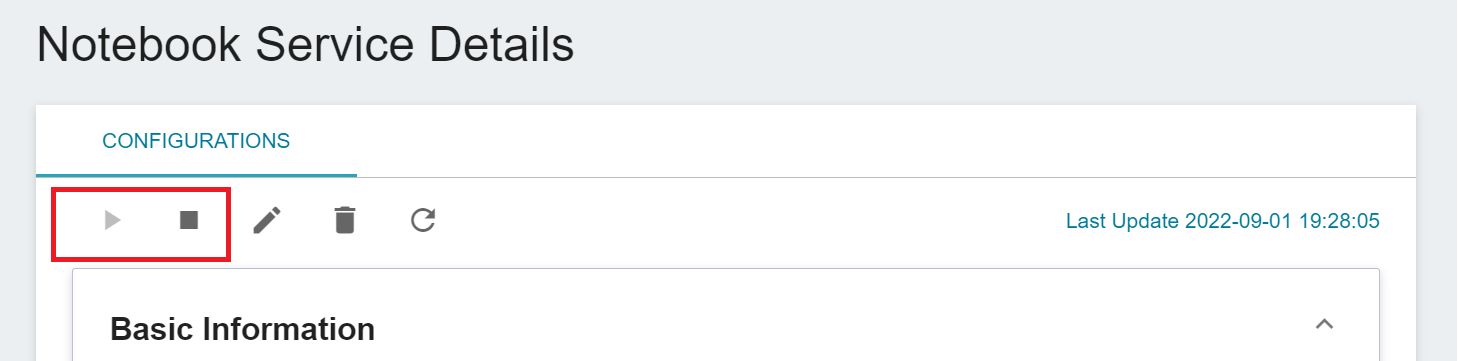
* Enter the Notebook Service Details page to view the settings information of the Notebook Service. You can perform operations such as **Start**, **Stop**, **Edit**, **Delete** and **Refresh** through icons on the command bar above. Below are the descriptions of the operations:
* **START**: Start the notebook service, if the notebook service has been started or in certain state, this button will be grayed out.
* **STOP**: If the notebook service will not be used for a while, you can stop it to release system resources. When you need to use it, run **START** again, but be aware that you may encounter insufficient resources or need to reinstall the package when you start again.
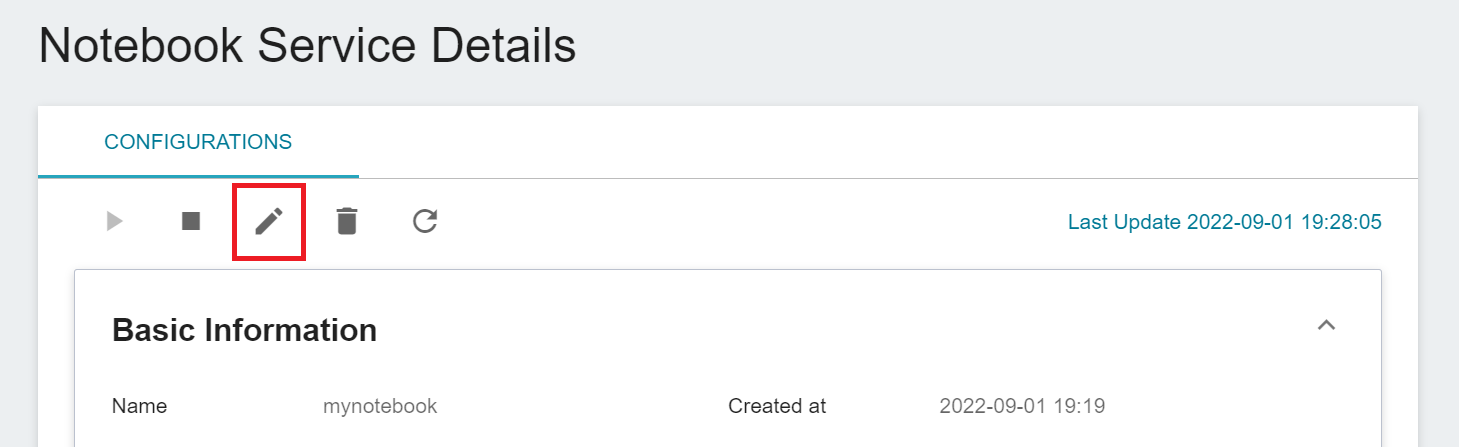
* **EDIT**: To modify the settings of the notebook service, the steps are similar to those of creating a notebook service. After editing, the service will restart automatically. For more information, see [**Modify Notebook Service Settings**](#Modify-Notebook-Service-Settings).
* **DELETE**: If the service is not used, click **Delete** to delete the notebook service permanently to save resources. Once deleted, the notebook service will disappear from the list.
* **REFRESH**: Instantly update the latest status and information displayed on the screen.
:::info
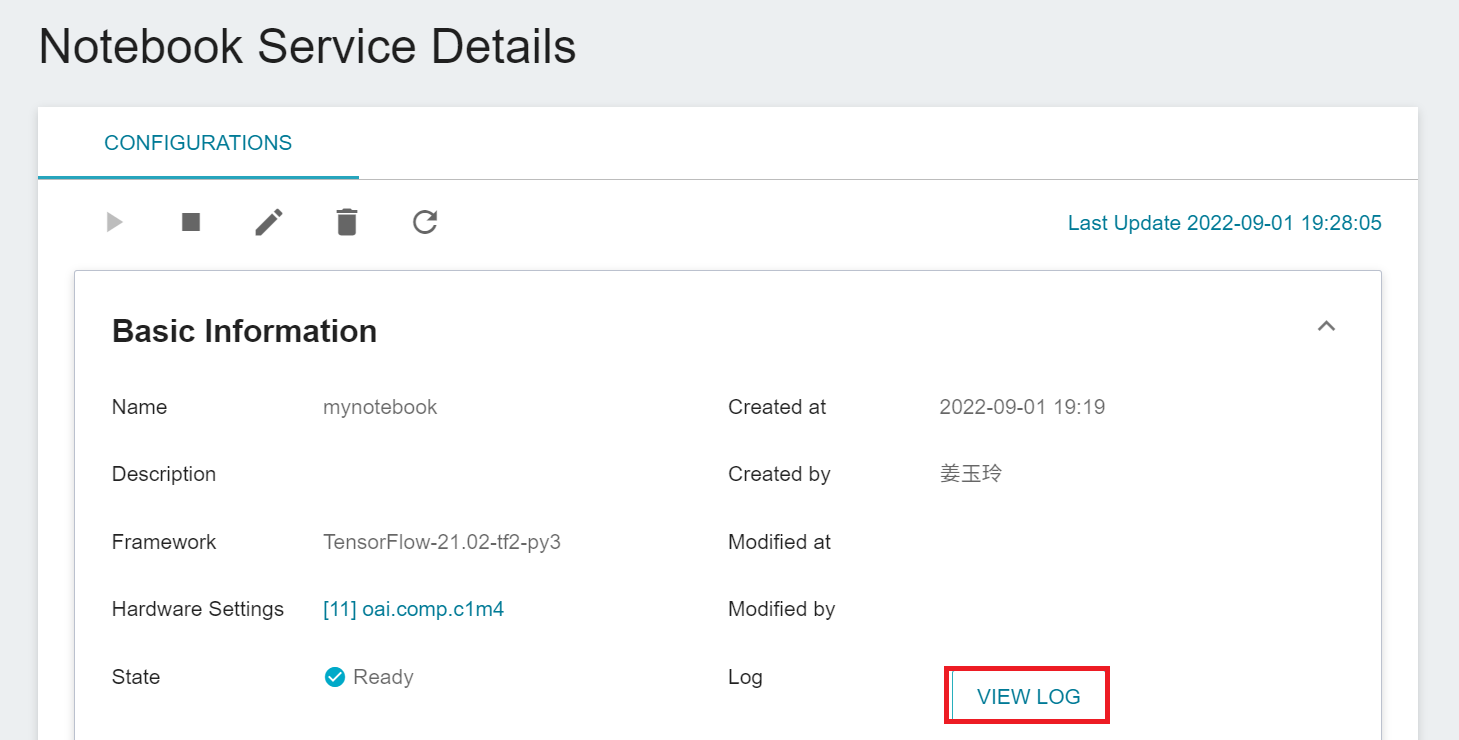
:bulb: **Tips:** Please refer to [**Service State Description**](/s/service-state-en#Notebook-Service). You can click **VIEW LOG** first to check the information in the logs for abnormalities; if the service creation failed, the log can be used to determine the possible cause; even if the service is successfully created and the state is **Ready**, there may still be problems with packages not being found or not being installed, and this information will be recorded in the logs.
:::
:::info
:bulb: **Tips:** Once the notebook service is restarted, the initial settings will be restored and any additional packages you installed after the notebook service was started may disappear. To avoid having to reinstall packages after a restart, it is recommended to write the necessary packages in [**requirements.txt**](#Install-Other-Python-Packages).
:::
### View Logs
* Click **VIEW LOG** to view the logs of the Notebook Service.
:::info
:bulb: **Tips:** It is recommended that you click **VIEW LOG** first to check the information in the logs for abnormalities; if the service creation failed, the log can be used to determine the possible cause; even if the service is successfully created and the state is **Ready**, there may still be problems with packages not being found or not being installed, and this information will be recorded in the logs.
:::
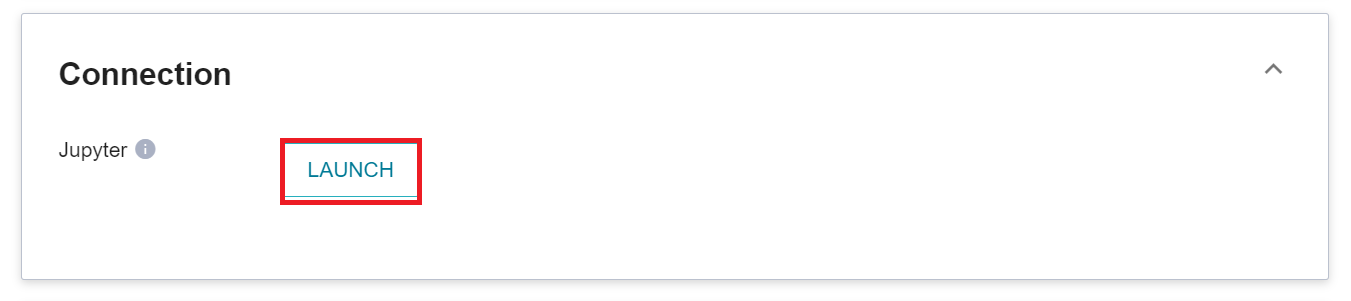
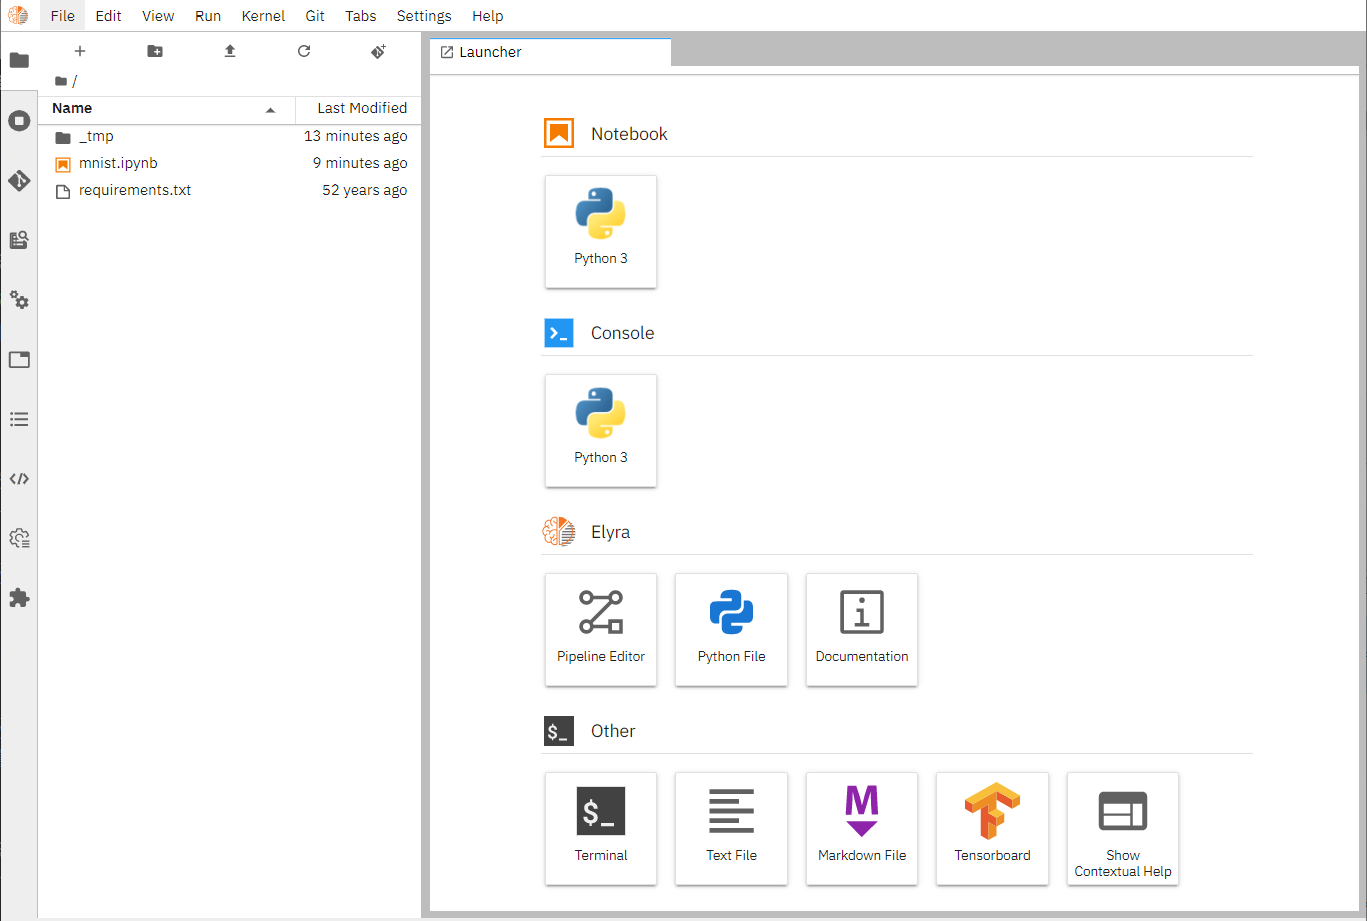
### Launch JupyterLab
* In the **Connection** section, click **LAUNCH** to launch JupyterLab in your browser.
:::info
:bulb: **Tips:**
* The JupyterLab notebook service integrates project permissions and account information. There's no need to enter login information again when opening the JupyterLab.
* For project collaboration and security considerations, JupyterLab is only available to project members.
* The software options displayed on the **Launcher** page will vary depending on the development framework selected when creating the notebook service.
* Please refer to the [**Official JupyterLab documentation**](https://jupyterlab.readthedocs.io/en/stable/index.html) for instructions on how to use **JupyterLab**.
:::
## Modify Notebook Service Settings
You can change the settings of the Notebook Service as needed at any time. For example, you can select a more powerful hardware configuration to improve the computing performance, or change the development framework, or mount other data storage source.
* Go to the **Notebook Service Details** page, click the **Edit** icon on the command bar above.
* You can then modify the description, development framework, hardware settings, and storage settings of the Notebook Service, and click **Save Changes** when finished.
:::warning
:warning: **Note:** After modifying the Notebook Service Settings, the service will restart and the notebook service will return to the initial settings. So please note:
1. Before modifying the notebook service settings, please save the file you are editing to avoid losing the edited content.
2. After you enable the notebook service, the additionally installed packages will be lost. It is recommended to write the necessary packages in [**requirements.txt**](#Install-Other-Python-Packages).
3. There may be insufficient resources when the service is restarted.
:::
## Install Other Python Packages
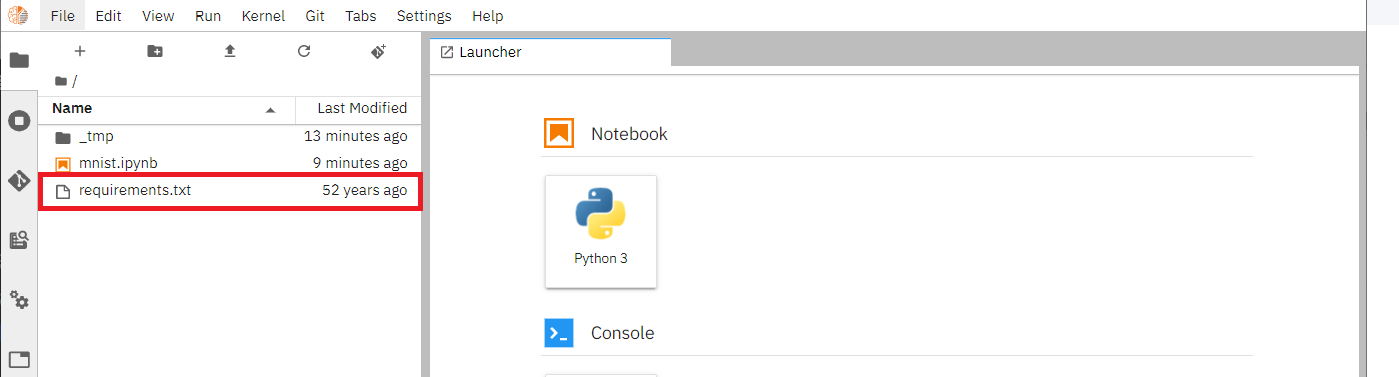
If you need to install other Python packages required for development, you can add the required Python packages to **requirements.txt** in the Notebook Service workspace. For the format of **requirements.txt**, please refer to the [**requirements.txt example**](https://pip.pypa.io/en/stable/reference/requirements-file-format/#example) officially provided by Python.
```=
###### Requirements without Version Specifiers ######
pytest
pytest-cov
beautifulsoup4
###### Requirements with Version Specifiers ######
# See https://www.python.org/dev/peps/pep-0440/#version-specifiers
docopt == 0.6.1 # Version Matching. Must be version 0.6.1
keyring >= 4.1.1 # Minimum version 4.1.1
coverage != 3.5 # Version Exclusion. Anything except version 3.5
Mopidy-Dirble ~= 1.1 # Compatible release. Same as >= 1.1, == 1.*
###### Refer to other requirements files ######
-r other-requirements.txt
###### A particular file ######
./downloads/numpy-1.9.2-cp34-none-win32.whl
http://wxpython.org/Phoenix/snapshot-builds/wxPython_Phoenix-3.0.3.dev1820+49a8884-cp34-none-win_amd64.whl
###### Additional Requirements without Version Specifiers ######
# Same as 1st section, just here to show that you can put things in any order.
rejected
green
```
* After modifying and saving **requirements.txt**, you need to restart the Notebook Service to install the new packages. Please close the notebook, go back to the Notebook Service Details page, click the **Stop** icon in the command bar above, and then click **Start**.
:::info
:bulb: **Tips:** Notebook service will automatically install the packages in **requirements.txt** when it starts, so after the **requirements.txt** is modified, you need to restart the **Notebook Service**.
:::
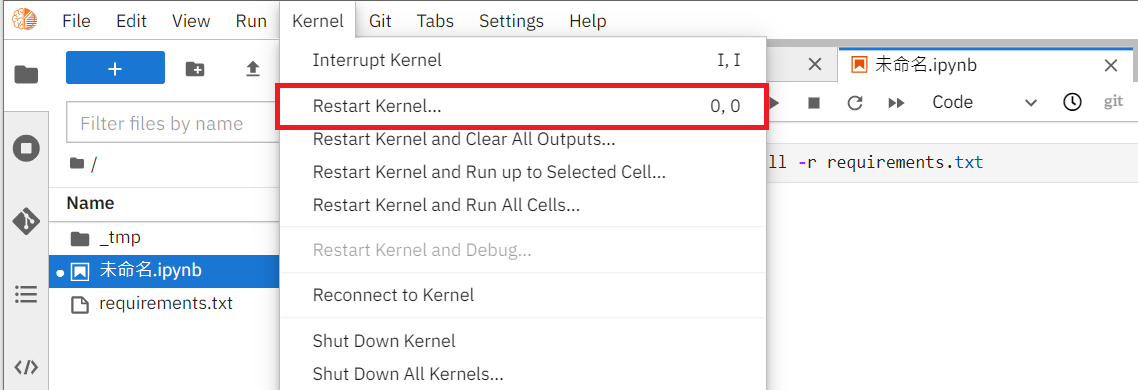
* After **requirements.txt** is modified, the notebook service will need to be restarted to install packages automatically.If you want to use the new packages immediately, you can follow the steps below to install, and then Restart Kernel to ensure that the packages are successfully imported.
- In Python Notebook, execute **`%pip install -r requirements.txt`**
- In JupyterLab's Terminal, execute **`pip install -r requirements.txt`**
* After the previous step, click the **RESTART KERNEL...** under the **KERNEL** menu at the top of **Jupyter** to restart the **Jupyter Notebook** kernel to ensure that the packages are successfully imported.
:::info
:bulb: **Tips:** When the content of **requirements.txt** is incorrect or the package installation fails, the notebook service can still be started normally (the status is displayed as **Ready**), but the program may not run properly. It is recommended to view the log information of the notebook service through **VIEW LOG** on the notebook service details page to confirm whether the packages are installed successfully.

:::
## Scenario - Mount Storage Service Space
### Scenario 1: Automatically Add Python Package Required for the Development Environment
The development framework provided by the system meets most developers' needs for Python packages. However, if you need to add additional Python packages, you can put the **requirements.txt** in a bucket and mount it to the Notebook Service workspace, and the additional Python packages will be installed when the Notebook Service starts.
1. First prepare a [**requirements.txt**](https://pip.pypa.io/en/stable/reference/requirements-file-format/#example 'Please refer to the official example of pip requirements.txt') locally, and list the additional Python packages to be installed; or you can directly generate requirements.txt from your development environment by using the [**pip freeze**](https://pip.pypa.io/en/stable/cli/pip_freeze/#examples 'Please refer to the official description of pip freeze') command`pip freeze > requirements.txt.`
2. Go to the **Storage Service Management** page to [**Create Bucket**](/s/storage-en#Create-a-Bucket 'Please refer to the Create Bucket Documentation'), assuming that the bucket name is `mybucket`.
3. Put **requirements.txt** [**into bucket**](/s/storage-en#Upload-Files 'File upload method - tutorial'), which means upload to `mybucket`.
4. Go to the **Notebook Service Management** page and click the **+CREATE** button to start setting up the Notebook Service.
5. In the third step of creating: Storage Settings, mount at least one bucket as the default Notebook Service workspace, and the mount path is fixedly named as `/workspace`. Then select the just created bucket `mybucket` in the drop-down list next to it. With this setting, after the Notebook Service is successfully started, all the file-related or directory-related actions performed by the user in the Notebook Service workspace (`/workspace`) are equivalent to actions directly made to the bucket (the example here is `mybucket`).
6. When the Notebook Service is created and started, the **requirements.txt** exists in the Notebook Service workspace (`/workspace`, which is the bucket `mybucket`), and therefore Python packages will be installed according to the description in **requirements.txt**, and you can directly import them for use.
### Scenario 2: Sharing Data Among Project Team Members Through Storage Service
The project team can manage data through different Storage Service buckets, and by mounting buckets to **Notebook Service**, the scenario of data sharing can be implemented.
Suppose there are two model development teams A and B in the same project, and they use the same data to train different machine learning models using different development frameworks. The data maintenance team is responsible for maintaining the data.
#### The Data Maintenance Team Prepares the Data and Upload It to the Storage Service
1. Go to the **Storage Service Management** page to [**Create Bucket**](/s/storage-en#Create-a-bucket) assuming the bucket name is `cat-images-dataset`.
2. In the `cat-images-dataset` bucket, [**create two folders**](/s/storage-en#Create-a-Folder) **train** and **valid**.
3. Go to the **train** and **valid** folders, and start to [**upload**](/s/storage-en#Upload-Files 'Please refer to the Storage documentation') the data required for the training or validation jobs.
#### Model Development Teams Load the Shared Data for Training in Their Notebook Services
A and B development teams can additionally mount the `cat-images-dataset` bucket while creating their Notebook Services.
1. Go to the **Storage Service Management** page to [**Create Bucket**](/s/storage-en#Create-a-bucket), this will be used as the workspace of their Notebook Services, and is also used to put in the model development team's development code. Suppose the bucket created by team A is named as `a-team-code` and the bucket created by team B is named as `b-team-code`.
2. Teams A and B each enter the **Notebook Service Management** page and click the **CREATE** button to start setting up the Notebook Service.
3. In the third step of creating: Storage Settings, Teams A and B select `a-team-code` or `b-team-code` for the default mount path `/workspace`, which becomes the Notebook Service workspace and is used to store the development code.
4. In the same step: Storage Settings, click **ADD** to additionally mount the data bucket `cat-images-dataset` maintained by the data maintenance team, in the mount path field, enter `/workspace/source_dataset` and select `cat-images-dataset` from the bucket drop-down list.
5. After the Notebook Service is created and started, enter the JupyterLab development environment, and the development team can load the shared data from the directory of the Notebook Service for model training.